> ## Documentation Index
> Fetch the complete documentation index at: https://terminal-docs.xendit.co/llms.txt
> Use this file to discover all available pages before exploring further.
# Gateway
> Configure Terminal Gateway app settings, connection types, and device management for Xendit Payment Terminal integration
# Terminal Gateway App Configuration
The Terminal Gateway app helps developers integrate their application with Xendit supported terminal devices. Configure connection types, manage devices, and monitor terminal status through an intuitive interface.
This app works alongside the Terminal API to provide complete in-person
payment functionality. You'll use the Terminal API to create payment sessions
and this app to manage terminal device connections.
## Version information
What's new:
* **Improved Resource Management**: Proper cleanup of observer jobs to prevent memory leaks and ensure optimal performance
* **Activity Tracking Fix**: Resolved bug where paused activities were not properly removed from the internal tracking list
* **Enhanced Error Handling**: Show Unsupported error for any invalid action to improve error visibility and debugging
* **Use System Overlay** \[Android]: New setting to show pending transactions as overlay instead of notification for better visibility
* **Print Receipt Setting**: Added Cashup provider setting to enable or disable receipt printing after transactions
What's new:
* Added Cashup provider support for Indonesian terminals
* Fixed an issue where the C2C server restarted when launching the app
Bug fixes and improvements:
* Fixed text field not editable in configuration and input screens
* \[Android] Fixed export log issue so logs export correctly
What's new:
* Added Cashup provider support for Indonesian terminals
* Made the client-to-client port static at 8189 for consistent POS connectivity
What's new:
* Fixed the NTT payment method value to ensure correct provider mapping
* Updated the BRI payment flow to validate transaction data before performing terminal actions
* Added timeout configuration for card and QR transactions to control operation windows
* Added support to handle retry requests via `/v1/terminal/sessions/{id}/retry` endpoint
What's new:
* Added support for multiple concurrent device connections so you can orchestrate simultaneous sessions across different terminals
* \[BRI] Fixed status value handling in void and cancel API responses for improved transaction status accuracy
* Enhanced the Android app lifecycle with a splash screen, notification handling, and provider app launcher support for a smoother user experience
* Fixed client-to-client API calls and the associated request queue to prevent stalled commands
New features and improvements:
* Added transaction timeout configuration with UI support and validation
* Introduced command ID handling for settlement operations
* Enhanced retry logic with configurable attempt counts
* Improved error handling and logging throughout the gateway service
* In-app version update
* Renamed to Gateway with updated icons
Bug fixes and improvements:
* Fix data mapping for terminal responses
* Hide device's restart button when connection mode is C2C
* Fix "restart service" button behavior on C2C mode
* \[BRI] Enhanced status verification after transaction timeout for improved reliability
Bug fixes and improvements:
* Fix UI issue
* Fix date time parser issue
* Fix test flag toggle not showing correct state on app open
Update UI/UX for improved user experience and interface design.
Remove timezone pinning for the BRI terminal. Fix an issue where the app
executes the same command after a transaction completes.
Terminal H2H is the companion SDK to In-Person Payments Terminal API.
The app follows semantic versioning. Breaking changes will bump the major
version number.
## Download the app
Choose your operating system to download the Terminal Gateway app installer:
Download the macOS installer (v1.9.0).
```
SHA256:98cae57b63bd56bfc7ea94f93efd4abcf66103a953f2001e48dc9c5da74fabe3
```
Download for macOS
Download the Windows installer (v1.9.0).
```
SHA256:bbd1af76d4f5cdfd146aadb72b0824f1fc0a8f459c0e4a6c2d500508de4bc509
```
Download for Windows
Download the Android APK (v1.9.0).
```
SHA256:4bf973549d0a305eb517a366f5b7c8a9340c54c40bfed09dc077a54cb77b7f74
```
Download for Android
## Getting Started
Before starting, you'll need a terminal CLIENT\_KEY from the Xendit In-Person Payments team and add a device.
Keep your client key secure and never share it with unauthorized parties. Use
test keys for development and production keys only for live environments.
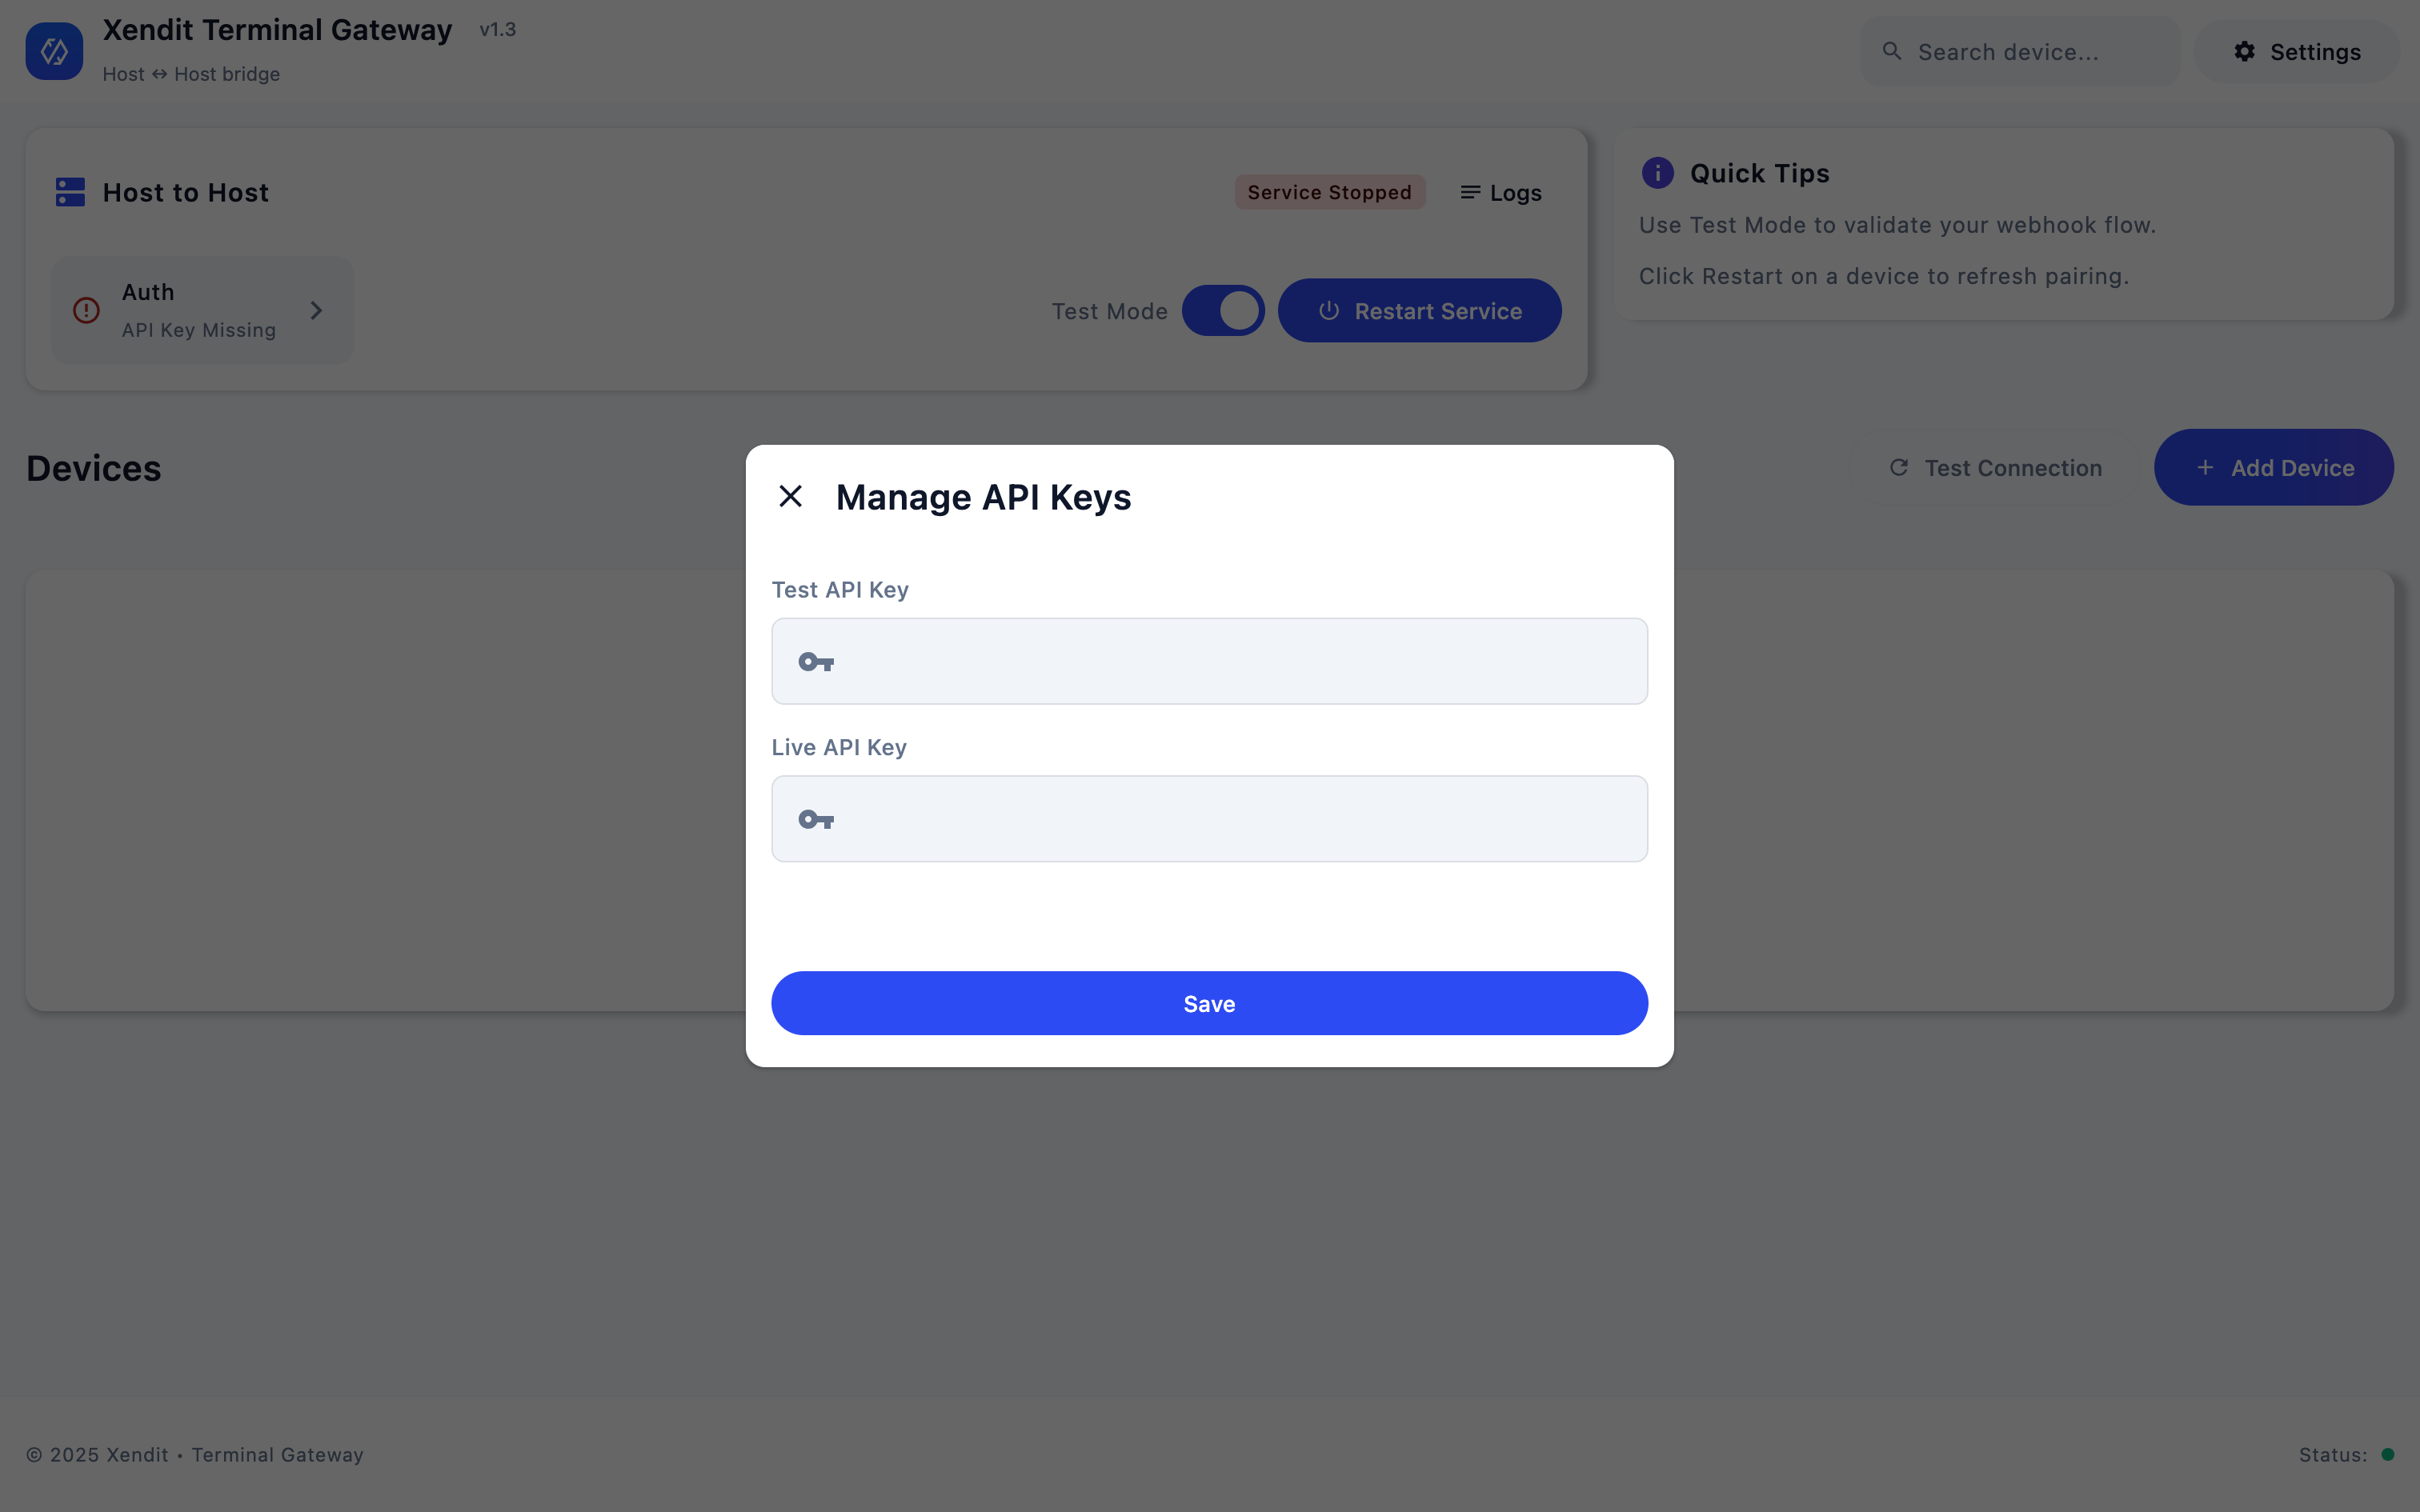
When the app opens for the first time, a modal will appear. Enter your testing CLIENT\_KEY in the "Test API Key" field and click "Save".
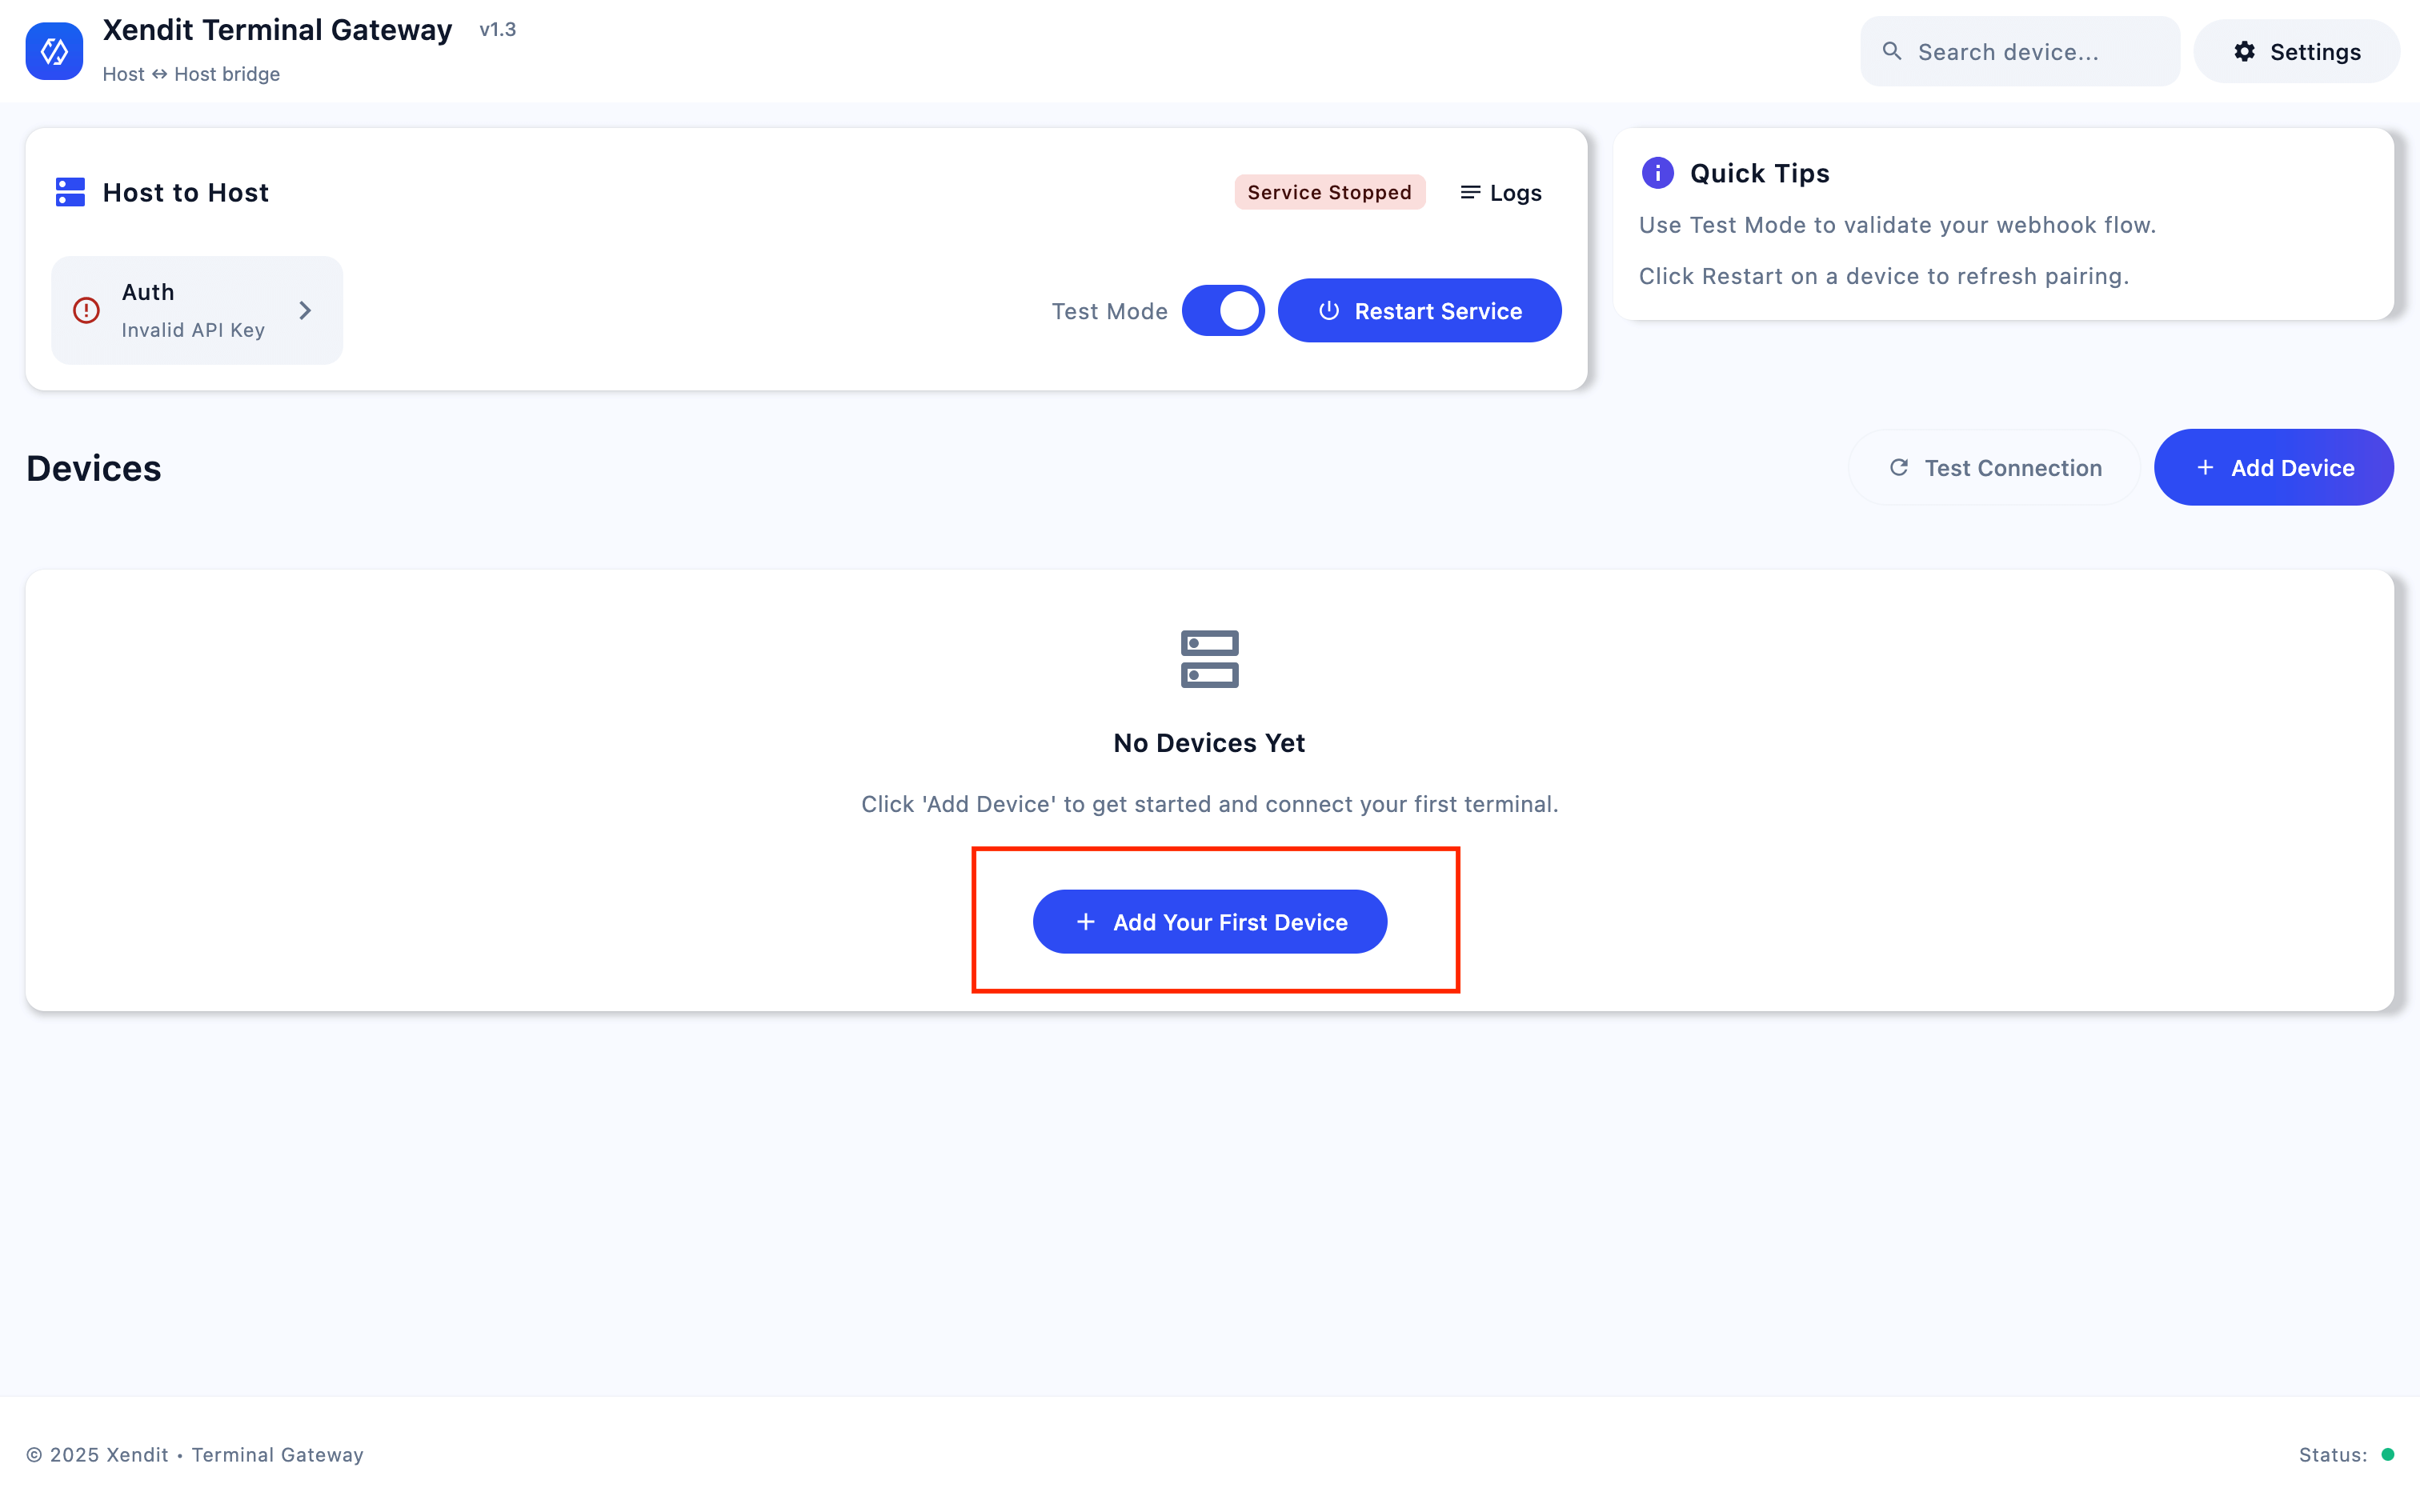
 Click "+ Add Your First Device" to link a terminal device.
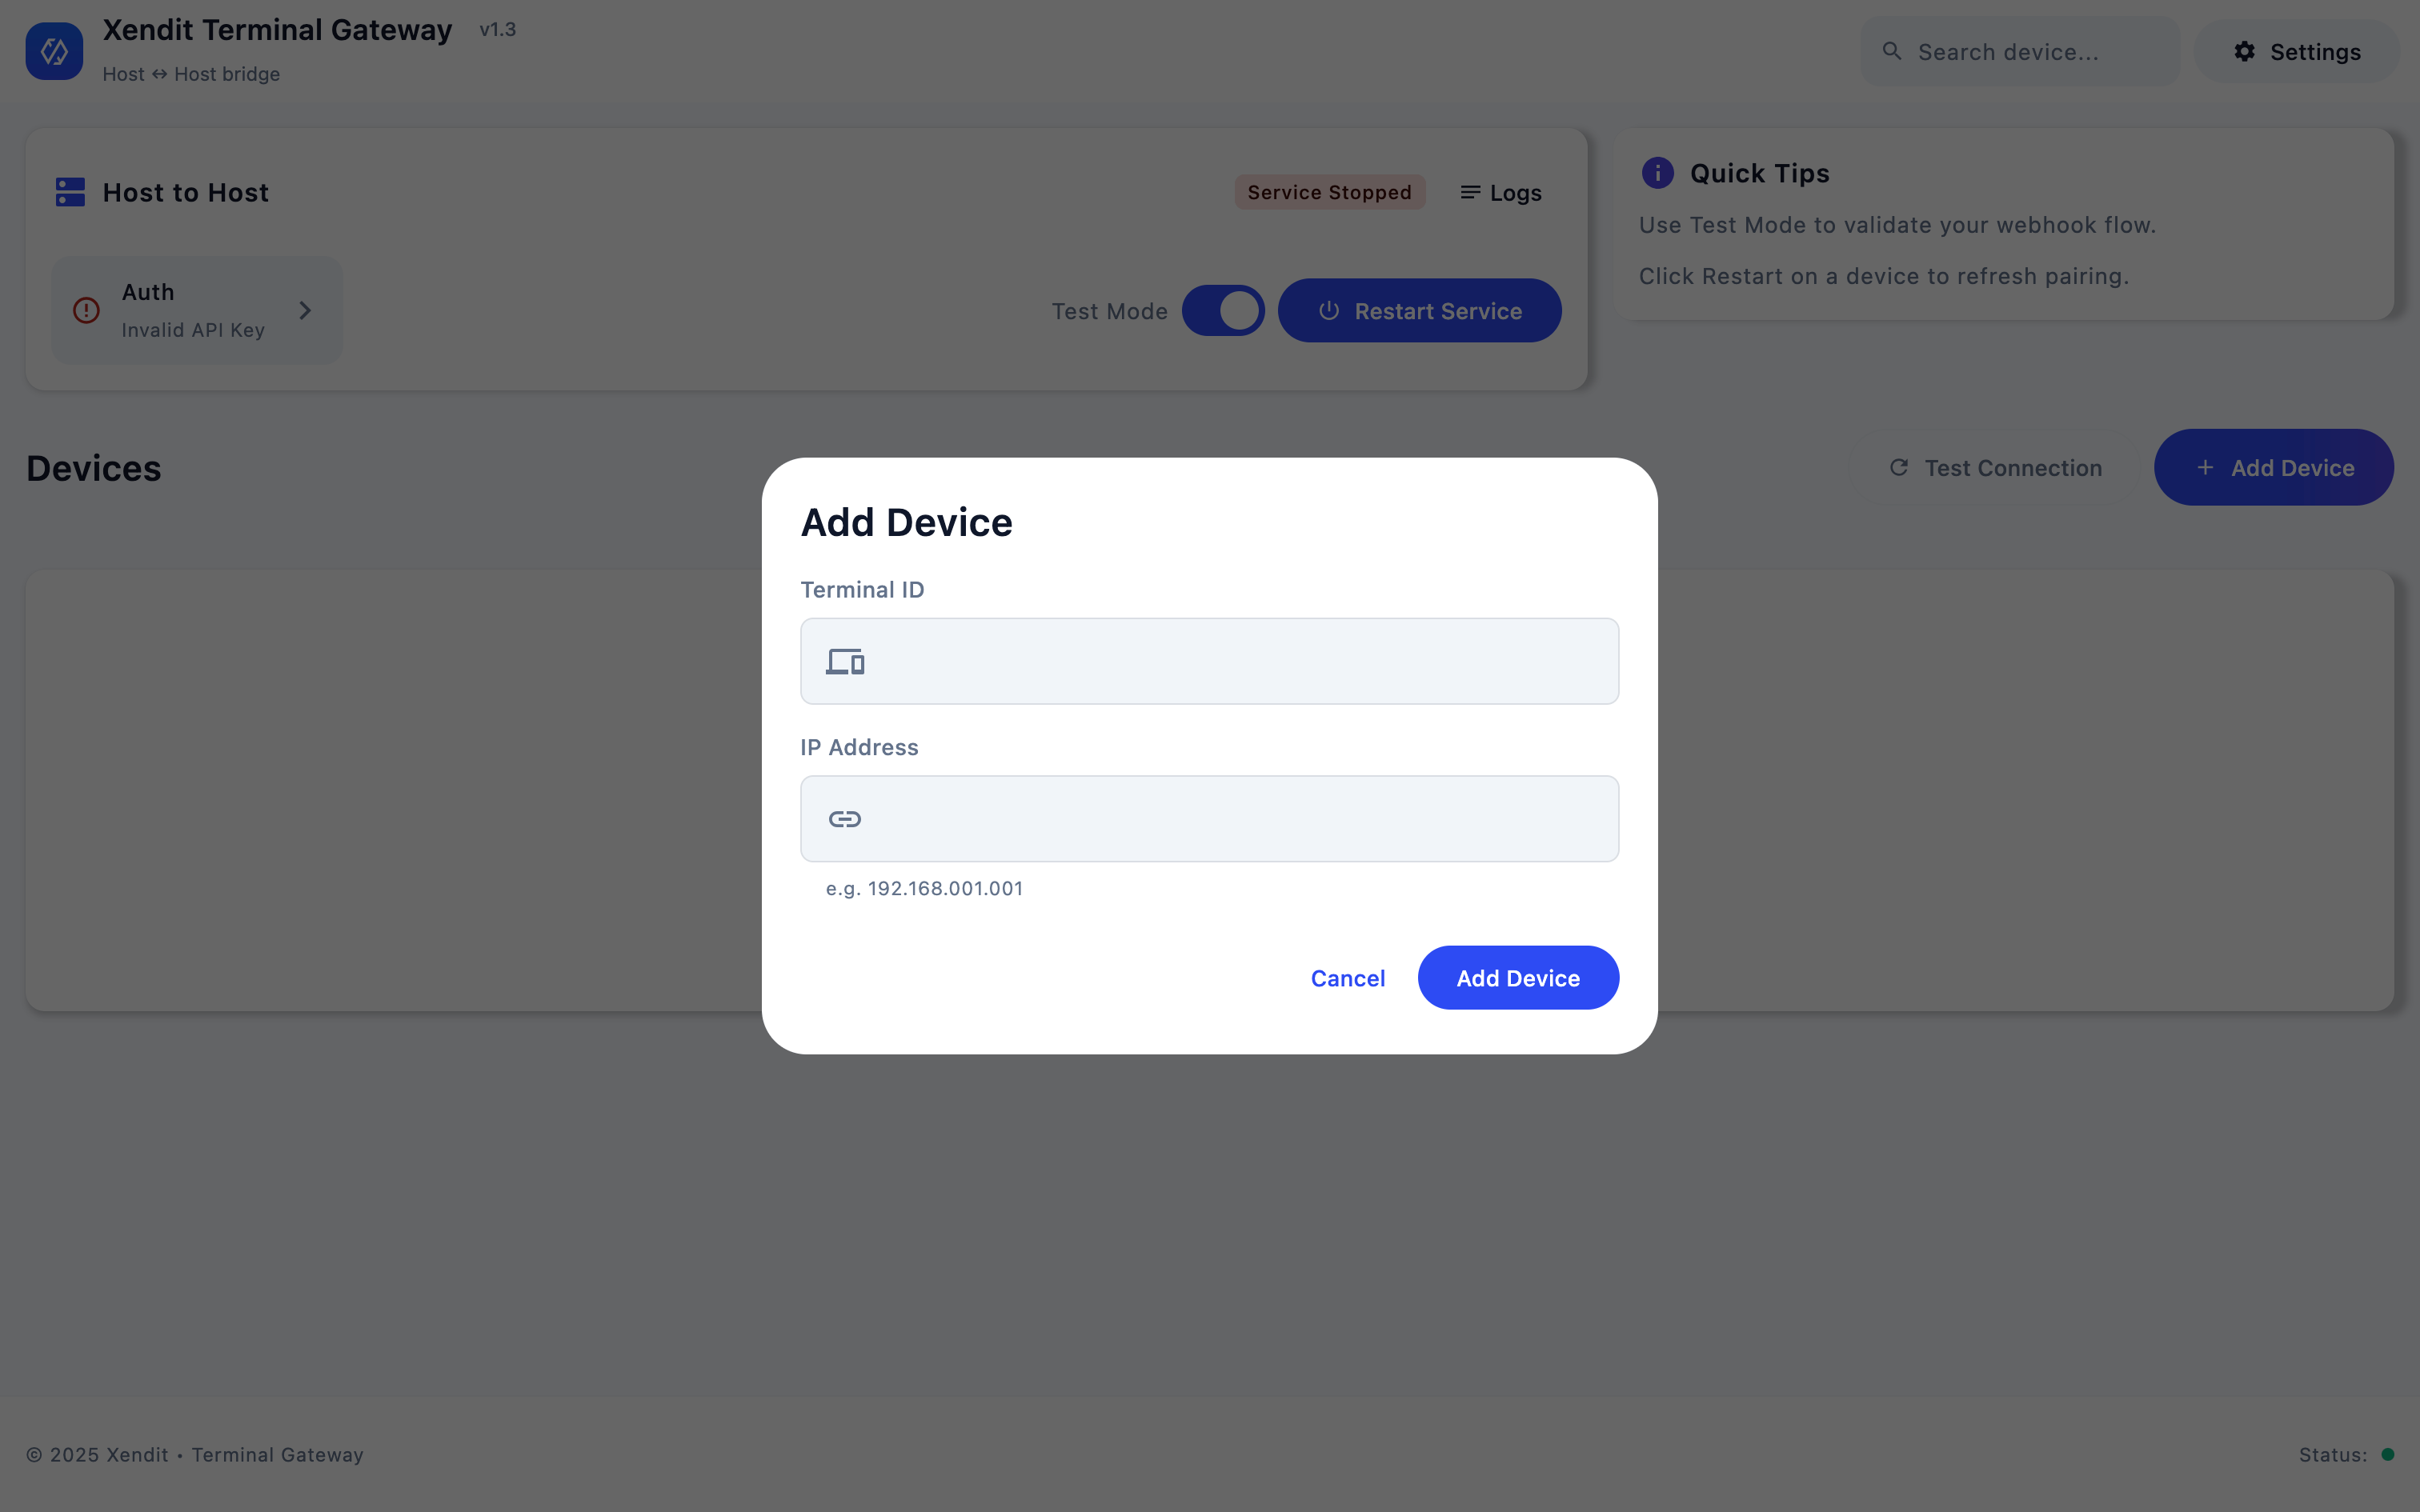
 Fill in Terminal ID and IP Address, and click "Add Device" button.
 The app will test the connection with the added device and run the service. The app is now accepting commands.
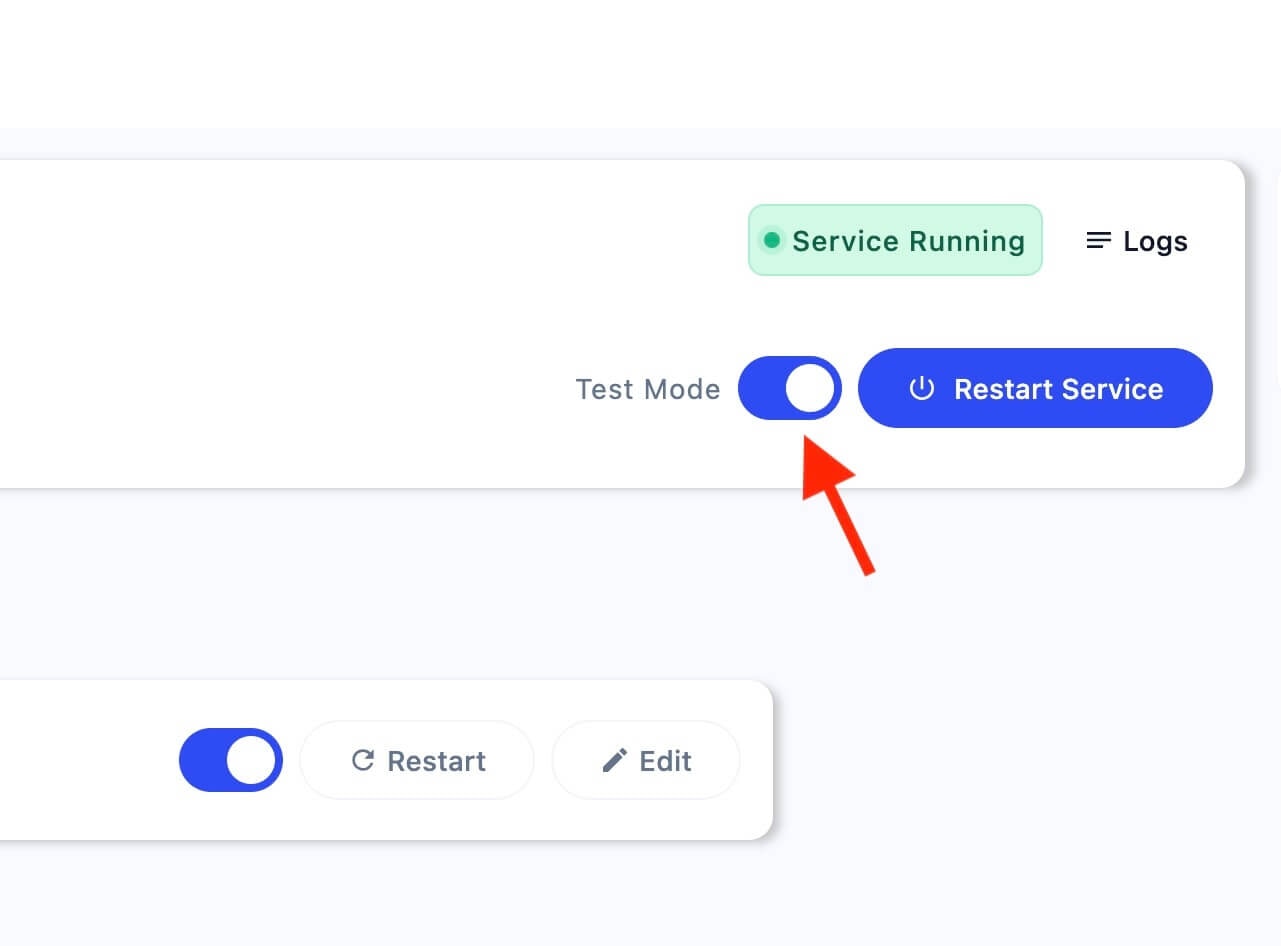 Your Terminal Gateway app is now ready to accept commands from your POS system.
## Connection Types
The Terminal Gateway app supports two connection modes for different integration scenarios:
**Recommended for most use cases** - The app runs a host-to-host service that manages your terminal fleet centrally.
The app automatically runs in host-to-host mode when first launched.
Add and manage multiple terminal devices through the app interface.
All terminal communications are handled through the app's centralized
service.
Host-to-host mode is ideal for managing multiple terminals and provides easier fleet management.
For detailed information about client-to-client integration, including when to use it and setup requirements, see the RESTful API.
Click the 'Settings' button in the app.
Your Terminal Gateway app is now ready to accept commands from your POS system.
## Connection Types
The Terminal Gateway app supports two connection modes for different integration scenarios:
**Recommended for most use cases** - The app runs a host-to-host service that manages your terminal fleet centrally.
The app automatically runs in host-to-host mode when first launched.
Add and manage multiple terminal devices through the app interface.
All terminal communications are handled through the app's centralized
service.
Host-to-host mode is ideal for managing multiple terminals and provides easier fleet management.
For detailed information about client-to-client integration, including when to use it and setup requirements, see the RESTful API.
Click the 'Settings' button in the app.
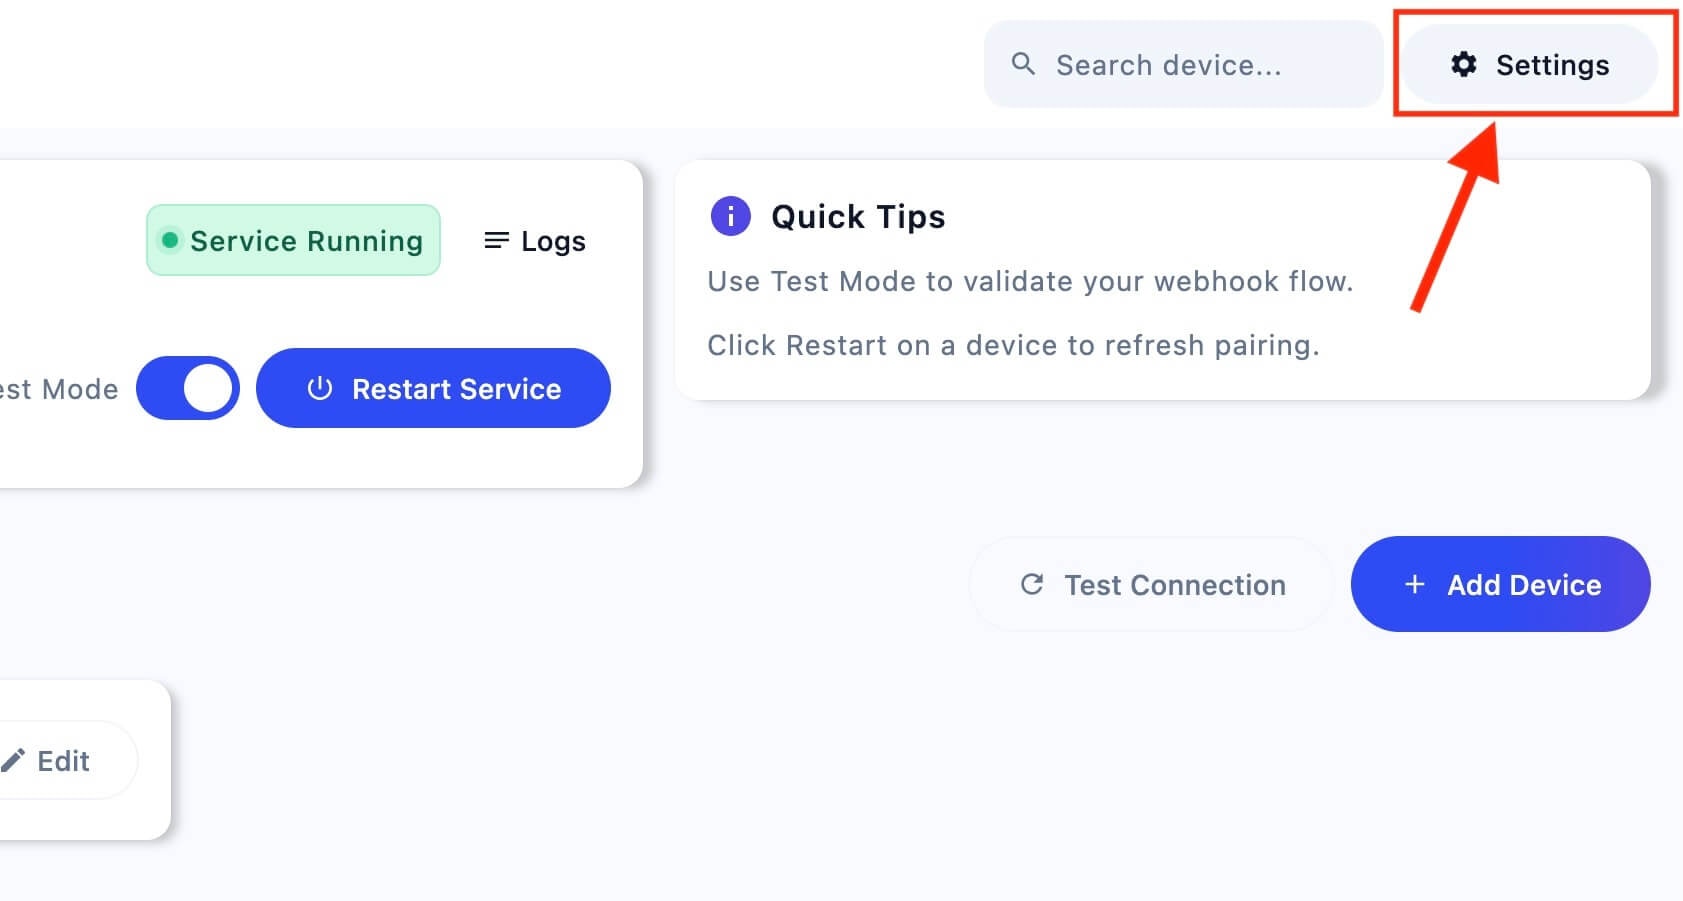 Select the 'Connection Type' menu item.
Enable the 'Client to Client' toggle on the top-right side, and then **go
back** to the home screen.
The **client-to-client** server is running, and now the POS can send commands directly to the Terminal device.
Your app is now running in client-to-client mode for direct terminal communication.
Client-to-client connection provides more localized integration but requires direct network access to your terminal devices.
## Environment Configuration
Configure the app for different environments based on your development and production needs:
**For development and testing** - Use test client keys and sandbox environment.
When the app opens for the first time, enter your testing CLIENT\_KEY in the
"Test API Key" field.
All transactions are processed in test mode and won't affect real payment
data.
Test mode is enabled by default and uses the test environment for all transactions.
**For live environments** - Use production client keys and live payment processing.
Untoggle the "Test mode" toggle in the app settings.
A modal will appear to input your **production** In-Person Payment
CLIENT\_KEY.
Confirm all settings are correct before processing live transactions.
Make sure you have the correct production CLIENT\_KEY before switching to production mode. Test thoroughly in test mode first.
## Transaction Timeout
Use transaction timeouts to auto-cancel in the app and reissue transactions when a terminal does not respond in time. You can set independent limits for card and QR flows.
Click the settings icon in the top-right corner of the app home screen.
In Settings, choose **Transaction Timeout** under the Network section.
Select the 'Connection Type' menu item.
Enable the 'Client to Client' toggle on the top-right side, and then **go
back** to the home screen.
The **client-to-client** server is running, and now the POS can send commands directly to the Terminal device.
Your app is now running in client-to-client mode for direct terminal communication.
Client-to-client connection provides more localized integration but requires direct network access to your terminal devices.
## Environment Configuration
Configure the app for different environments based on your development and production needs:
**For development and testing** - Use test client keys and sandbox environment.
When the app opens for the first time, enter your testing CLIENT\_KEY in the
"Test API Key" field.
All transactions are processed in test mode and won't affect real payment
data.
Test mode is enabled by default and uses the test environment for all transactions.
**For live environments** - Use production client keys and live payment processing.
Untoggle the "Test mode" toggle in the app settings.
A modal will appear to input your **production** In-Person Payment
CLIENT\_KEY.
Confirm all settings are correct before processing live transactions.
Make sure you have the correct production CLIENT\_KEY before switching to production mode. Test thoroughly in test mode first.
## Transaction Timeout
Use transaction timeouts to auto-cancel in the app and reissue transactions when a terminal does not respond in time. You can set independent limits for card and QR flows.
Click the settings icon in the top-right corner of the app home screen.
In Settings, choose **Transaction Timeout** under the Network section.
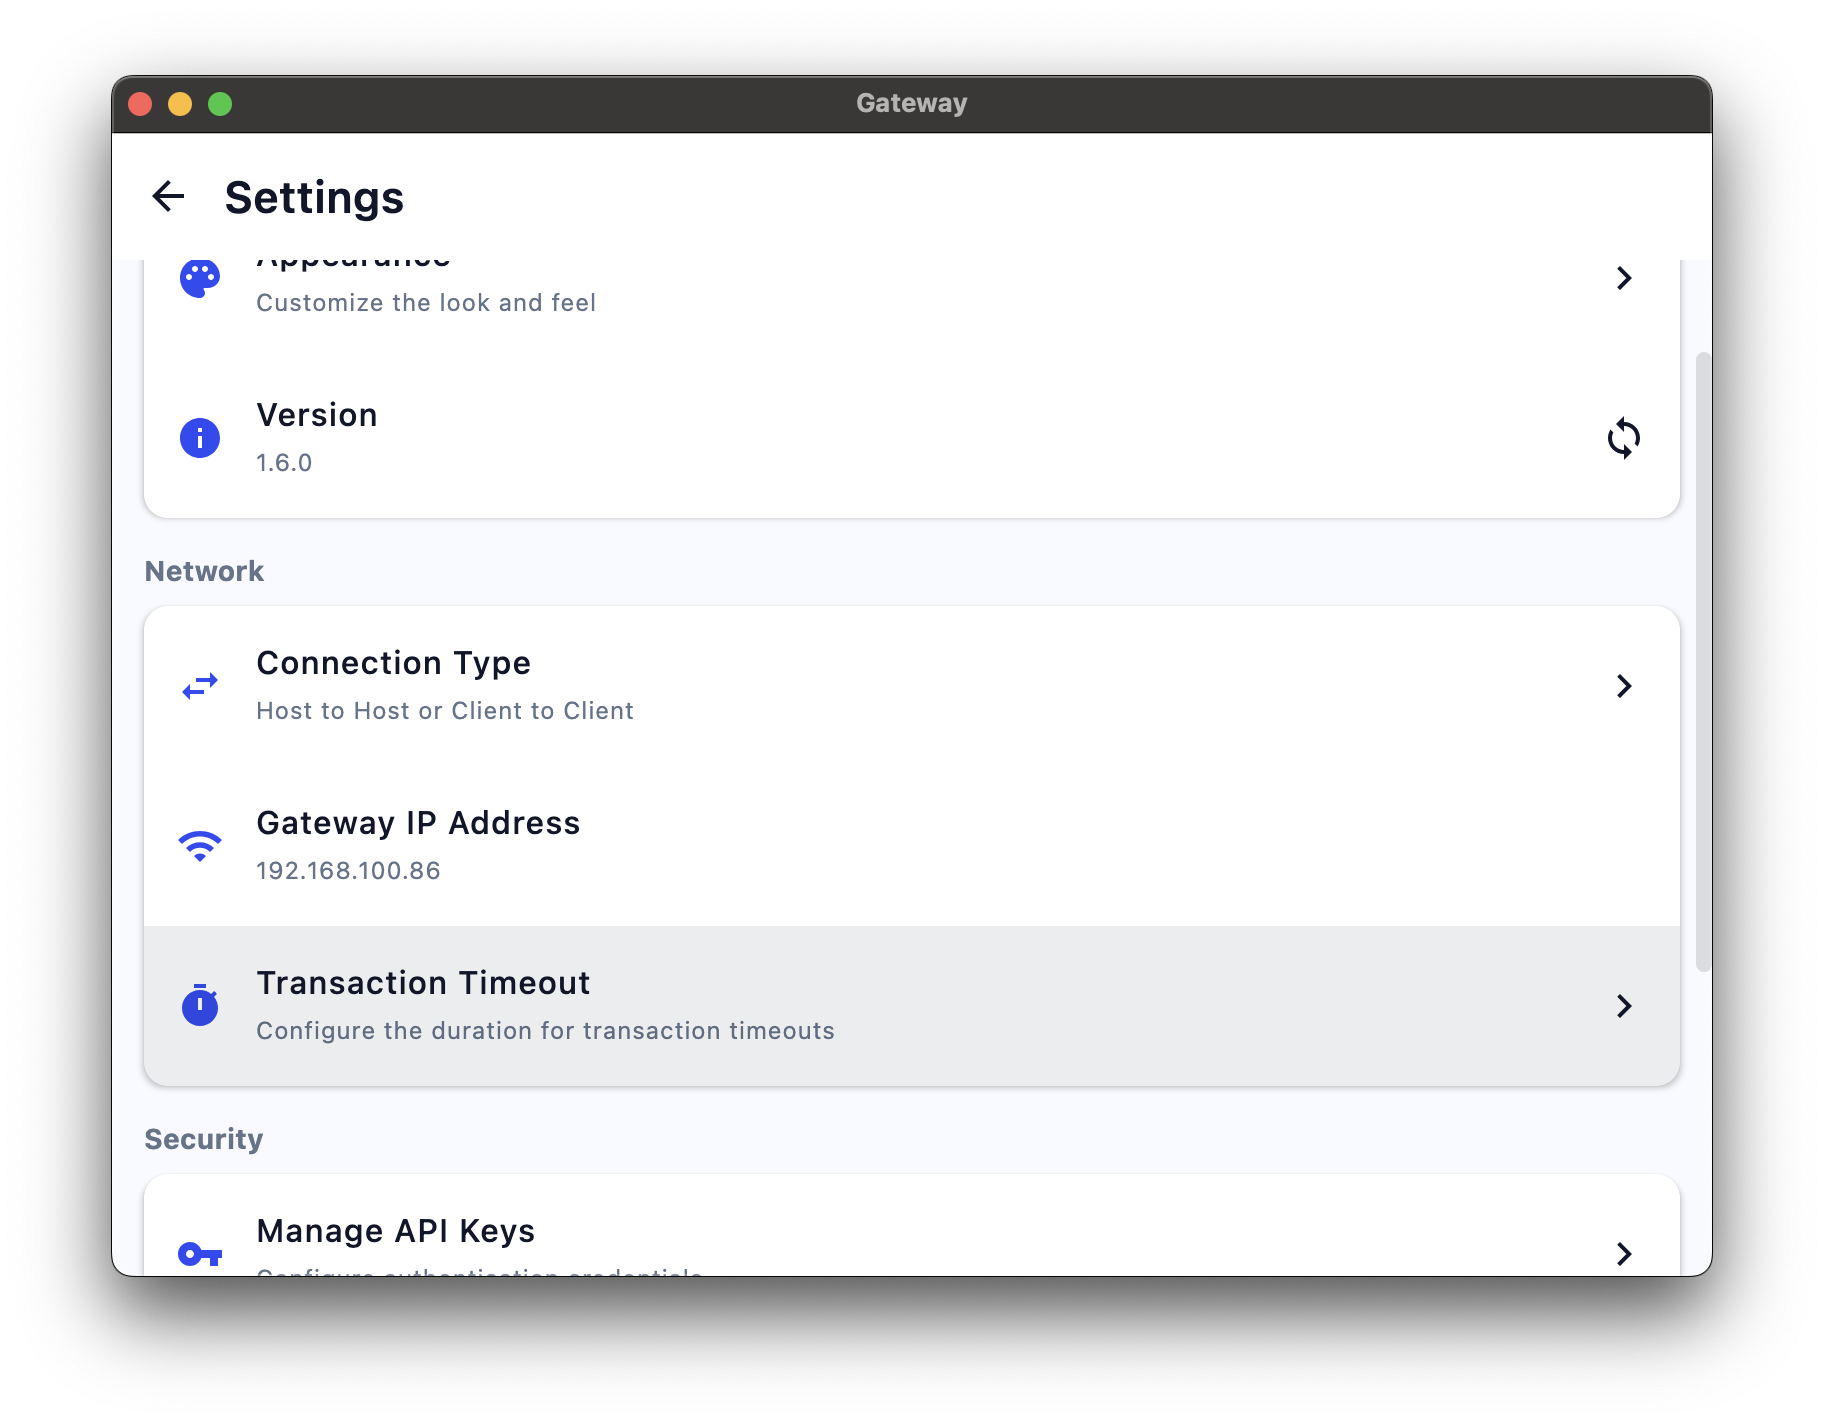 * Card Timeout (minutes) — maximum time the terminal has to complete a card transaction before the app auto-cancels and retries the transaction.
* QR Timeout (minutes) — maximum time for QR transactions before the app auto-cancels and retries the transaction.
Click **Save Changes** to apply the new timeouts.
## Use System Overlay (Android)
Enable system overlay to display pending transactions as an overlay window instead of a notification. This provides better visibility for ongoing transactions on Android devices.
This feature is only available on Android devices and requires system permission to display over other apps. Note that this feature may not be accessible on certain terminal devices due to system restrictions.
Navigate to the app settings and toggle on "Use System Overlay". Click the "Open Settings" button to grant the required permission.
* Card Timeout (minutes) — maximum time the terminal has to complete a card transaction before the app auto-cancels and retries the transaction.
* QR Timeout (minutes) — maximum time for QR transactions before the app auto-cancels and retries the transaction.
Click **Save Changes** to apply the new timeouts.
## Use System Overlay (Android)
Enable system overlay to display pending transactions as an overlay window instead of a notification. This provides better visibility for ongoing transactions on Android devices.
This feature is only available on Android devices and requires system permission to display over other apps. Note that this feature may not be accessible on certain terminal devices due to system restrictions.
Navigate to the app settings and toggle on "Use System Overlay". Click the "Open Settings" button to grant the required permission.
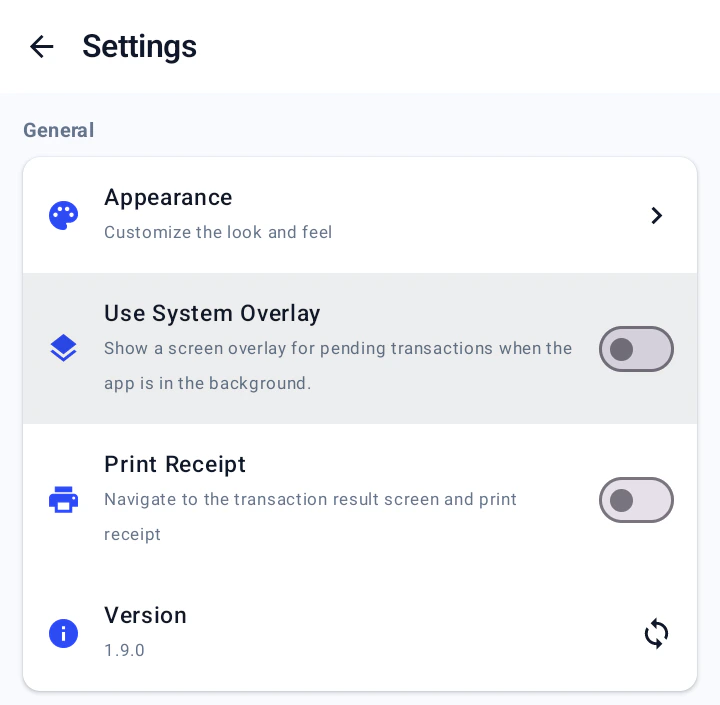 In the system settings list, find and click on the Xendit app.
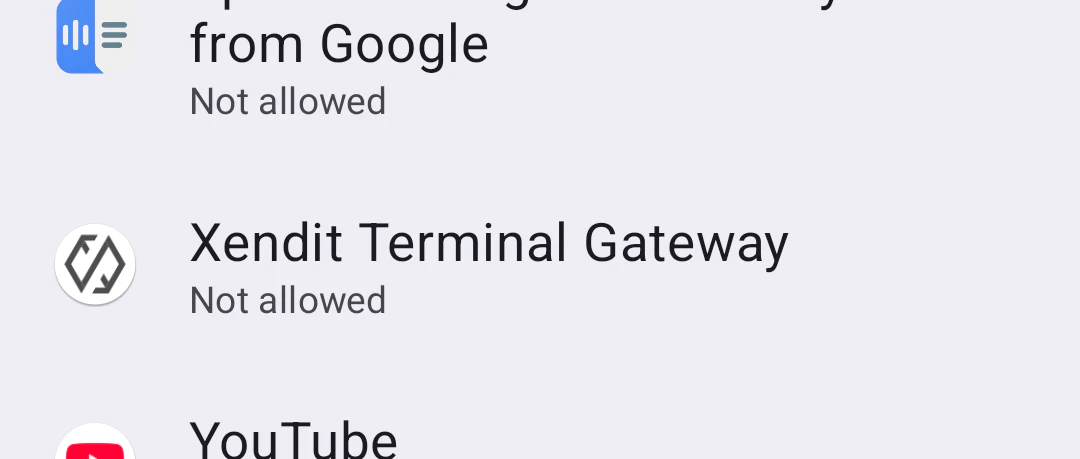 Enable the "Allow display over other apps" permission to allow the overlay to appear.
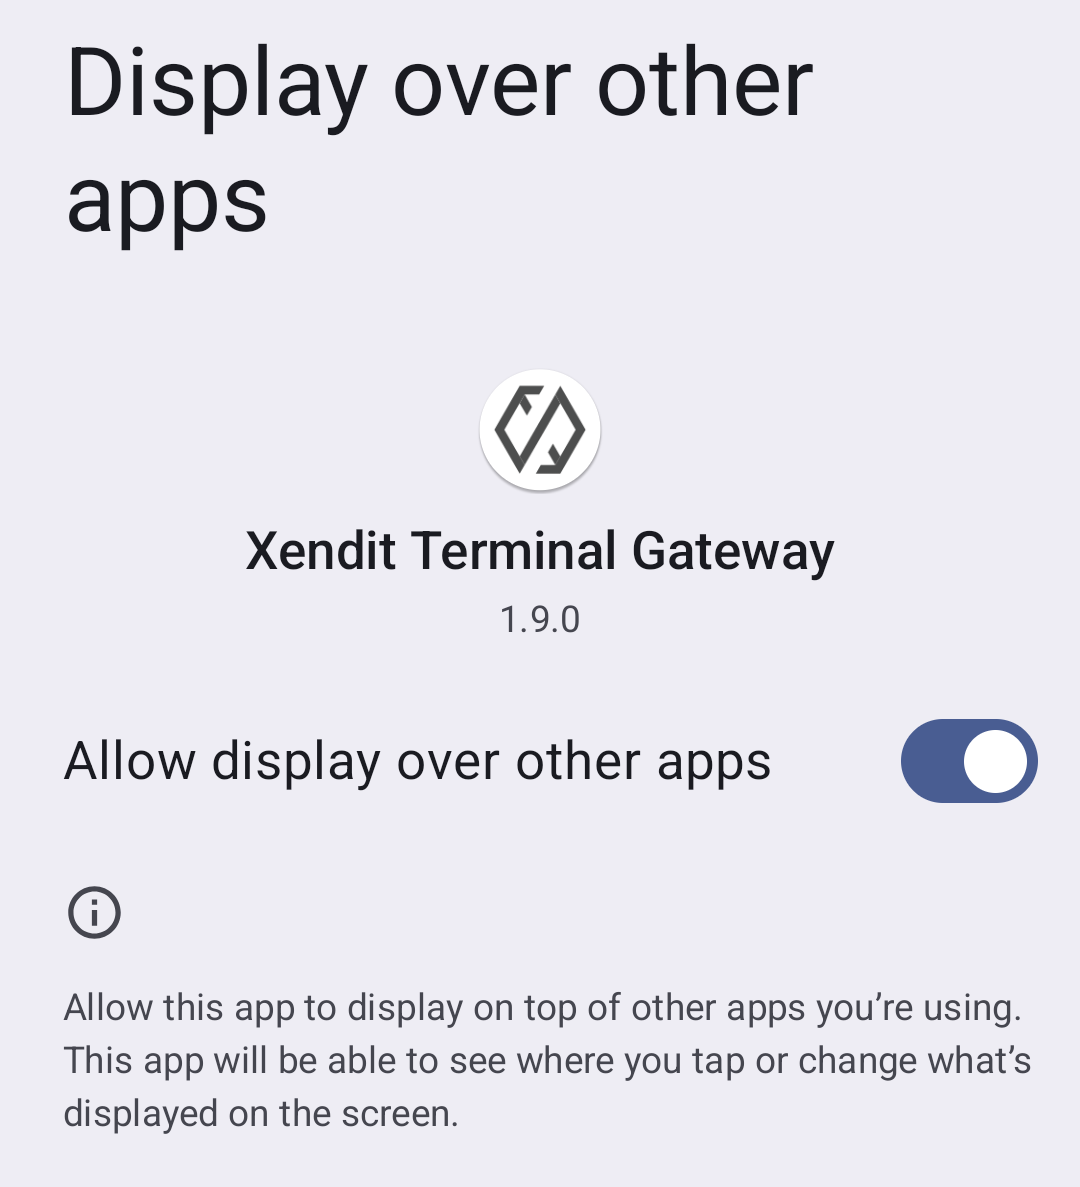 System overlay is now enabled. Pending transactions will appear as overlay windows instead of notifications.
System overlay provides better visibility for pending transactions compared to notifications, making it easier to track ongoing payment processing.
## Print Receipt (Cashup Provider)
Control whether the Cashup terminal automatically prints receipts after completing transactions. You can disable receipt printing to reduce paper usage or enable it for customer documentation requirements.
This setting only applies to Cashup terminals. Other terminal providers use their own receipt printing configuration.
Navigate to the app settings and toggle "Print Receipt" off to disable automatic receipt printing after transactions. Toggle it on to enable receipt printing.
System overlay is now enabled. Pending transactions will appear as overlay windows instead of notifications.
System overlay provides better visibility for pending transactions compared to notifications, making it easier to track ongoing payment processing.
## Print Receipt (Cashup Provider)
Control whether the Cashup terminal automatically prints receipts after completing transactions. You can disable receipt printing to reduce paper usage or enable it for customer documentation requirements.
This setting only applies to Cashup terminals. Other terminal providers use their own receipt printing configuration.
Navigate to the app settings and toggle "Print Receipt" off to disable automatic receipt printing after transactions. Toggle it on to enable receipt printing.
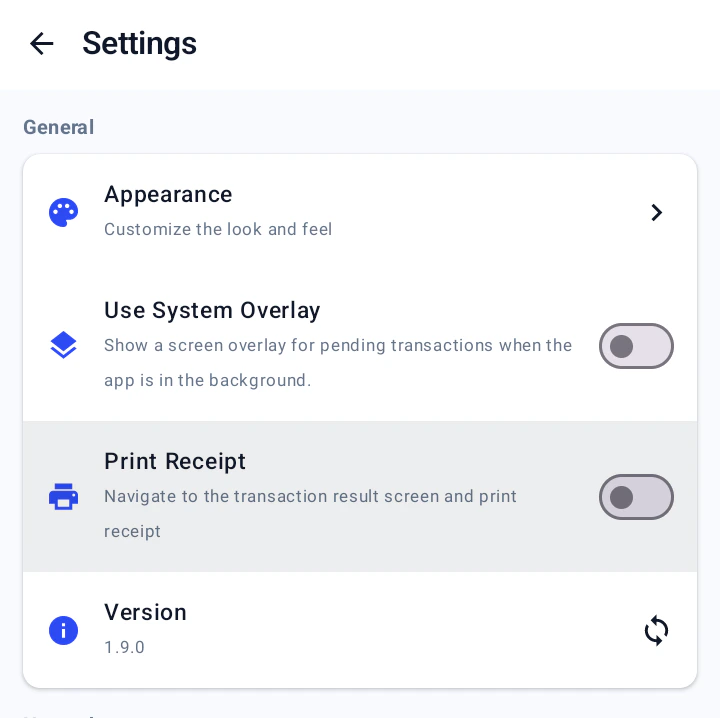 Receipt printing is now configured. The Cashup terminal will follow this setting for all future transactions.
Disable receipt printing to save paper costs or enable it when customers require physical transaction records.
## Device Status Monitoring
Each device in the terminal list displays a status indicator that changes color based on its current state. Monitor these indicators to ensure your terminal fleet is operating correctly.
### Status Indicators
| Status | Color | Description |
| ------------------- | ------ | ------------------------------------------------------------------------------------------------------------------------------------------------------------ |
| Unreachable/Offline | Red | EDC terminal is unreachable or offline due to incorrect IP address, network issues, or missing EDC configuration |
| Processing | Yellow | A transaction is currently in progress on the EDC terminal |
| Online | Green | EDC terminal is online, connected, and ready for transactions |
| Disabled | Grey | EDC terminal is disabled and not available for transactions |
### Troubleshooting Status Issues
**Problem**: Terminal shows red status indicating it cannot be reached or is offline.
**Solutions**:
* Verify the terminal IP address is correct and accessible
* Check network connectivity between the app and terminal
* Ensure the terminal is powered on and properly configured
* Verify firewall settings aren't blocking the connection
Red status terminals cannot process transactions and require immediate attention.
**Problem**: Terminal shows grey status indicating it's disabled.
**Solutions**:
* Check if the terminal has been manually disabled in the app
* Verify terminal configuration and settings
* Restart the terminal connection if needed
* Contact support if the issue persists
Disabled terminals are intentionally unavailable and won't process transactions.
**Problem**: Terminal shows yellow status indicating a transaction is in progress or appears stuck.
**Solutions**:
* Verify the terminal and POS are properly connected to the network
* Check if the current transaction is still awaiting card input or PIN
* Confirm whether the POS has already received a callback/response
* Review app logs for timeouts or error messages during processing
Yellow status is normal while a transaction is actively processing.
**Context**: Terminal shows green status indicating it is online and ready.
**What this means**:
* The device is connected and reachable by the app
* No transaction is currently in progress
* The terminal can accept new commands
**If you still encounter issues**:
* Confirm the POS is sending commands to the correct terminal
* Verify API credentials and environment (test vs production)
* Check recent logs for command errors or rejected requests
Green status indicates the terminal is healthy and ready to use.
Monitor device status indicators regularly to ensure your terminal fleet is
operating correctly. Red or grey statuses may require immediate attention.
## Troubleshooting
For more recovery scenarios across H2H and C2C terminal flows, see the [SDK Troubleshooting Guide](/sdk/troubleshooting).
### Common Issues and Solutions
**Problem**: The EDC (Electronic Data Capture) machine becomes unresponsive or stops processing transactions.
**Solution**:
1. Restart the EDC machine by holding the power button and selecting "Restart"
2. Wait for the device to fully boot up and reconnect
3. Verify the terminal is back online using the connection monitoring features
Always ensure the EDC is properly restarted before attempting new transactions to avoid data corruption.
**Problem**: Unexpected behaviors or unauthorized access to terminal functions.
**Solution**:
1. Ensure all transactions are initiated only through the app
2. Contact the Xendit EDC team to enable POS-only mode for your Terminal IDs
3. Configure terminal settings to disable manual transaction entry
POS-only mode prevents manual transaction entry and ensures all operations go through your application.
**Problem**: EDC fails to send transaction results to the app after payment completion.
**Solution**:
1. Query the Payment Session using the Terminal API to retrieve the latest status
2. Check network connectivity between the EDC and your application
3. Verify the callback URL configuration in your payment session
4. Implement retry logic for failed status updates
**Problem**: Transaction appears stuck or you don't receive a callback after the terminal prints a receipt, indicating the transaction may be incomplete.
This troubleshooting section applies only to BRI terminals.
**Solution**:
Call the Terminal API retry endpoint `/v1/terminal/sessions/{id}/retry` to request the app check the transaction status and redo the transaction if it's incomplete.
The retry endpoint instructs the app to verify the current transaction status with the terminal and automatically redo the transaction if it's found to be incomplete.
Use this retry mechanism when you see a receipt printed but haven't received a callback, as it may indicate the transaction didn't complete successfully on the terminal side.
**Problem**: Unable to establish or maintain connection with terminal devices.
**Solutions**:
* **Check network connectivity**: Ensure both devices are on the same network
* **Verify IP addresses**: Confirm terminal IP addresses are correct and accessible
* **Firewall settings**: Check if firewall is blocking the connection ports
* **Terminal status**: Ensure the terminal is powered on and in ready state
* **App initialization**: Verify client key and terminal configuration
Use the connection monitoring features to diagnose specific connection issues.
## Finding Terminal Information
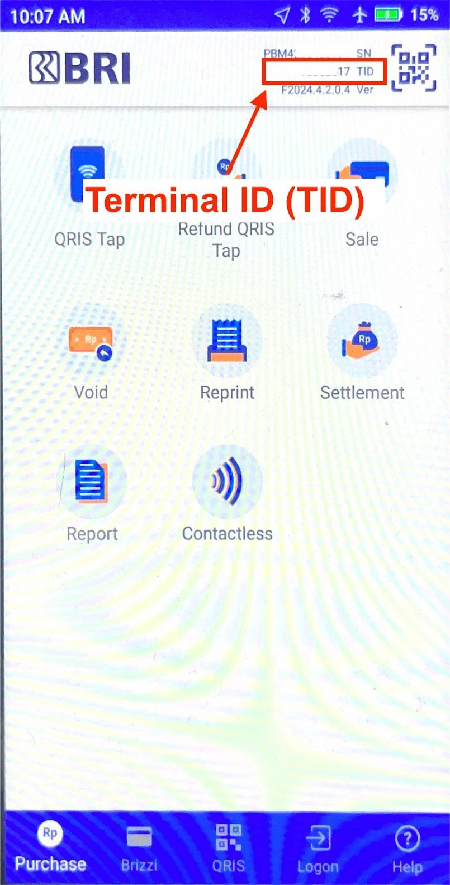
Open the BRI FMS app on the terminal device and locate the Terminal ID in the device information section.
Receipt printing is now configured. The Cashup terminal will follow this setting for all future transactions.
Disable receipt printing to save paper costs or enable it when customers require physical transaction records.
## Device Status Monitoring
Each device in the terminal list displays a status indicator that changes color based on its current state. Monitor these indicators to ensure your terminal fleet is operating correctly.
### Status Indicators
| Status | Color | Description |
| ------------------- | ------ | ------------------------------------------------------------------------------------------------------------------------------------------------------------ |
| Unreachable/Offline | Red | EDC terminal is unreachable or offline due to incorrect IP address, network issues, or missing EDC configuration |
| Processing | Yellow | A transaction is currently in progress on the EDC terminal |
| Online | Green | EDC terminal is online, connected, and ready for transactions |
| Disabled | Grey | EDC terminal is disabled and not available for transactions |
### Troubleshooting Status Issues
**Problem**: Terminal shows red status indicating it cannot be reached or is offline.
**Solutions**:
* Verify the terminal IP address is correct and accessible
* Check network connectivity between the app and terminal
* Ensure the terminal is powered on and properly configured
* Verify firewall settings aren't blocking the connection
Red status terminals cannot process transactions and require immediate attention.
**Problem**: Terminal shows grey status indicating it's disabled.
**Solutions**:
* Check if the terminal has been manually disabled in the app
* Verify terminal configuration and settings
* Restart the terminal connection if needed
* Contact support if the issue persists
Disabled terminals are intentionally unavailable and won't process transactions.
**Problem**: Terminal shows yellow status indicating a transaction is in progress or appears stuck.
**Solutions**:
* Verify the terminal and POS are properly connected to the network
* Check if the current transaction is still awaiting card input or PIN
* Confirm whether the POS has already received a callback/response
* Review app logs for timeouts or error messages during processing
Yellow status is normal while a transaction is actively processing.
**Context**: Terminal shows green status indicating it is online and ready.
**What this means**:
* The device is connected and reachable by the app
* No transaction is currently in progress
* The terminal can accept new commands
**If you still encounter issues**:
* Confirm the POS is sending commands to the correct terminal
* Verify API credentials and environment (test vs production)
* Check recent logs for command errors or rejected requests
Green status indicates the terminal is healthy and ready to use.
Monitor device status indicators regularly to ensure your terminal fleet is
operating correctly. Red or grey statuses may require immediate attention.
## Troubleshooting
For more recovery scenarios across H2H and C2C terminal flows, see the [SDK Troubleshooting Guide](/sdk/troubleshooting).
### Common Issues and Solutions
**Problem**: The EDC (Electronic Data Capture) machine becomes unresponsive or stops processing transactions.
**Solution**:
1. Restart the EDC machine by holding the power button and selecting "Restart"
2. Wait for the device to fully boot up and reconnect
3. Verify the terminal is back online using the connection monitoring features
Always ensure the EDC is properly restarted before attempting new transactions to avoid data corruption.
**Problem**: Unexpected behaviors or unauthorized access to terminal functions.
**Solution**:
1. Ensure all transactions are initiated only through the app
2. Contact the Xendit EDC team to enable POS-only mode for your Terminal IDs
3. Configure terminal settings to disable manual transaction entry
POS-only mode prevents manual transaction entry and ensures all operations go through your application.
**Problem**: EDC fails to send transaction results to the app after payment completion.
**Solution**:
1. Query the Payment Session using the Terminal API to retrieve the latest status
2. Check network connectivity between the EDC and your application
3. Verify the callback URL configuration in your payment session
4. Implement retry logic for failed status updates
**Problem**: Transaction appears stuck or you don't receive a callback after the terminal prints a receipt, indicating the transaction may be incomplete.
This troubleshooting section applies only to BRI terminals.
**Solution**:
Call the Terminal API retry endpoint `/v1/terminal/sessions/{id}/retry` to request the app check the transaction status and redo the transaction if it's incomplete.
The retry endpoint instructs the app to verify the current transaction status with the terminal and automatically redo the transaction if it's found to be incomplete.
Use this retry mechanism when you see a receipt printed but haven't received a callback, as it may indicate the transaction didn't complete successfully on the terminal side.
**Problem**: Unable to establish or maintain connection with terminal devices.
**Solutions**:
* **Check network connectivity**: Ensure both devices are on the same network
* **Verify IP addresses**: Confirm terminal IP addresses are correct and accessible
* **Firewall settings**: Check if firewall is blocking the connection ports
* **Terminal status**: Ensure the terminal is powered on and in ready state
* **App initialization**: Verify client key and terminal configuration
Use the connection monitoring features to diagnose specific connection issues.
## Finding Terminal Information
Open the BRI FMS app on the terminal device and locate the Terminal ID in the device information section.
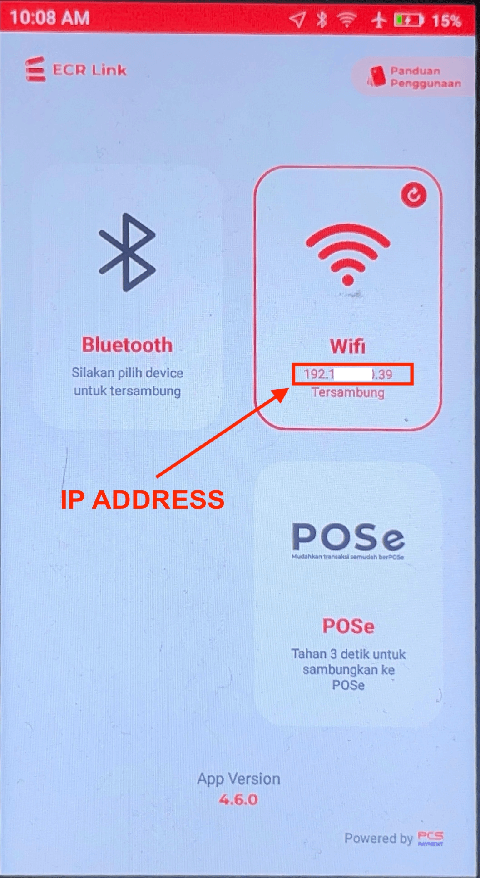
 Open the ECRLink app on the terminal and check the network settings for the IP address.
 Look for the Terminal ID on the physical sticker attached to the device.
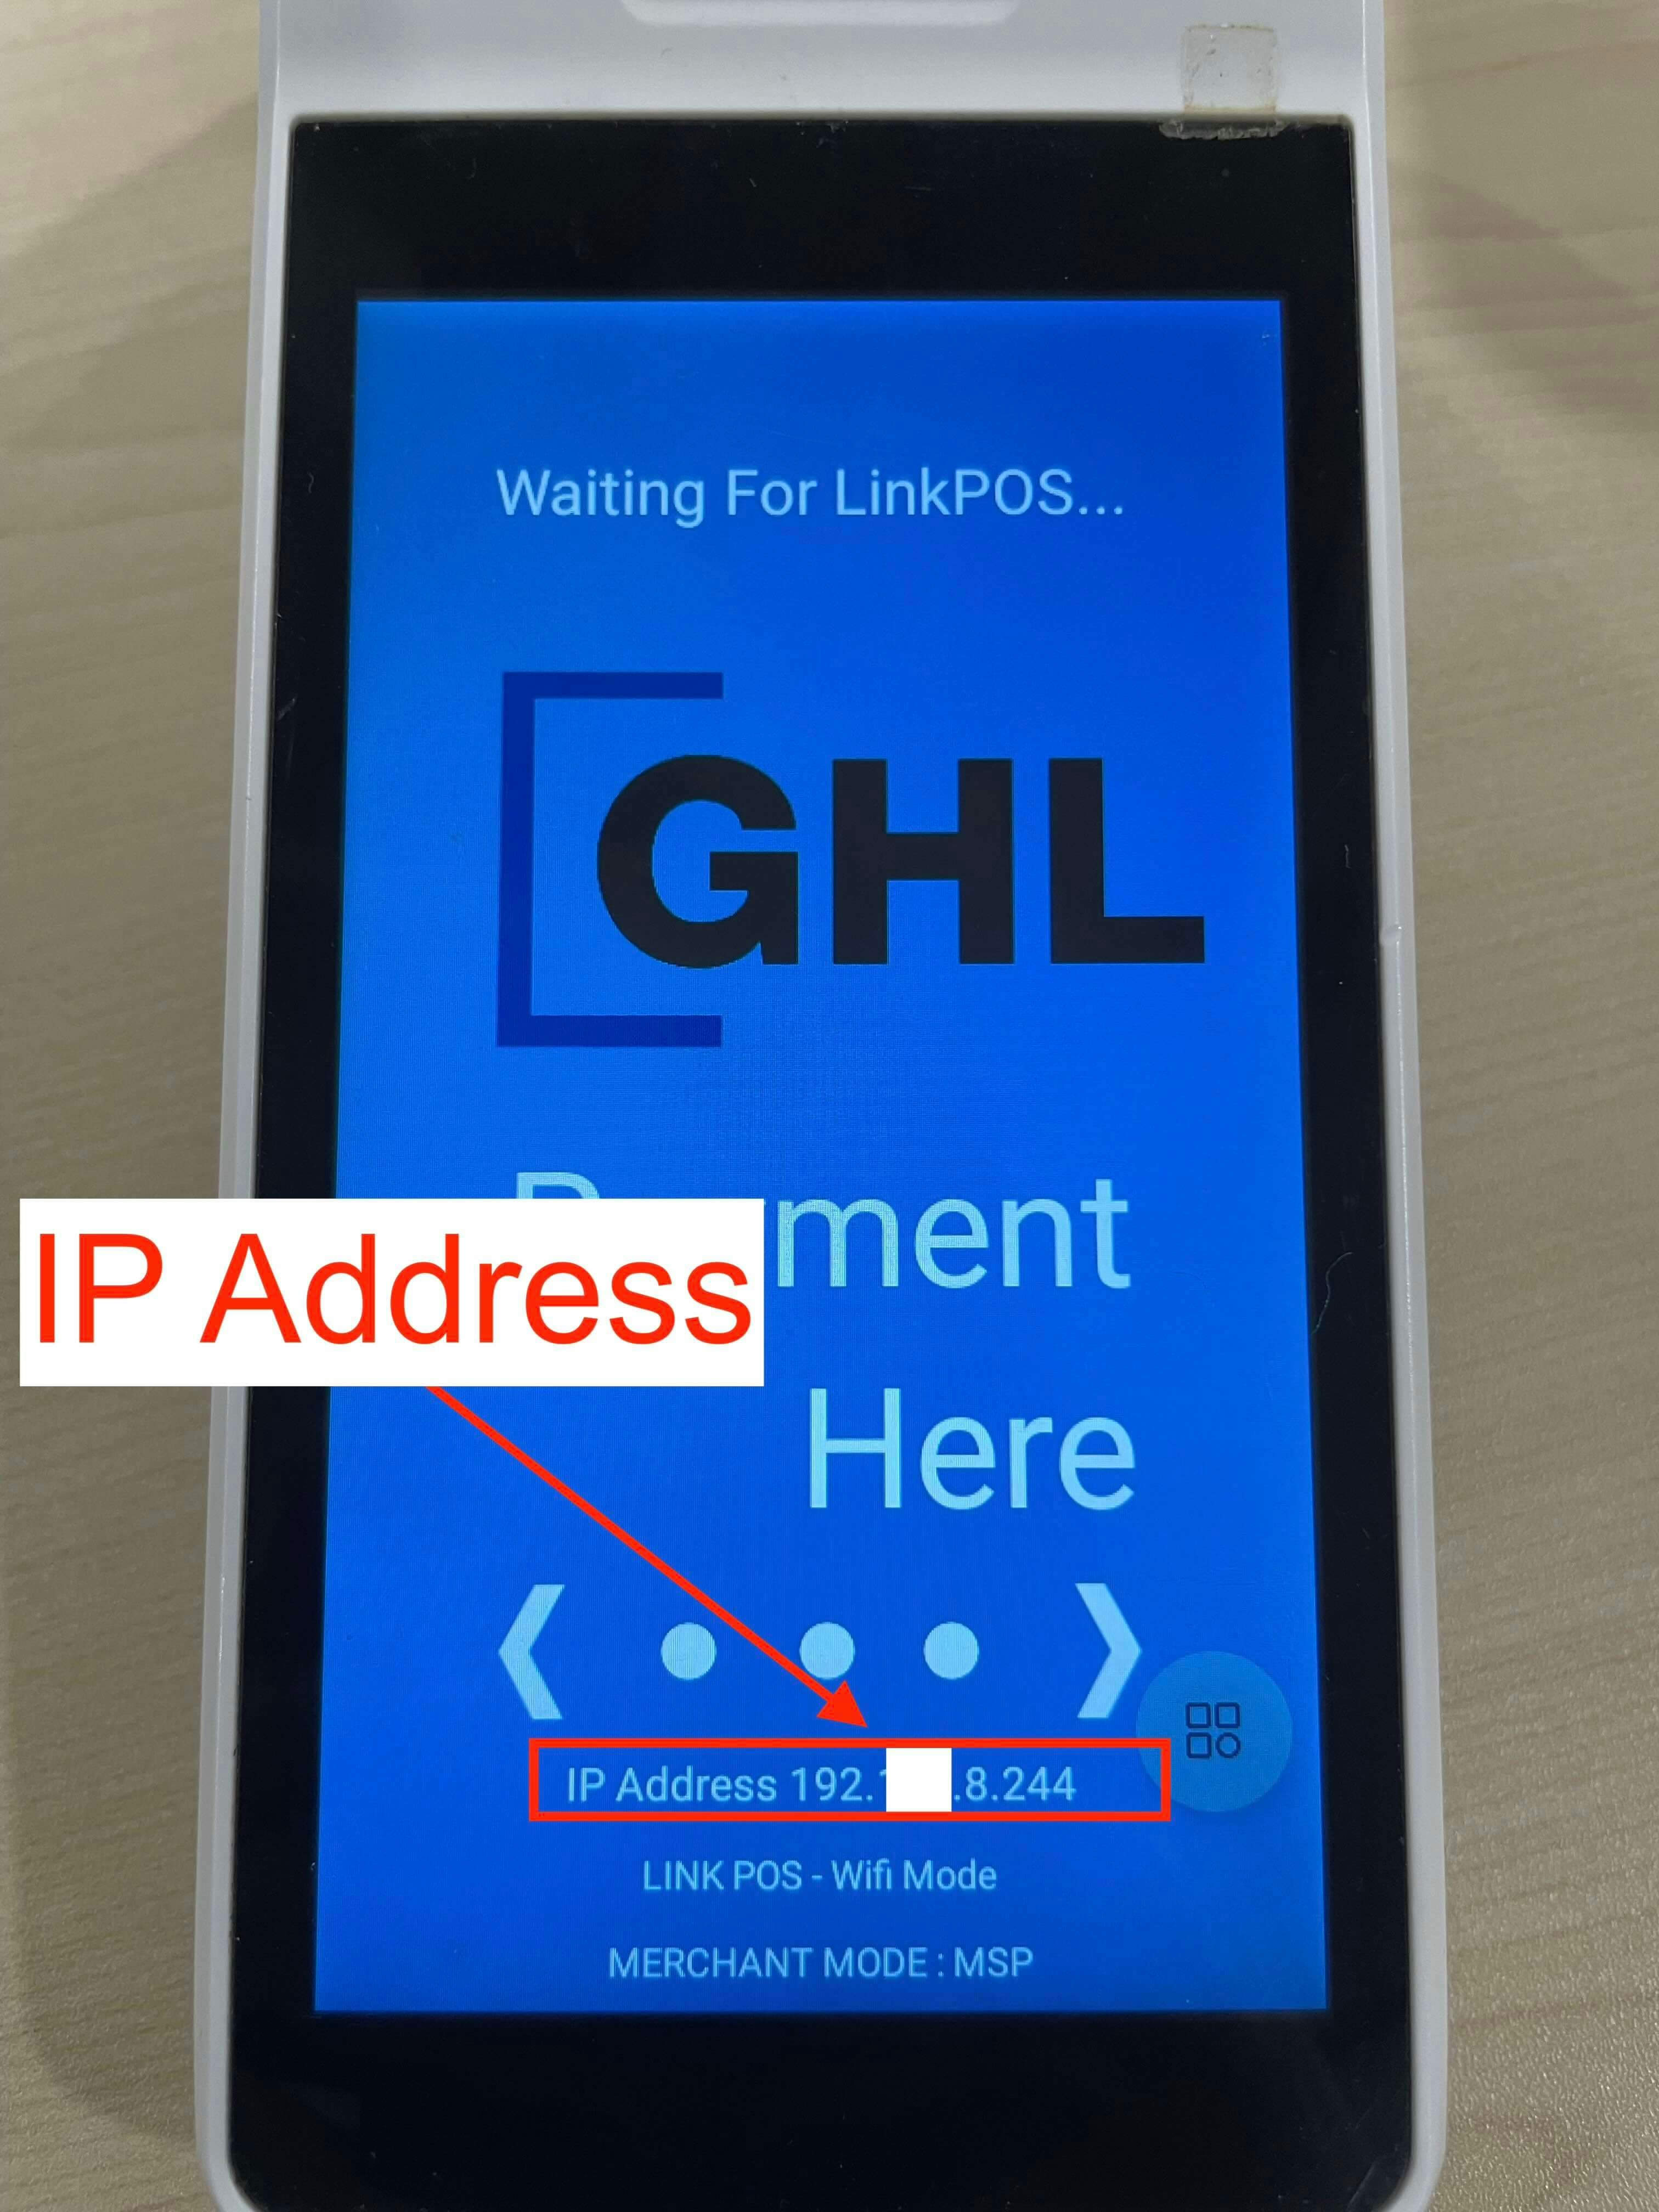
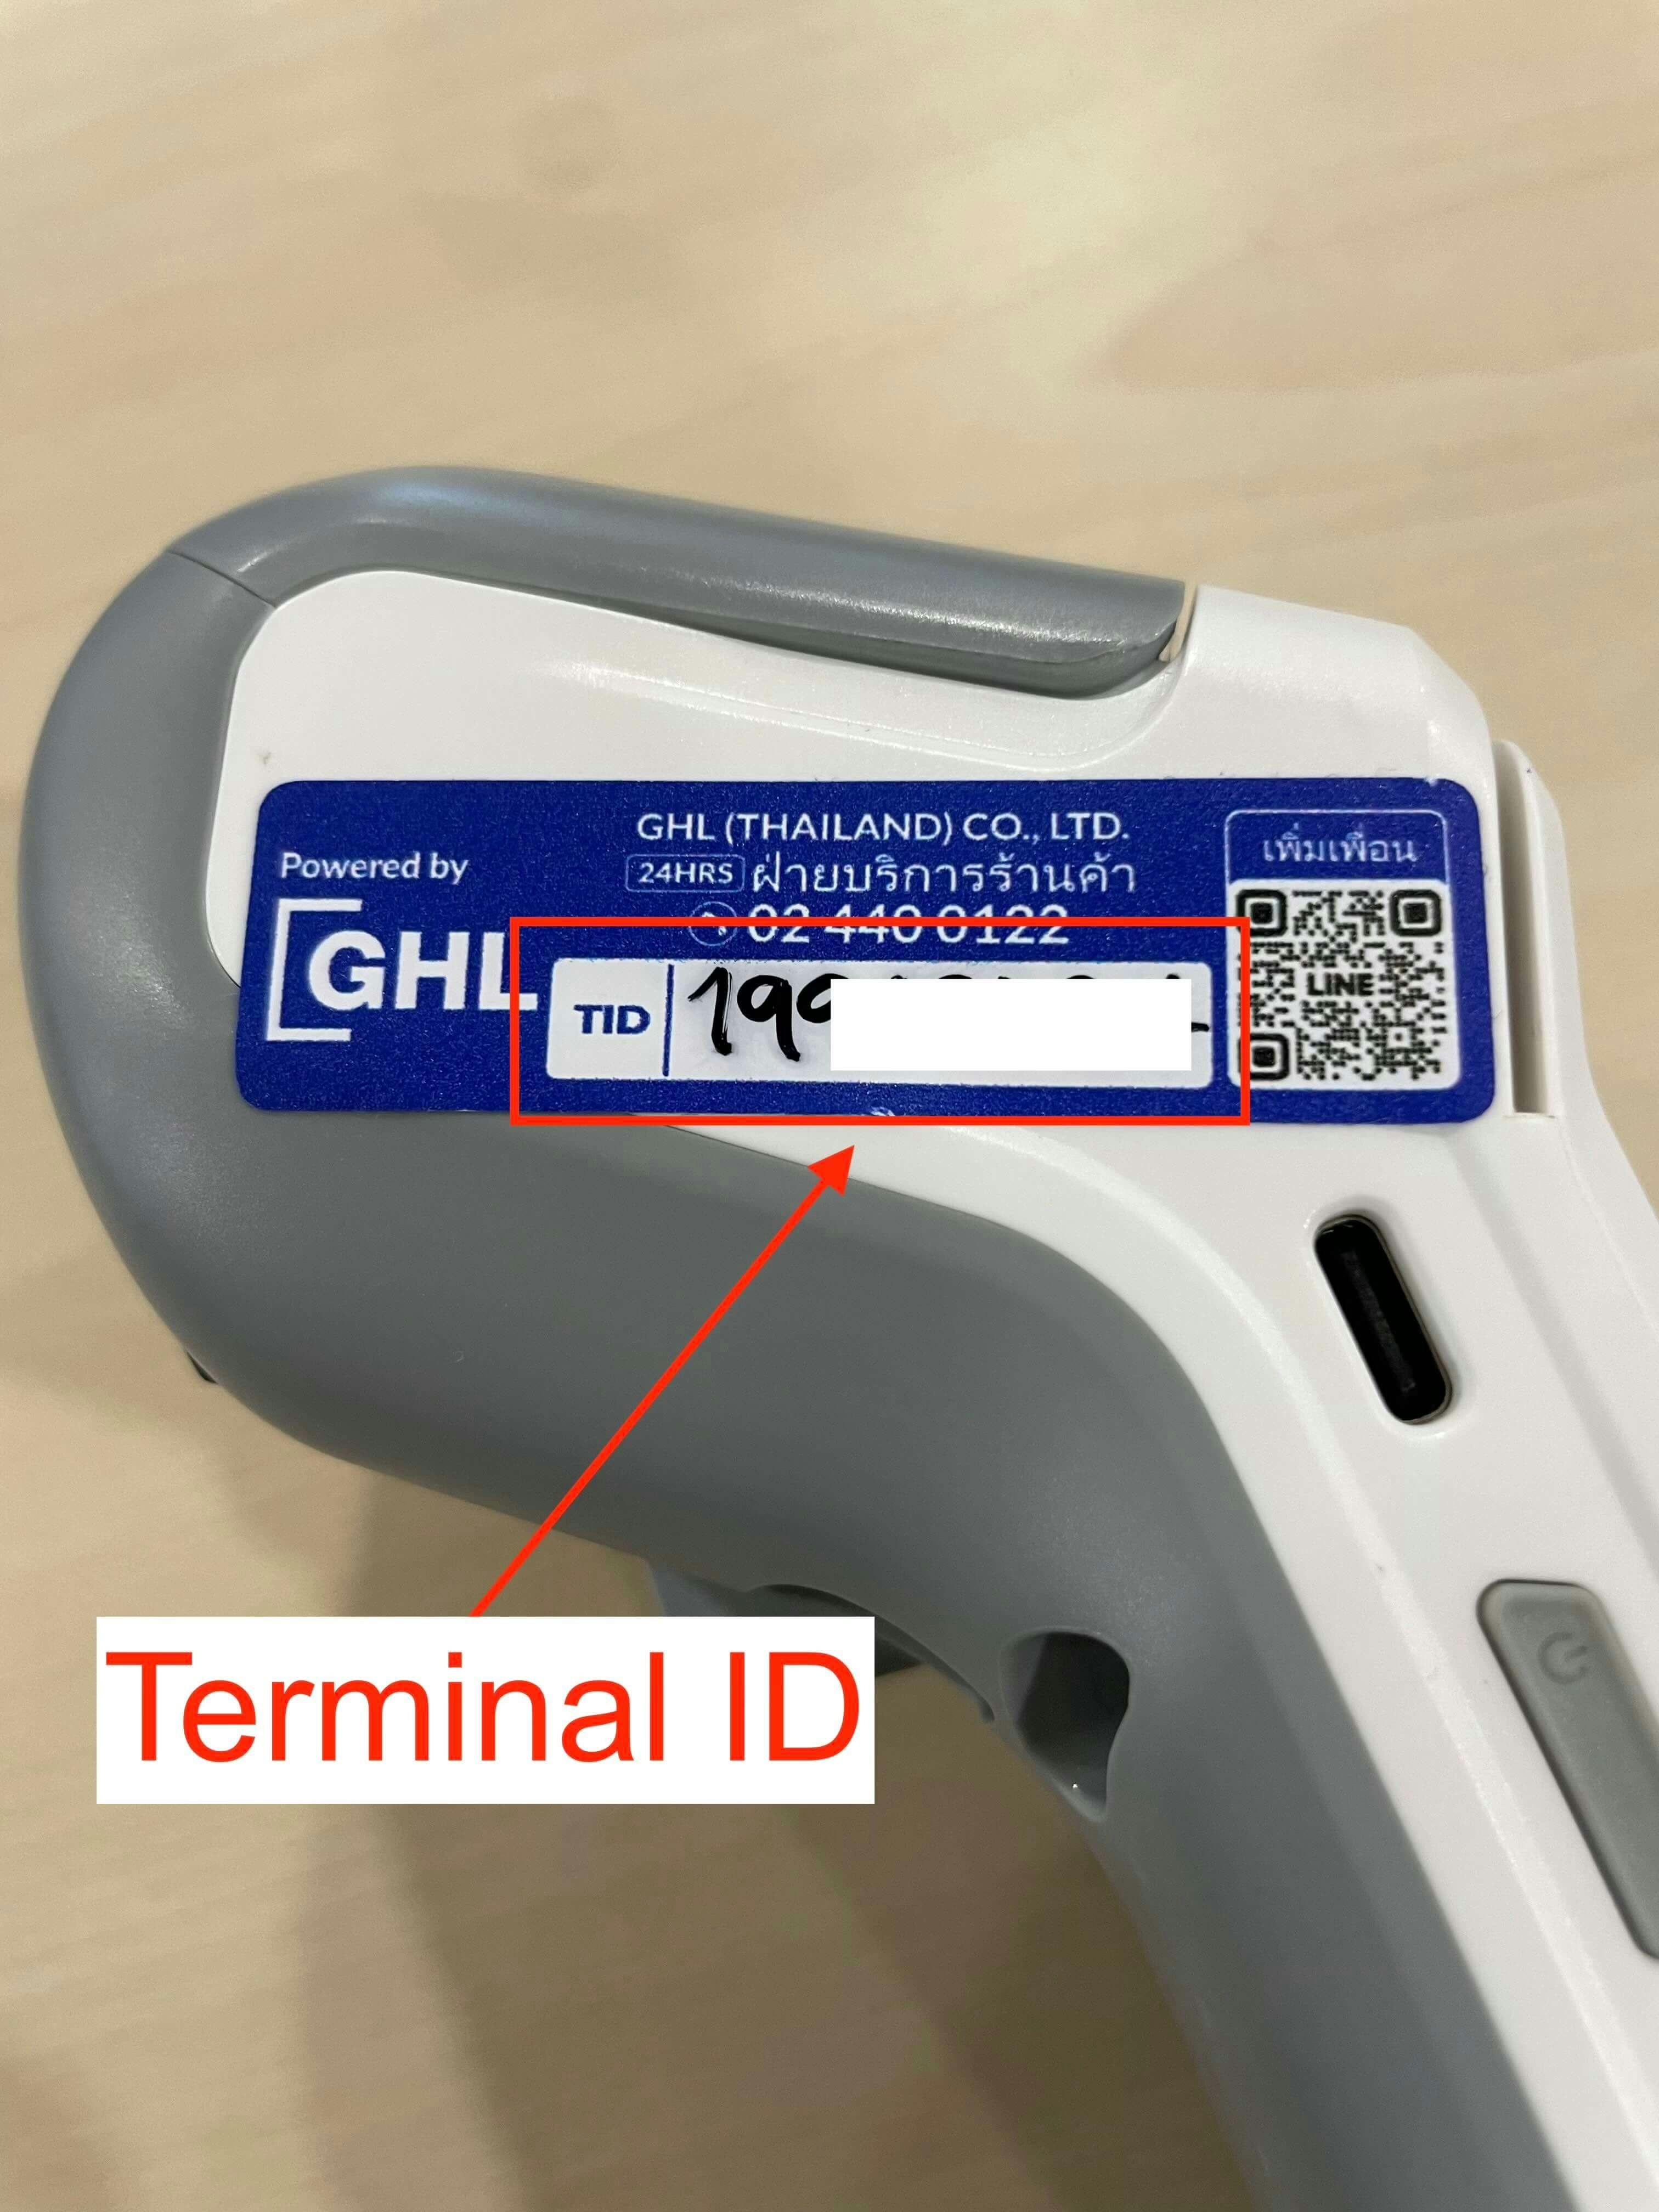 Open the NTT LinkPOS app on the terminal and navigate to network settings to find the IP address.
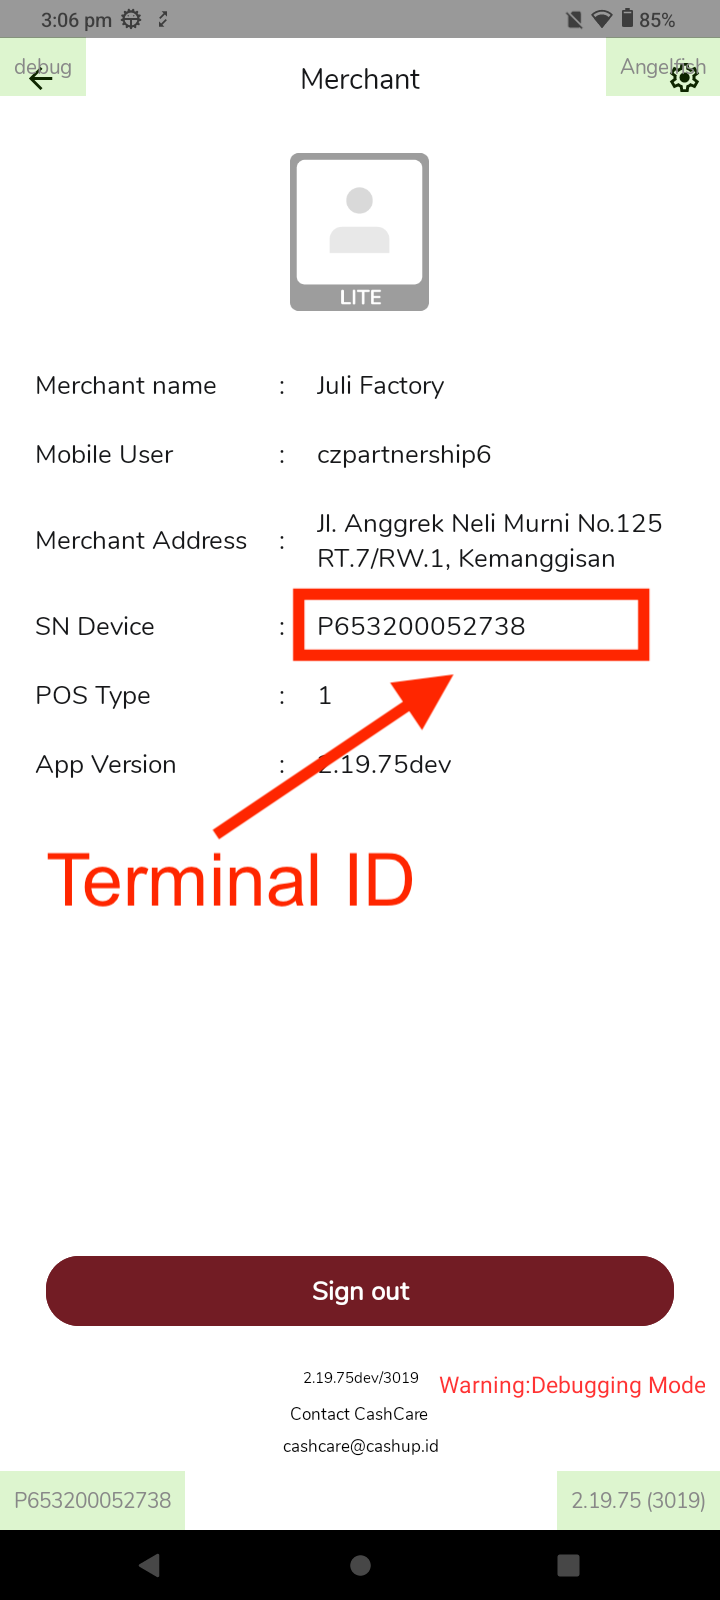
 Open the Cashlez app and navigate to the User Account tab to locate the Terminal ID.
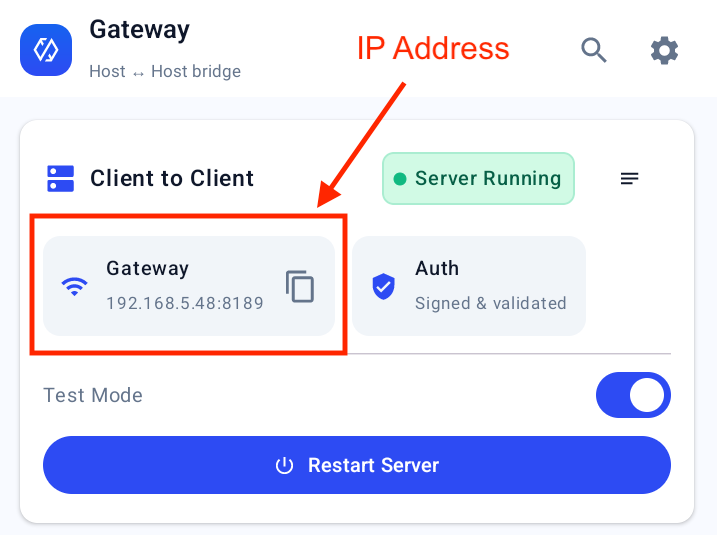
 Open the Terminal Gateway app and check the device list for the terminal IP address.
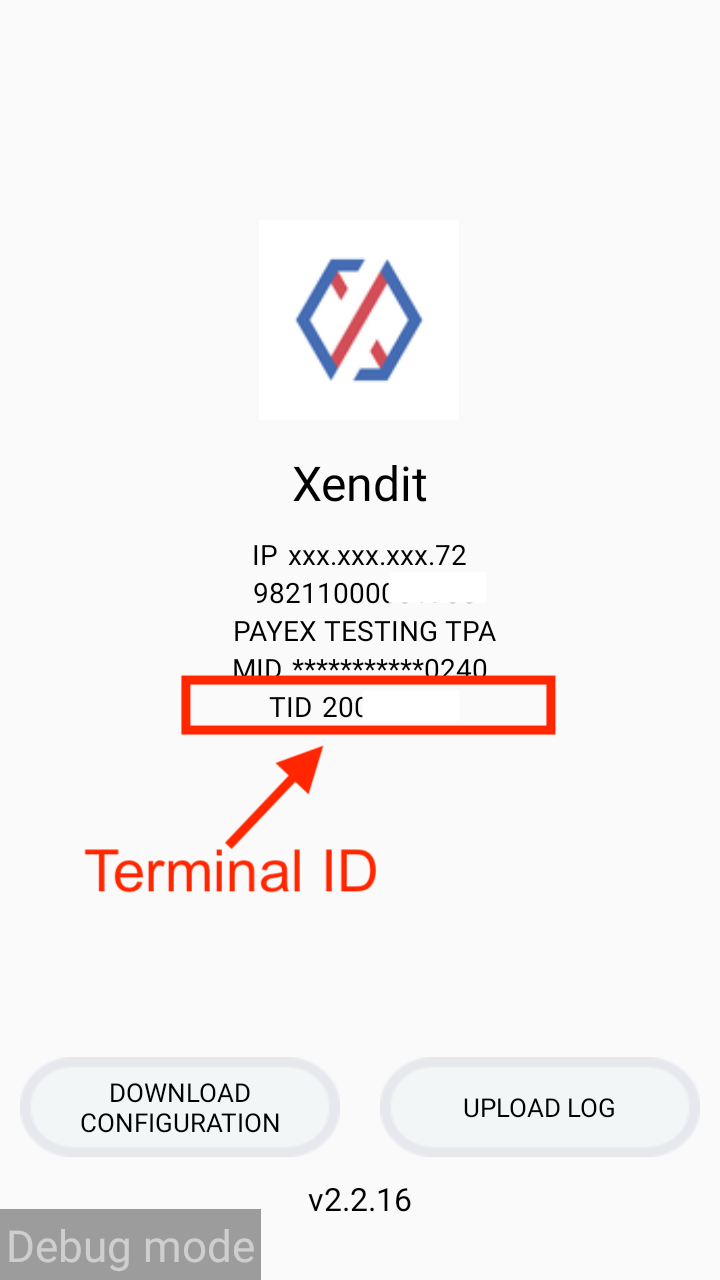
 Open the Xendit app on the device and review the terminal details screen to locate the Terminal ID.
 Open the Terminal Gateway app and check the device list for the terminal IP address.
Open the payment app on the Atom terminal, then go to Settings → Device Info to view the Terminal ID.
Open the Terminal Gateway app and check the device list for the terminal IP address.
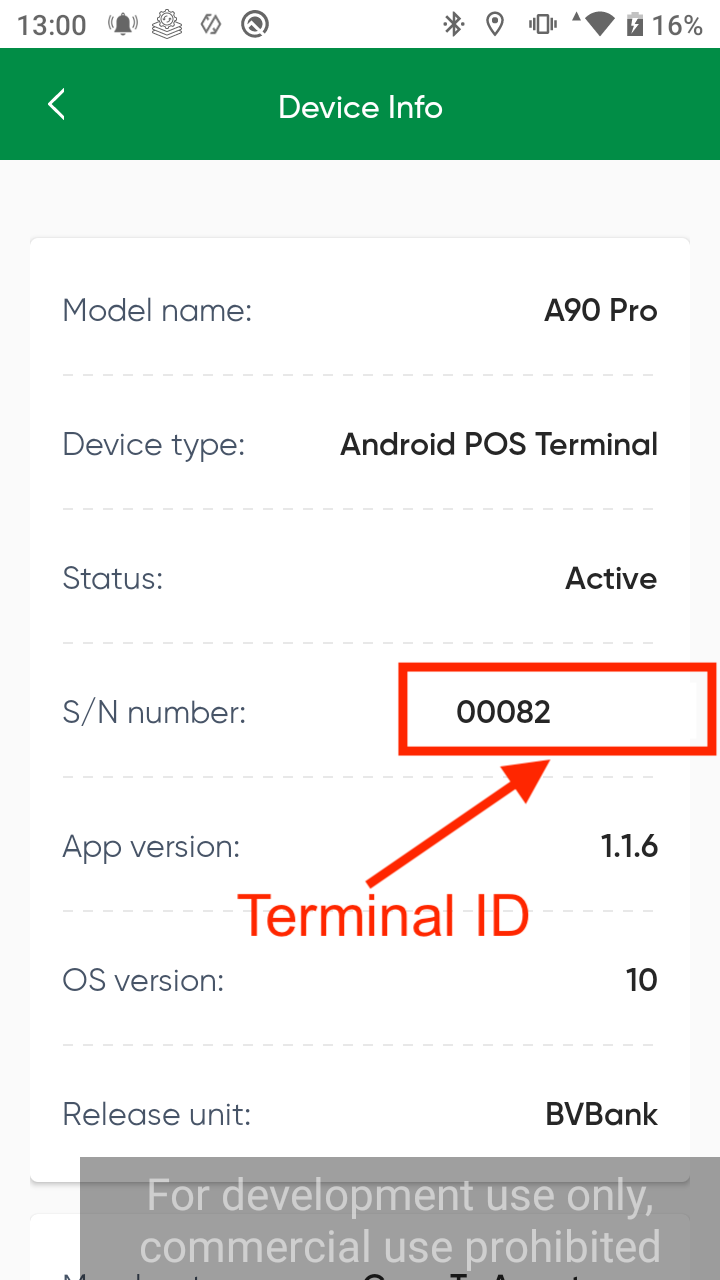
Open the payment app on the Atom terminal, then go to Settings → Device Info to view the Terminal ID.
 Open the Terminal Gateway app and check the device list for the terminal IP address.
Screenshots and UI layouts may vary by firmware or app version. Refer to the latest vendor documentation if the interface differs from these instructions.
Open the Terminal Gateway app and check the device list for the terminal IP address.
Screenshots and UI layouts may vary by firmware or app version. Refer to the latest vendor documentation if the interface differs from these instructions.