> ## Documentation Index
> Fetch the complete documentation index at: https://terminal-docs.xendit.co/llms.txt
> Use this file to discover all available pages before exploring further.
# iOS SDK (Swift)
> Integrate payment processing with physical terminals using the Terminal H2H SDK for iOS (Swift)
# Terminal H2H SDK for iOS (Swift)
The Terminal H2H SDK for iOS enables you to integrate secure payment processing directly into your iOS applications. Connect to physical payment terminals and process transactions seamlessly using our comprehensive Swift SDK.
This SDK works alongside the Terminal API to provide a complete in-person payment solution. You'll use the Terminal API to create payment sessions and the Terminal H2H SDK to interact with physical payment devices.
## Version information
What's new:
* **Core Stability**: Fixed activity tracking bug in TerminalApplication where paused activities were not properly removed from internal tracking list
What's new:
* Fixed casting issue on C2C request payload to improve compatibility and prevent runtime errors.
What's new:
* Added Cashup provider support for Indonesian terminals
What's new:
* Renamed class name `TerminalGateway` to `TerminalH2H` for better consistency
**Breaking Change**: Class name changed from `TerminalGateway` to `TerminalH2H`. Update your imports and references accordingly.
What's new:
* Fixed NTT payment method value mapping to ensure correct provider selection
* Updated BRI payment flow to validate transaction data before executing terminal actions
* Added timeout configuration for card and QR transactions to auto-cancel and retry stalled requests
* Added support to handle retry requests via `/v1/terminal/sessions/{id}/retry` endpoint
What's new:
* Added support for multiple concurrent device connections, enabling simultaneous transactions across different terminals
* \[BRI] Fixed status value handling in void and cancel API responses for improved transaction status accuracy
What's new:
* Introduced command ID handling for settlement operations
* Enhanced retry logic with configurable attempt counts
* Improved error handling and logging throughout the gateway service
Bug fixes and improvements:
* Fix data mapping for terminal responses
* \[BRI] Enhanced status verification after transaction timeout for improved reliability
XenTerminal is the companion SDK to In-Person Payment Sessions API. This version provides core functionality for connecting to payment terminals and processing transactions.
The SDK follows semantic versioning. Breaking changes will bump the major version number.
## Installation
Install the Terminal SDK using Swift Package Manager (SPM) in Xcode:
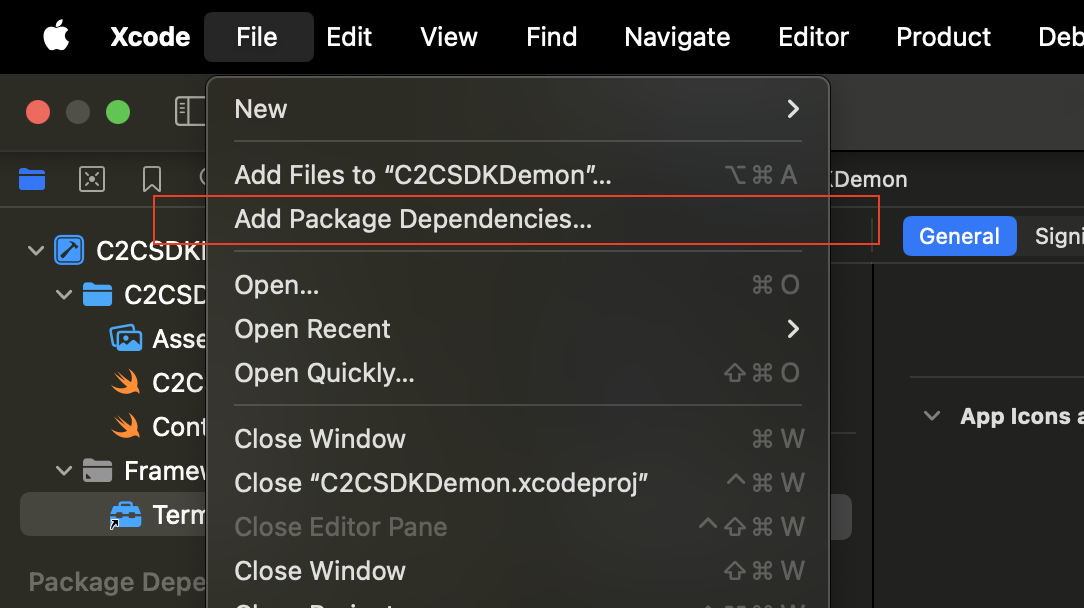
In Xcode, open your project and choose **File → Add Package Dependencies...**.
 Enter this repository URL in the package search field:
```text theme={null}
https://github.com/xendit/xendit-terminal-ios
```
Then click **Add Package**.
Choose your dependency rule (recommended: **Up to Next Major Version**) and make sure your app target is selected before confirming.
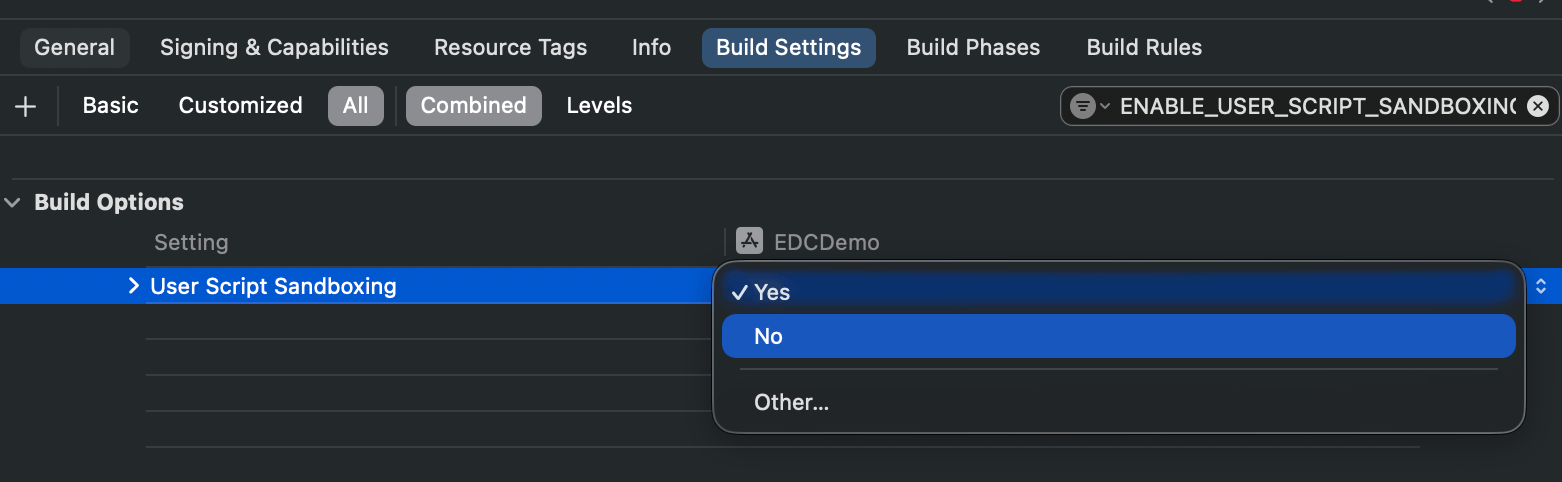
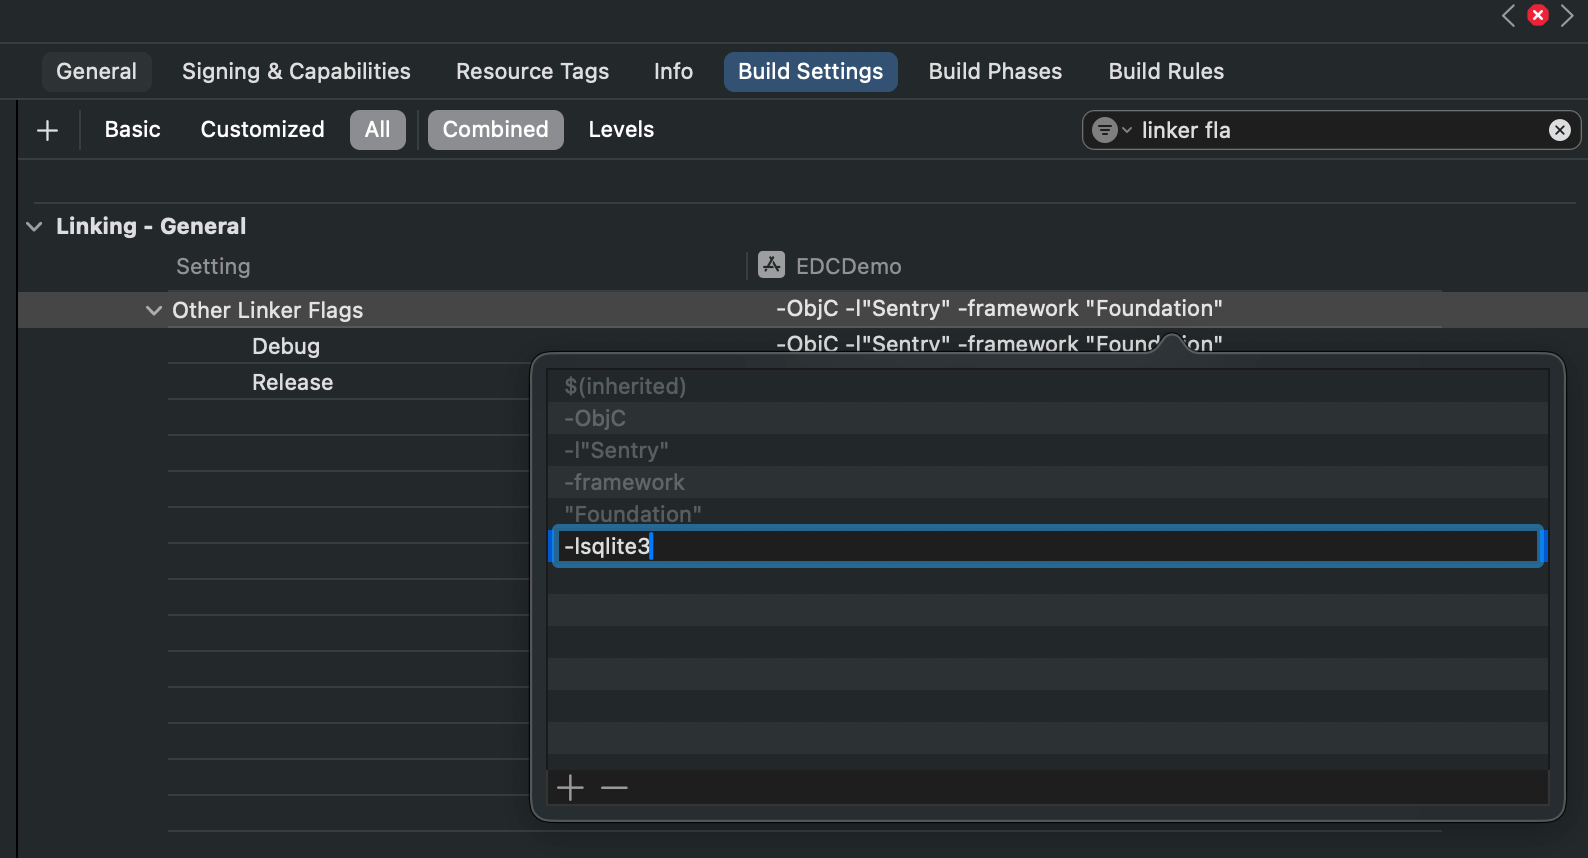
Go to **Build Settings** and make the following changes:
* Search for `ENABLE_USER_SCRIPT_SANDBOXING` and set it to `NO`
* Search for `Other Linker Flags` and add `-lsqlite3`
Enter this repository URL in the package search field:
```text theme={null}
https://github.com/xendit/xendit-terminal-ios
```
Then click **Add Package**.
Choose your dependency rule (recommended: **Up to Next Major Version**) and make sure your app target is selected before confirming.
Go to **Build Settings** and make the following changes:
* Search for `ENABLE_USER_SCRIPT_SANDBOXING` and set it to `NO`
* Search for `Other Linker Flags` and add `-lsqlite3`
 ## Getting Started
Before starting, you'll need an In-Person Payment CLIENT\_KEY from the Xendit In-Person Payment team. You will also need the terminal IP address.
Terminal H2H requires physical payment devices to function. Contact the Xendit team to obtain compatible terminal devices and configuration details.
### Step 1: Initialize SDK
Import the SDK module and call `TerminalApp.shared.initialize` from your application entry point:
```swift AppDelegate.swift theme={null}
import TerminalH2H
TerminalApp.shared.initialize(
clientKey: TEST_CLIENT_KEY,
mode: TerminalMode.integration // switch to TerminalMode.live for production builds
)
```
The SDK supports two modes:
Use `TerminalMode.integration` for development and testing with physical terminals. Transactions are sent to Test Mode on the Xendit Dashboard.
Use `TerminalMode.live` for production builds. Data is pushed to your Live Xendit Dashboard and requires a LIVE\_CLIENT\_KEY.
### Step 2: Add Terminal Providers
Add the specific terminal providers you need for your integration:
For Share Commerce (SHC), Cashup, and Atom terminals, you do not need to add a Terminal H2H provider. Those devices run terminal logic through the Gateway app installed on the hardware. If the app is missing, install it from the Gateway download page or contact [inpersonpayments@xendit.co](mailto:inpersonpayments@xendit.co) for help.
```swift theme={null}
// Add BRI provider for Indonesian terminals
TerminalH2H.shared.addProvider(provider: TerminalBRI.shared)
```
BRI provider supports timeout configuration for card and QR transactions, and provides enhanced transaction retry capabilities.
```swift theme={null}
// Add NTT provider for Thai terminals
TerminalH2H.shared.addProvider(provider: TerminalNTT.shared)
```
NTT provider supports multi-function terminals with card payments and QR code transactions.
```swift theme={null}
// Cashup terminals use the Gateway app flow.
// No TerminalH2H.shared.addProvider(...) call is required.
```
Cashup terminals run terminal logic through the Gateway app on the device. Ensure the Gateway app is installed and your terminal is registered before processing payments.
```swift theme={null}
// Add multiple providers for supporting different terminal types
TerminalH2H.shared.addProvider(provider: TerminalBRI.shared)
TerminalH2H.shared.addProvider(provider: TerminalNTT.shared)
```
Only add providers for terminal types you actually plan to use. Each provider adds to your app's size and initialization time.
After adding providers, they will be available for use when registering terminal devices in the next step.
### Step 3: Register Terminal Device
Create terminal device entries using `TerminalDevice.companion.create` and register them with the gateway:
```swift theme={null}
let devices = [
TerminalDevice.companion.create(id: "BRI12345", ipAddress: "192.168.1.10"),
TerminalDevice.companion.create(id: "BRI67890", ipAddress: "192.168.1.11")
]
TerminalH2H.shared.registerDevices(
devices: devices,
restart: true // restart to apply the refreshed device list immediately
)
```
For detailed instructions on finding Terminal ID and IP address for different terminal providers, see our [Finding Terminal Information guide](#finding-terminal-information).
### Step 4: Calling Terminal API
With Terminal H2H SDK configured, you can now process payments using the Terminal API. The SDK handles communication with physical terminals through the local gateway service.
```bash theme={null}
# Example: Create a payment session
curl -X POST 'https://terminal-dev.xendit.co/v1/terminal/sessions' \
-u 'API_KEY:' \
-H 'Content-Type: application/json' \
-H 'Idempotency-key: unique-session-123' \
-d '{
"terminal_id": "TERMINAL_ID",
"amount": 10000,
"currency": "IDR",
"external_id": "payment-123",
"payment_method": "card"
}'
```
For complete API documentation including request/response formats, error handling, and advanced features, see the [Terminal API (H2H)](/api-reference/terminal-api/introduction) documentation.
The Terminal H2H SDK automatically manages the connection to your registered terminal devices and handles communication protocols for different providers.
You're now ready to process payments using the Terminal H2H SDK integrated with Terminal API.
## Optional Methods
### Set Operation Timeout
Configure the maximum allowed time for operations to complete before the service cancels and retries the transaction:
```swift theme={null}
TerminalH2H.shared.setOperationTimeout(minutes: 5) // default value is 5 minutes
// Set provider-specific timeouts
TerminalH2H.shared.setOperationTimeout(type: TimeoutType.card, minutes: 10)
TerminalH2H.shared.setOperationTimeout(type: TimeoutType.qr, minutes: 10)
```
### Restart Terminal Connection
Manage and restart terminal service connections:
Call the method without parameters to restart all connections and tasks:
```swift theme={null}
// This restarts all connections
TerminalH2H.shared.restart(terminalID: nil)
```
Provide the terminal ID to restart a specific terminal connection:
```swift theme={null}
// This restarts the connection to a specific Terminal
TerminalH2H.shared.restart(terminalID: TERMINAL_ID)
```
### Observing Connection State
Monitor Terminal connection status using the `observeEDCConnection` method:
```swift theme={null}
let device = TerminalDevice.companion.create(id: "BRI12345", ipAddress: "192.168.1.10")
TerminalH2H.shared.observeConnection(device: device) { state in
// Handle connection state transitions
}
```
The SDK handles the following connection states:
| Code | Description |
| ------------------ | --------------------------------------------------------------- |
| `connected` | Device connected to Terminal |
| `disconnected` | Device disconnected to Terminal |
| `unknown` | When no connection has been established yet |
| `connecting` | Device requesting connection to Terminal |
| `connectingFailed` | Device unable to connect with Terminal |
| `unsupported` | Connection not supported |
| `unreachable` | Ping failed; gateway marks device unreachable until it recovers |
### Observing Error State
Monitor Terminal error states using the `observeError` method:
```swift theme={null}
TerminalH2H.shared.observeError { device, error in
// Use device?.id to correlate errors with specific terminals
}
```
## Error Handling
### Error Data Structure
All errors returned by the Terminal H2H SDK follow this structure:
```swift theme={null}
struct TerminalError {
let code: ErrorCode
let message: String
}
```
### Error Codes Reference
| Error Code | HTTP Status | Description |
| ----------------------- | ----------- | ------------------------------------------------------------------- |
| INVALID\_CREDENTIAL | 401 | Provided credentials are invalid or expired |
| INVALID\_REQUEST | 400 | Request format or parameters are invalid |
| INTERNAL\_SERVER\_ERROR | 500 | Server-side error occurred during processing |
| UNKNOWN\_ERROR | - | Unexpected error that does not map to a specific category |
| KEY\_INVALID | -1 | API key is invalid or not authorized |
| AUTHENTICATION\_FAILED | -21 | Terminal authentication failed - verify terminal ID and credentials |
| FAILED\_TO\_CONNECT | -4 | Unable to establish connection to terminal |
| NOT\_CONNECTED | -3 | No active connection to any terminal device |
| TERMINAL\_BUSY | -6 | Terminal is processing another transaction |
| SEND\_FAILED | -2 | Failed to send data to the terminal device |
| UNSUPPORTED | -5 | Operation or platform not supported |
| ENCRYPTION\_FAILED | -7 | Encryption key invalid or encryption process failed |
| DECLINED\_BY\_READER | N/A | Card or reader rejected the transaction; prompt customer to retry |
| PAYMENT\_UNPAID | N/A | Payment still pending on terminal; confirm status before retrying |
| DUPLICATED | N/A | Duplicate command detected; generate a new order ID before retrying |
| CANCELLED | N/A | Action cancelled on the terminal or by the operator |
| TIMEOUT | N/A | Operation exceeded configured timeout window |
| NO\_DATA\_FOUND | N/A | Terminal cannot find the referenced transaction data |
| TID\_NOT\_SET | N/A | Terminal ID is missing in the gateway configuration |
| TID\_NOT\_MATCH | N/A | Terminal ID does not match the registered device |
### Error Handling Best Practices
Implement comprehensive error handling for robust payment processing:
```swift theme={null}
func handleTerminalError(_ error: TerminalError?) {
guard let error = error else { return }
switch error.code {
case ErrorCode.authenticationFailed:
// Verify API key and terminal ID
print("Authentication failed: \(error.message)")
// Show user-friendly message and retry with correct credentials
case ErrorCode.terminalBusy:
// Terminal is processing another transaction
print("Terminal busy: \(error.message)")
// Wait and retry after a delay
retryAfterDelay(5.0) // 5 seconds
case ErrorCode.failedToConnect, ErrorCode.notConnected:
// Network connectivity issues
print("Connection failed: \(error.message)")
// Check network connection and terminal IP address
checkNetworkConnectivity()
case ErrorCode.declinedByReader:
// Terminal rejected the card tap/insert
print("Declined by reader: \(error.message)")
promptCustomerToRetry()
case ErrorCode.paymentUnpaid:
// Payment still pending on the terminal
print("Payment unpaid: \(error.message)")
confirmStatusWithBackend()
case ErrorCode.timeout:
// Gateway timed out while waiting for terminal response
print("Command timeout: \(error.message)")
TerminalH2H.shared.restart(terminalID: nil)
case ErrorCode.duplicated:
// Duplicate command detected by the gateway
print("Duplicate command detected: \(error.message)")
regenerateOrderID()
case ErrorCode.keyInvalid, ErrorCode.invalidCredential:
// Credential issues
print("Invalid credentials: \(error.message)")
// Rotate or refresh API credentials
refreshCredentials()
case ErrorCode.encryptionFailed:
// Encryption key issues
print("Encryption failed: \(error.message)")
// Re-initialize SDK with correct encryption keys
reinitializeSDK()
case ErrorCode.cancelled:
// Operator cancelled the command on the terminal
print("Operation cancelled: \(error.message)")
notifyCashier()
default:
// Log and escalate unknown errors
print("Unknown error: \(error.message)")
// Report to monitoring system
reportError(error)
}
}
```
Always implement retry logic for transient errors like `TERMINAL_BUSY` and `FAILED_TO_CONNECT`. Use exponential backoff to avoid overwhelming the terminal.
## Troubleshooting
For more recovery scenarios across H2H and C2C terminal flows, see the [SDK Troubleshooting Guide](/sdk/troubleshooting).
### Common Issues and Solutions
**Problem**: The EDC (Electronic Data Capture) machine becomes unresponsive or stops processing transactions.
**Solution**:
1. Restart the EDC machine by holding the power button and selecting "Restart"
2. Wait for the device to fully boot up and reconnect
3. Verify the terminal is back online using the connection monitoring features
Always ensure the EDC is properly restarted before attempting new transactions to avoid data corruption.
**Problem**: Unexpected behaviors or unauthorized access to terminal functions.
**Solution**:
1. Ensure all transactions are initiated only through the SDK
2. Contact the Xendit EDC team to enable POS-only mode for your Terminal IDs
3. Configure terminal settings to disable manual transaction entry
POS-only mode prevents manual transaction entry and ensures all operations go through your application.
**Problem**: EDC fails to send transaction results to the SDK after payment completion.
**Solution**:
1. Query the Payment Session using the Terminal API to retrieve the latest status
2. Check network connectivity between the EDC and your application
3. Verify the callback URL configuration in your payment session
4. Implement retry logic for failed status updates
```swift theme={null}
// Example: Query payment session status
let paymentSession = terminalApi.getPaymentSession(sessionId)
switch paymentSession.status {
case PaymentStatus.completed:
// Process successful payment
case PaymentStatus.failed:
// Handle failed payment
case PaymentStatus.pending:
// Payment still in progress
}
```
**Problem**: Transaction appears stuck or you don't receive a callback after the terminal prints a receipt, indicating the transaction may be incomplete.
This troubleshooting section applies only to BRI terminals.
**Solution**:
Call the Terminal API retry endpoint to request the app check the transaction status and redo the transaction if it's incomplete:
```swift theme={null}
// Retry transaction via Terminal API
let response = try await terminalApi.retrySession(sessionId: sessionId)
// The app will check transaction status and redo if incomplete
```
The retry endpoint `/v1/terminal/sessions/{id}/retry` instructs the app to verify the current transaction status with the terminal and automatically redo the transaction if it's found to be incomplete.
Use this retry mechanism when you see a receipt printed but haven't received a callback, as it may indicate the transaction didn't complete successfully on the terminal side.
**Problem**: Unable to establish or maintain connection with terminal devices.
**Solutions**:
* **Check network connectivity**: Ensure both devices are on the same network
* **Verify IP addresses**: Confirm terminal IP addresses are correct and accessible
* **Firewall settings**: Check if firewall is blocking the connection ports
* **Terminal status**: Ensure the terminal is powered on and in ready state
* **SDK initialization**: Verify client key and terminal configuration
Use the connection monitoring features to diagnose specific connection issues.
## Finding Terminal Information
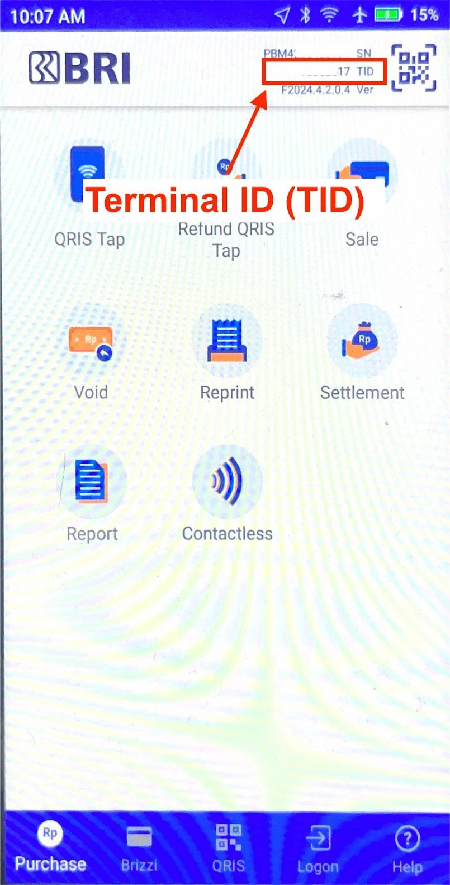
Open the BRI FMS app on the terminal device and locate the Terminal ID in the device information section.
## Getting Started
Before starting, you'll need an In-Person Payment CLIENT\_KEY from the Xendit In-Person Payment team. You will also need the terminal IP address.
Terminal H2H requires physical payment devices to function. Contact the Xendit team to obtain compatible terminal devices and configuration details.
### Step 1: Initialize SDK
Import the SDK module and call `TerminalApp.shared.initialize` from your application entry point:
```swift AppDelegate.swift theme={null}
import TerminalH2H
TerminalApp.shared.initialize(
clientKey: TEST_CLIENT_KEY,
mode: TerminalMode.integration // switch to TerminalMode.live for production builds
)
```
The SDK supports two modes:
Use `TerminalMode.integration` for development and testing with physical terminals. Transactions are sent to Test Mode on the Xendit Dashboard.
Use `TerminalMode.live` for production builds. Data is pushed to your Live Xendit Dashboard and requires a LIVE\_CLIENT\_KEY.
### Step 2: Add Terminal Providers
Add the specific terminal providers you need for your integration:
For Share Commerce (SHC), Cashup, and Atom terminals, you do not need to add a Terminal H2H provider. Those devices run terminal logic through the Gateway app installed on the hardware. If the app is missing, install it from the Gateway download page or contact [inpersonpayments@xendit.co](mailto:inpersonpayments@xendit.co) for help.
```swift theme={null}
// Add BRI provider for Indonesian terminals
TerminalH2H.shared.addProvider(provider: TerminalBRI.shared)
```
BRI provider supports timeout configuration for card and QR transactions, and provides enhanced transaction retry capabilities.
```swift theme={null}
// Add NTT provider for Thai terminals
TerminalH2H.shared.addProvider(provider: TerminalNTT.shared)
```
NTT provider supports multi-function terminals with card payments and QR code transactions.
```swift theme={null}
// Cashup terminals use the Gateway app flow.
// No TerminalH2H.shared.addProvider(...) call is required.
```
Cashup terminals run terminal logic through the Gateway app on the device. Ensure the Gateway app is installed and your terminal is registered before processing payments.
```swift theme={null}
// Add multiple providers for supporting different terminal types
TerminalH2H.shared.addProvider(provider: TerminalBRI.shared)
TerminalH2H.shared.addProvider(provider: TerminalNTT.shared)
```
Only add providers for terminal types you actually plan to use. Each provider adds to your app's size and initialization time.
After adding providers, they will be available for use when registering terminal devices in the next step.
### Step 3: Register Terminal Device
Create terminal device entries using `TerminalDevice.companion.create` and register them with the gateway:
```swift theme={null}
let devices = [
TerminalDevice.companion.create(id: "BRI12345", ipAddress: "192.168.1.10"),
TerminalDevice.companion.create(id: "BRI67890", ipAddress: "192.168.1.11")
]
TerminalH2H.shared.registerDevices(
devices: devices,
restart: true // restart to apply the refreshed device list immediately
)
```
For detailed instructions on finding Terminal ID and IP address for different terminal providers, see our [Finding Terminal Information guide](#finding-terminal-information).
### Step 4: Calling Terminal API
With Terminal H2H SDK configured, you can now process payments using the Terminal API. The SDK handles communication with physical terminals through the local gateway service.
```bash theme={null}
# Example: Create a payment session
curl -X POST 'https://terminal-dev.xendit.co/v1/terminal/sessions' \
-u 'API_KEY:' \
-H 'Content-Type: application/json' \
-H 'Idempotency-key: unique-session-123' \
-d '{
"terminal_id": "TERMINAL_ID",
"amount": 10000,
"currency": "IDR",
"external_id": "payment-123",
"payment_method": "card"
}'
```
For complete API documentation including request/response formats, error handling, and advanced features, see the [Terminal API (H2H)](/api-reference/terminal-api/introduction) documentation.
The Terminal H2H SDK automatically manages the connection to your registered terminal devices and handles communication protocols for different providers.
You're now ready to process payments using the Terminal H2H SDK integrated with Terminal API.
## Optional Methods
### Set Operation Timeout
Configure the maximum allowed time for operations to complete before the service cancels and retries the transaction:
```swift theme={null}
TerminalH2H.shared.setOperationTimeout(minutes: 5) // default value is 5 minutes
// Set provider-specific timeouts
TerminalH2H.shared.setOperationTimeout(type: TimeoutType.card, minutes: 10)
TerminalH2H.shared.setOperationTimeout(type: TimeoutType.qr, minutes: 10)
```
### Restart Terminal Connection
Manage and restart terminal service connections:
Call the method without parameters to restart all connections and tasks:
```swift theme={null}
// This restarts all connections
TerminalH2H.shared.restart(terminalID: nil)
```
Provide the terminal ID to restart a specific terminal connection:
```swift theme={null}
// This restarts the connection to a specific Terminal
TerminalH2H.shared.restart(terminalID: TERMINAL_ID)
```
### Observing Connection State
Monitor Terminal connection status using the `observeEDCConnection` method:
```swift theme={null}
let device = TerminalDevice.companion.create(id: "BRI12345", ipAddress: "192.168.1.10")
TerminalH2H.shared.observeConnection(device: device) { state in
// Handle connection state transitions
}
```
The SDK handles the following connection states:
| Code | Description |
| ------------------ | --------------------------------------------------------------- |
| `connected` | Device connected to Terminal |
| `disconnected` | Device disconnected to Terminal |
| `unknown` | When no connection has been established yet |
| `connecting` | Device requesting connection to Terminal |
| `connectingFailed` | Device unable to connect with Terminal |
| `unsupported` | Connection not supported |
| `unreachable` | Ping failed; gateway marks device unreachable until it recovers |
### Observing Error State
Monitor Terminal error states using the `observeError` method:
```swift theme={null}
TerminalH2H.shared.observeError { device, error in
// Use device?.id to correlate errors with specific terminals
}
```
## Error Handling
### Error Data Structure
All errors returned by the Terminal H2H SDK follow this structure:
```swift theme={null}
struct TerminalError {
let code: ErrorCode
let message: String
}
```
### Error Codes Reference
| Error Code | HTTP Status | Description |
| ----------------------- | ----------- | ------------------------------------------------------------------- |
| INVALID\_CREDENTIAL | 401 | Provided credentials are invalid or expired |
| INVALID\_REQUEST | 400 | Request format or parameters are invalid |
| INTERNAL\_SERVER\_ERROR | 500 | Server-side error occurred during processing |
| UNKNOWN\_ERROR | - | Unexpected error that does not map to a specific category |
| KEY\_INVALID | -1 | API key is invalid or not authorized |
| AUTHENTICATION\_FAILED | -21 | Terminal authentication failed - verify terminal ID and credentials |
| FAILED\_TO\_CONNECT | -4 | Unable to establish connection to terminal |
| NOT\_CONNECTED | -3 | No active connection to any terminal device |
| TERMINAL\_BUSY | -6 | Terminal is processing another transaction |
| SEND\_FAILED | -2 | Failed to send data to the terminal device |
| UNSUPPORTED | -5 | Operation or platform not supported |
| ENCRYPTION\_FAILED | -7 | Encryption key invalid or encryption process failed |
| DECLINED\_BY\_READER | N/A | Card or reader rejected the transaction; prompt customer to retry |
| PAYMENT\_UNPAID | N/A | Payment still pending on terminal; confirm status before retrying |
| DUPLICATED | N/A | Duplicate command detected; generate a new order ID before retrying |
| CANCELLED | N/A | Action cancelled on the terminal or by the operator |
| TIMEOUT | N/A | Operation exceeded configured timeout window |
| NO\_DATA\_FOUND | N/A | Terminal cannot find the referenced transaction data |
| TID\_NOT\_SET | N/A | Terminal ID is missing in the gateway configuration |
| TID\_NOT\_MATCH | N/A | Terminal ID does not match the registered device |
### Error Handling Best Practices
Implement comprehensive error handling for robust payment processing:
```swift theme={null}
func handleTerminalError(_ error: TerminalError?) {
guard let error = error else { return }
switch error.code {
case ErrorCode.authenticationFailed:
// Verify API key and terminal ID
print("Authentication failed: \(error.message)")
// Show user-friendly message and retry with correct credentials
case ErrorCode.terminalBusy:
// Terminal is processing another transaction
print("Terminal busy: \(error.message)")
// Wait and retry after a delay
retryAfterDelay(5.0) // 5 seconds
case ErrorCode.failedToConnect, ErrorCode.notConnected:
// Network connectivity issues
print("Connection failed: \(error.message)")
// Check network connection and terminal IP address
checkNetworkConnectivity()
case ErrorCode.declinedByReader:
// Terminal rejected the card tap/insert
print("Declined by reader: \(error.message)")
promptCustomerToRetry()
case ErrorCode.paymentUnpaid:
// Payment still pending on the terminal
print("Payment unpaid: \(error.message)")
confirmStatusWithBackend()
case ErrorCode.timeout:
// Gateway timed out while waiting for terminal response
print("Command timeout: \(error.message)")
TerminalH2H.shared.restart(terminalID: nil)
case ErrorCode.duplicated:
// Duplicate command detected by the gateway
print("Duplicate command detected: \(error.message)")
regenerateOrderID()
case ErrorCode.keyInvalid, ErrorCode.invalidCredential:
// Credential issues
print("Invalid credentials: \(error.message)")
// Rotate or refresh API credentials
refreshCredentials()
case ErrorCode.encryptionFailed:
// Encryption key issues
print("Encryption failed: \(error.message)")
// Re-initialize SDK with correct encryption keys
reinitializeSDK()
case ErrorCode.cancelled:
// Operator cancelled the command on the terminal
print("Operation cancelled: \(error.message)")
notifyCashier()
default:
// Log and escalate unknown errors
print("Unknown error: \(error.message)")
// Report to monitoring system
reportError(error)
}
}
```
Always implement retry logic for transient errors like `TERMINAL_BUSY` and `FAILED_TO_CONNECT`. Use exponential backoff to avoid overwhelming the terminal.
## Troubleshooting
For more recovery scenarios across H2H and C2C terminal flows, see the [SDK Troubleshooting Guide](/sdk/troubleshooting).
### Common Issues and Solutions
**Problem**: The EDC (Electronic Data Capture) machine becomes unresponsive or stops processing transactions.
**Solution**:
1. Restart the EDC machine by holding the power button and selecting "Restart"
2. Wait for the device to fully boot up and reconnect
3. Verify the terminal is back online using the connection monitoring features
Always ensure the EDC is properly restarted before attempting new transactions to avoid data corruption.
**Problem**: Unexpected behaviors or unauthorized access to terminal functions.
**Solution**:
1. Ensure all transactions are initiated only through the SDK
2. Contact the Xendit EDC team to enable POS-only mode for your Terminal IDs
3. Configure terminal settings to disable manual transaction entry
POS-only mode prevents manual transaction entry and ensures all operations go through your application.
**Problem**: EDC fails to send transaction results to the SDK after payment completion.
**Solution**:
1. Query the Payment Session using the Terminal API to retrieve the latest status
2. Check network connectivity between the EDC and your application
3. Verify the callback URL configuration in your payment session
4. Implement retry logic for failed status updates
```swift theme={null}
// Example: Query payment session status
let paymentSession = terminalApi.getPaymentSession(sessionId)
switch paymentSession.status {
case PaymentStatus.completed:
// Process successful payment
case PaymentStatus.failed:
// Handle failed payment
case PaymentStatus.pending:
// Payment still in progress
}
```
**Problem**: Transaction appears stuck or you don't receive a callback after the terminal prints a receipt, indicating the transaction may be incomplete.
This troubleshooting section applies only to BRI terminals.
**Solution**:
Call the Terminal API retry endpoint to request the app check the transaction status and redo the transaction if it's incomplete:
```swift theme={null}
// Retry transaction via Terminal API
let response = try await terminalApi.retrySession(sessionId: sessionId)
// The app will check transaction status and redo if incomplete
```
The retry endpoint `/v1/terminal/sessions/{id}/retry` instructs the app to verify the current transaction status with the terminal and automatically redo the transaction if it's found to be incomplete.
Use this retry mechanism when you see a receipt printed but haven't received a callback, as it may indicate the transaction didn't complete successfully on the terminal side.
**Problem**: Unable to establish or maintain connection with terminal devices.
**Solutions**:
* **Check network connectivity**: Ensure both devices are on the same network
* **Verify IP addresses**: Confirm terminal IP addresses are correct and accessible
* **Firewall settings**: Check if firewall is blocking the connection ports
* **Terminal status**: Ensure the terminal is powered on and in ready state
* **SDK initialization**: Verify client key and terminal configuration
Use the connection monitoring features to diagnose specific connection issues.
## Finding Terminal Information
Open the BRI FMS app on the terminal device and locate the Terminal ID in the device information section.
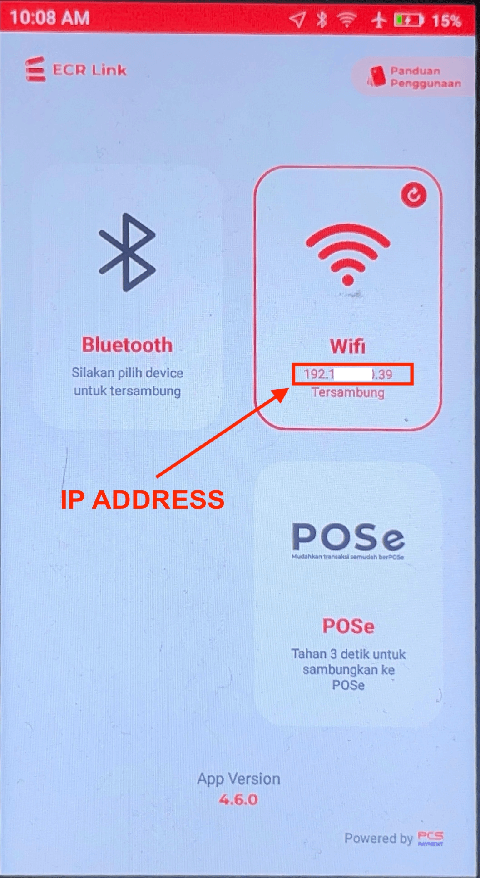
 Open the ECRLink app on the terminal and check the network settings for the IP address.
 Look for the Terminal ID on the physical sticker attached to the device.
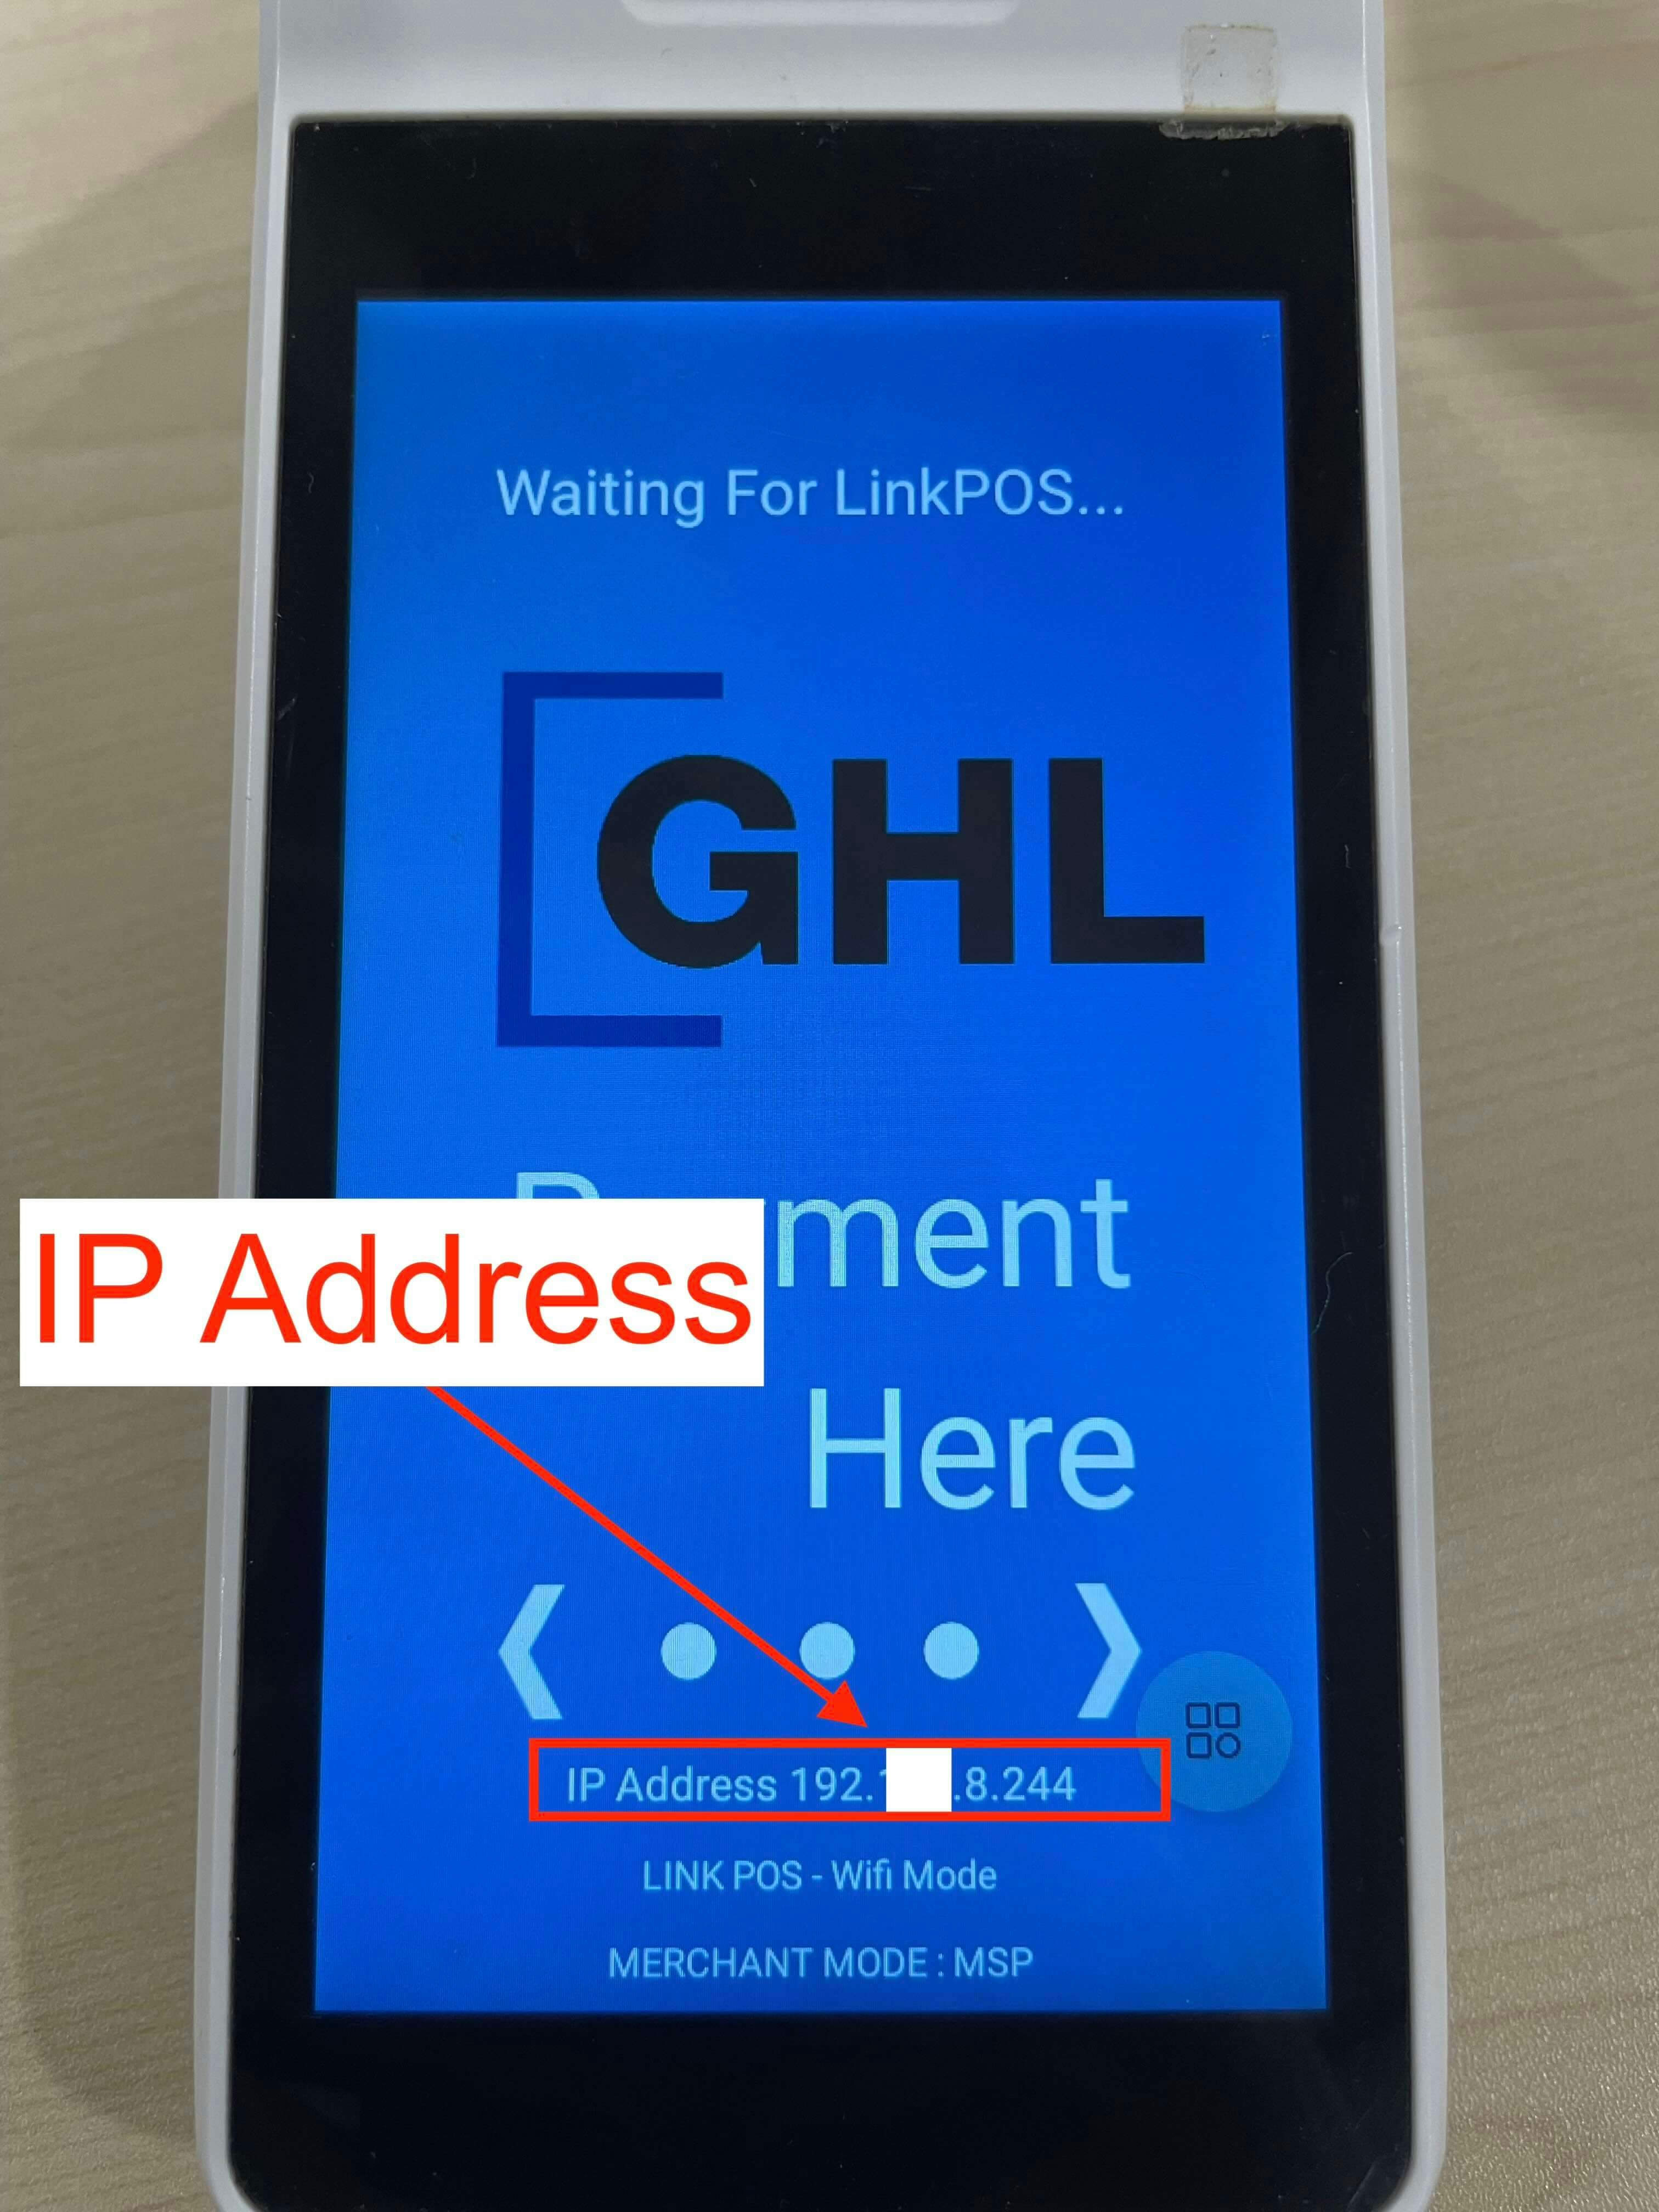
 Open the NTT LinkPOS app on the terminal and navigate to network settings to find the IP address.
 Open the Cashlez app and navigate to the User Account tab to locate the Terminal ID.
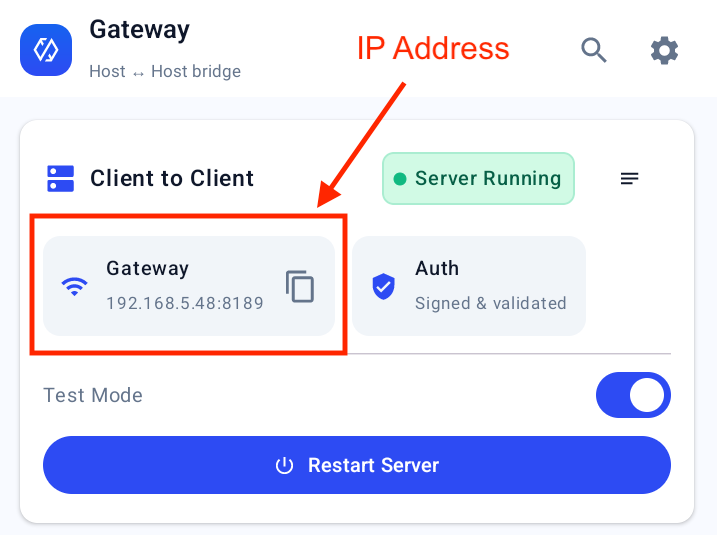
 Open the Terminal Gateway app and check the device list for the terminal IP address.
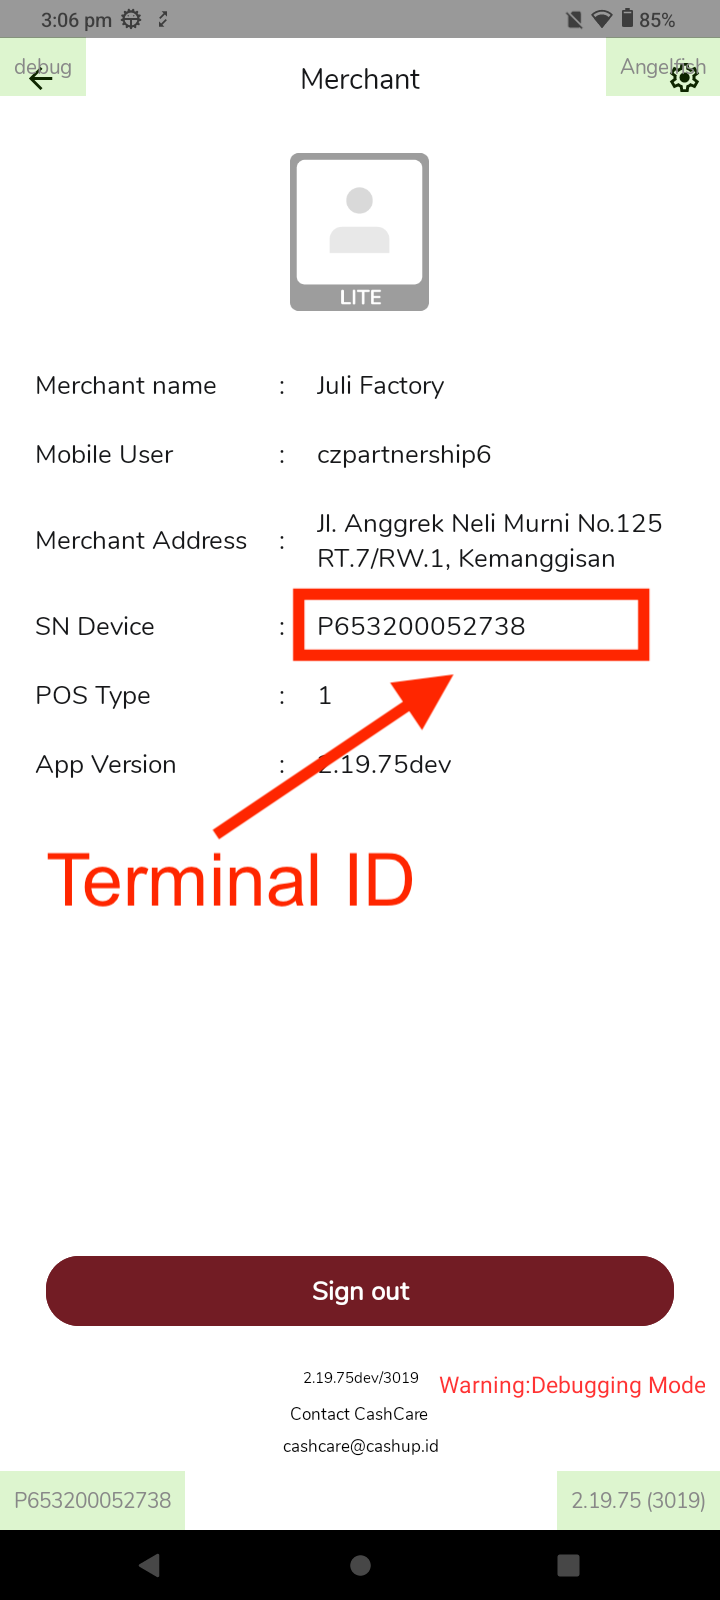
 Open the Xendit app on the device and review the terminal details screen to locate the Terminal ID.
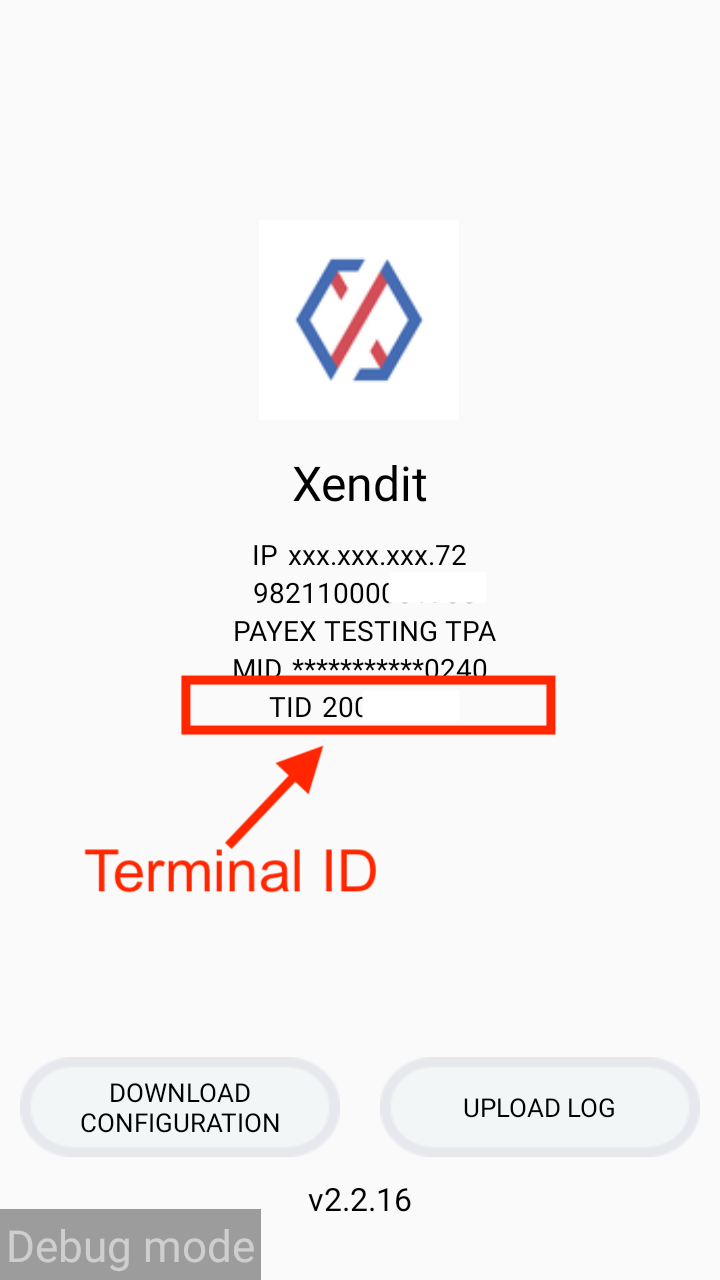 Open the Terminal Gateway app and check the device list for the terminal IP address.
Open the payment app on the Atom terminal, then go to Settings → Device Info to view the Terminal ID.
Open the Terminal Gateway app and check the device list for the terminal IP address.
Open the payment app on the Atom terminal, then go to Settings → Device Info to view the Terminal ID.
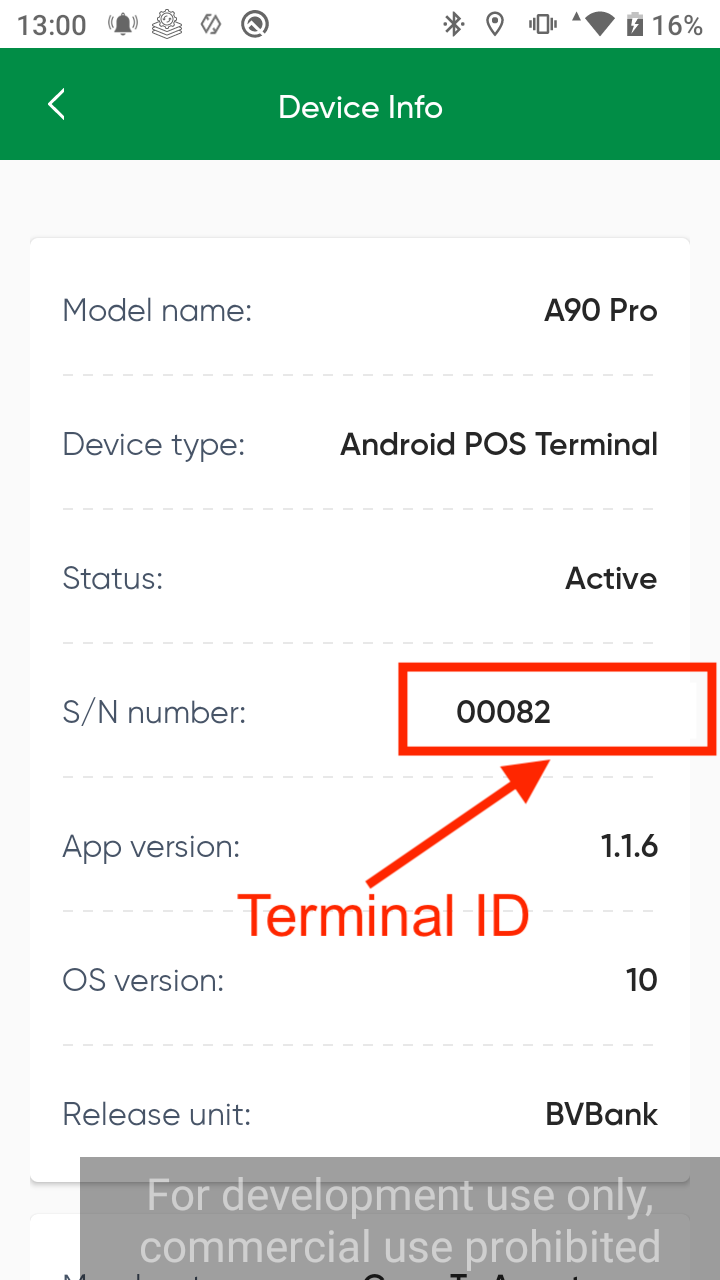 Open the Terminal Gateway app and check the device list for the terminal IP address.
Screenshots and UI layouts may vary by firmware or app version. Refer to the latest vendor documentation if the interface differs from these instructions.
Open the Terminal Gateway app and check the device list for the terminal IP address.
Screenshots and UI layouts may vary by firmware or app version. Refer to the latest vendor documentation if the interface differs from these instructions.