

Terminal C2C SDK for iOS (Swift)
The Terminal C2C SDK is a convenience wrapper around the Terminal C2C API. For providers other than BRI and NTT, you can call the Terminal C2C API directly without the SDK. BRI and NTT terminals require either the Gateway App or the C2C SDK as a pre-install.
TerminalC2C singleton object that handles HTTP communication with the Terminal Gateway.
This SDK uses a singleton pattern with the
TerminalC2C object to communicate with the Terminal Gateway service via HTTP requests. The SDK provides both async/await and callback-based APIs for payment processing.Version information
v1.2.2 — 24-Aug-2026
v1.2.2 — 24-Aug-2026
What’s new:
- BRI payment method mapping: Fixed case sensitivity in BRI mapping logic. BRI payment methods (such as QRIS) now map correctly regardless of string casing.
v1.2.0 — 8-May-2026
v1.2.0 — 8-May-2026
What’s new:
- Device Connection Observability: Added
observeConnection()andconnectionState()APIs to monitor real-time connection state changes (CONNECTING, CONNECTED, DISCONNECTED, CONNECTING_FAILED) - Error State Observability: Added
observeError()anderrorState()APIs to track terminal errors in real-time with device context - Connection Testing: New
testDeviceConnection()method to verify terminal reachability before making requests
v1.1.3 — 26-Apr-2026
v1.1.3 — 26-Apr-2026
What’s new:
- Fixed casting issue on C2C request payload to improve compatibility and prevent runtime errors.
v1.1.1 — 23-Apr-2026
v1.1.1 — 23-Apr-2026
What’s new:
- Added Cashup provider support for Indonesian terminals
View all versions
View all versions
v1.0.0 — 19-Feb-2026
v1.0.0 — 19-Feb-2026
What’s new:
- Added SHC provider support for Malaysian terminals
- Added multiple-provider support enabling apps to handle different terminal types simultaneously
- Enhanced TerminalDevice configuration with provider-specific methods
- Improved terminal selection for apps managing multiple EDC devices
The SDK follows semantic versioning. Breaking changes will bump the major version number.
Installation
Install the Terminal SDK using Swift Package Manager (SPM) in Xcode:1
Open package dependencies in Xcode
In Xcode, open your project and choose File → Add Package Dependencies….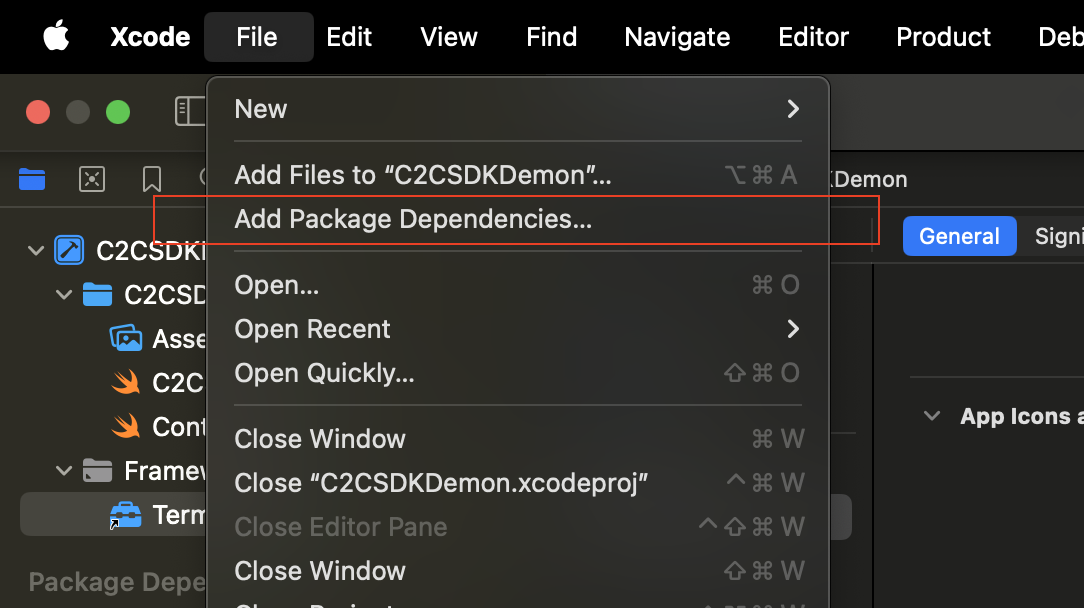
2
Add Xendit package URL
Enter this repository URL in the package search field:Then click Add Package.
3
Select version and target
Choose your dependency rule (recommended: Up to Next Major Version) and make sure your app target is selected before confirming.
4
Configure build settings
Go to Build Settings and make the following changes: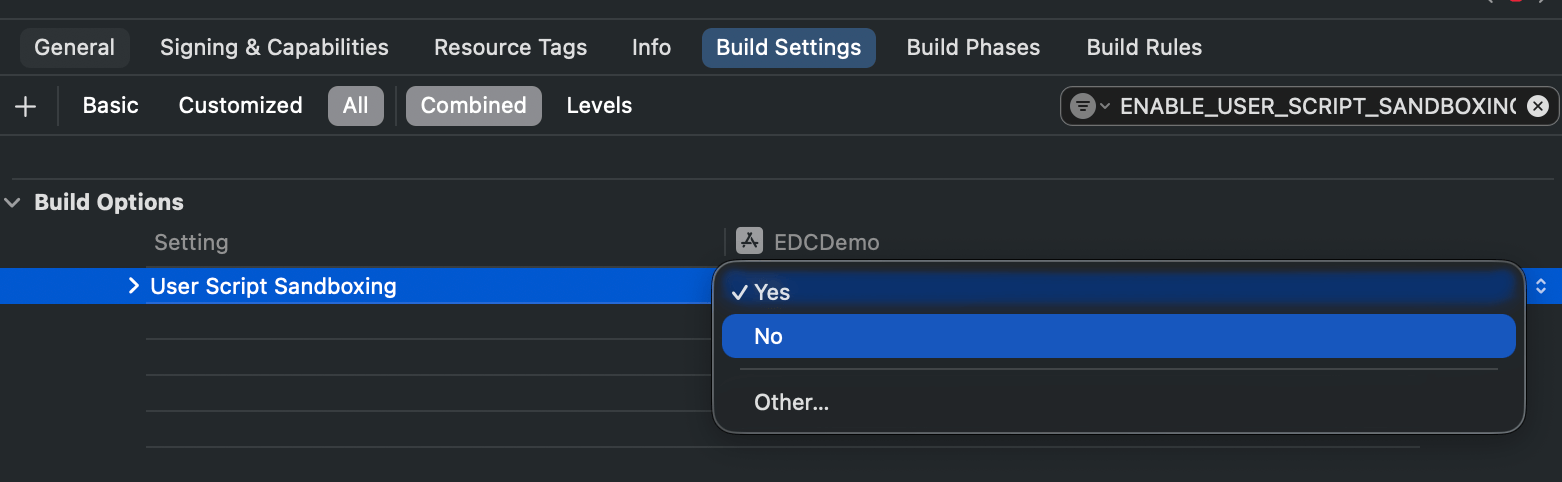
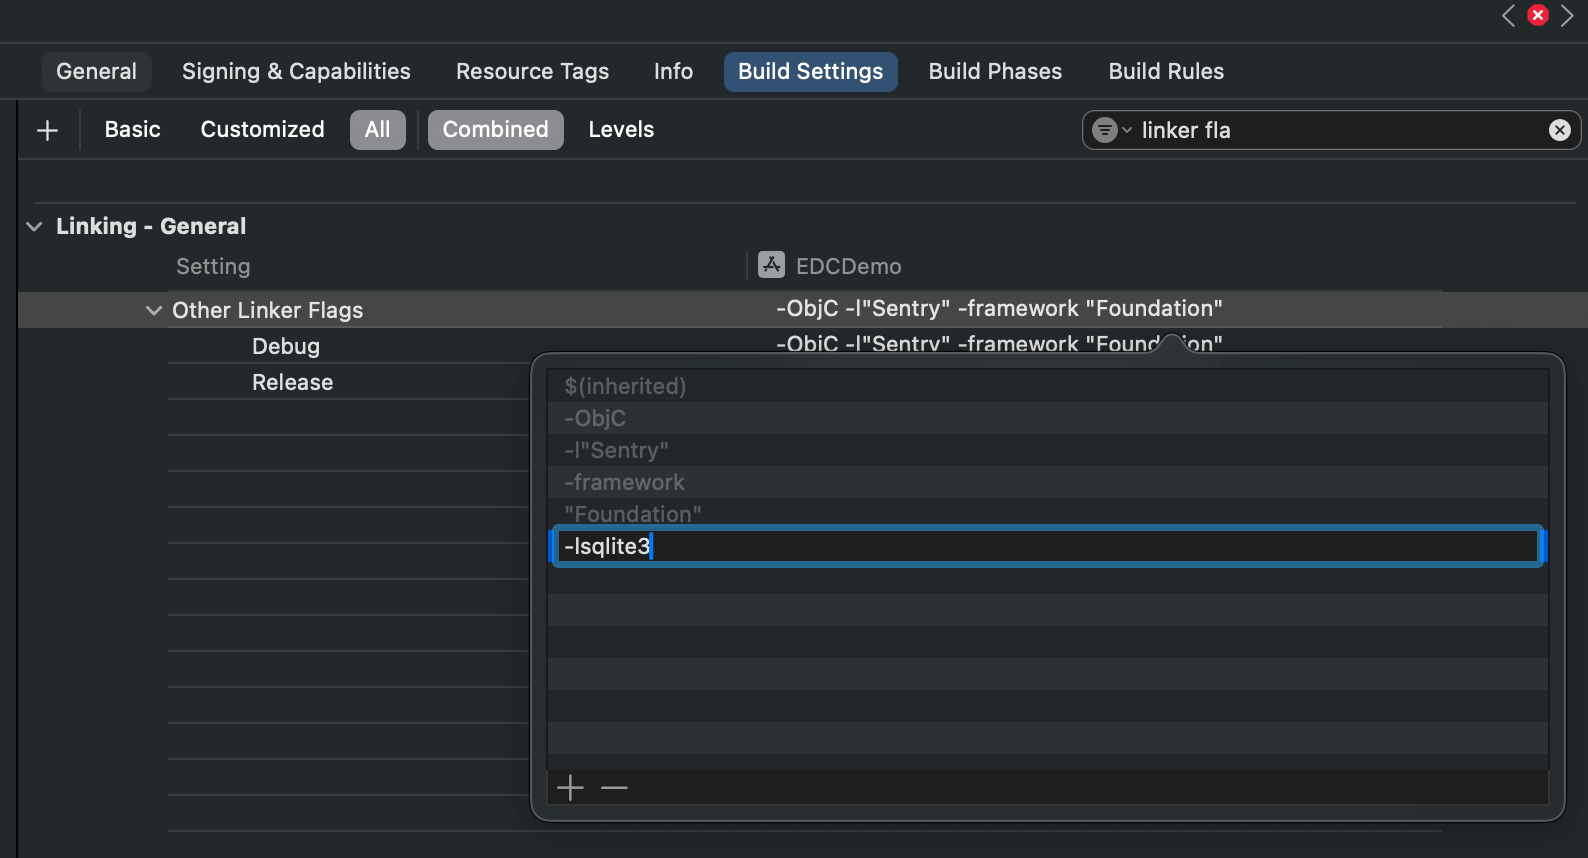
- Search for
ENABLE_USER_SCRIPT_SANDBOXINGand set it toNO - Search for
Other Linker Flagsand add-lsqlite3
Optional provider frameworks - Contact Xendit support for access to:Terminal Device Methods:
- BRI framework: Enables
TerminalDevice.companion.bri()method for BRI terminals - NTT framework: Enables
TerminalDevice.companion.ntt()method for NTT terminals - Cashup framework: Enables
TerminalDevice.companion.cashup()method for Cashup provider - SHC framework: Enables
TerminalDevice.companion.shc()method for SHC provider - Not required if using the generic
TerminalDevice.companion.create()method
Getting Started
Before starting, you’ll need an In-Person Payment CLIENT_KEY from the Xendit In-Person Payment team. You will also need the terminal IP address and Terminal ID (TID).Step 1: Initialize SDK
Call theTerminalApp.shared.initialize() method within the Application class of your app:
AppDelegate.swift
Step 2: Add Terminal Providers
For Share Commerce (SHC) and Cashup terminals, make sure the Gateway app is installed on the device. If it is missing, install it from the Gateway download page or contact inpersonpayments@xendit.co for assistance.
- BRI Indonesia
- NTT Thailand
- Cashup Indonesia
- SHC Malaysia
- Multiple Providers
BRI provider supports timeout configuration for card and QR transactions, and provides enhanced transaction retry capabilities.
Provider frameworks are optional. You can use the generic
TerminalDevice.companion.create() method without adding provider-specific frameworks. Provider frameworks enable access to specialized helper methods like TerminalDevice.companion.bri(), TerminalDevice.companion.ntt(), and TerminalDevice.companion.cashup().Step 3: Configure Terminal Device
Set up your terminal device configuration using the Terminal ID (TID) and IP address:- Generic Method
- Provider-Specific Methods
- Multiple EDC Devices
Use the generic
create method:Supported Payment Methods by Provider
- BRI Terminals
- Cashup Terminals
- NTT Terminals
- SHC Terminals
When using BRI terminal configuration:
BRI terminals support both physical card payments and digital payment methods popular in Indonesia.
API Usage
Create Payment
Process a payment transaction using async/await:Simulation Testing
Enable simulation mode to exercise payment flows without a physical terminal.Reset the simulation flag (
TerminalC2C.shared.isSimulation = false) and omit the isSimulation parameter when moving to physical terminals. Combine simulation mode with the special test amounts (400508 decline, 400509 unavailable, 400711 cancel) to validate error handling before go-live.Cancel Payment
Cancel an ongoing payment transaction:Print Receipt
Trigger receipt printing on the terminal:Perform Settlement
Initiate a settlement (batch close) process:Get Transaction History
Retrieve transaction history from the terminal:Callback-Based API Usage
For compatibility with older code or specific use cases, callback-based methods are also available. Each*Async call returns an ActionJob you can cancel and invokes the handler with (TerminalResult?, KotlinThrowable?):
Create Payment (Callback)
Cancel Payment (Callback)
Print Receipt (Callback)
Perform Settlement (Callback)
Get History (Callback)
Configuration and Management
Test Device Connection
Check if the terminal device is reachable before making requests:Observe Error State
Listen for error updates using Combine or callback approach:Observe Connection State
Monitor connection state changes:Observe Error and Connection with Callbacks
For callback-based observation:Error Handling
TerminalException
The SDK throwsTerminalException for terminal-specific errors:
Troubleshooting
Common Issues and Solutions
Cannot Connect to Terminal Gateway
Cannot Connect to Terminal Gateway
Problem: SDK cannot reach the Terminal Gateway service.Solution:
- Verify Terminal Gateway service is running locally
- Check the port configuration (default: 8189)
- Ensure the terminal device IP address is correct
- Verify network connectivity between your app and gateway
No Terminal Device Provided
No Terminal Device Provided
Problem: Error indicating no terminal device is configured.Solution: Set a default terminal device before making requests:
Authentication Failed
Authentication Failed
Problem: Requests fail with authentication errors.Solutions:
- Verify TerminalApp is initialized with correct client key
- Check terminal ID matches the configured device
- Ensure client key has Terminal C2C permissions
Network Errors
Network Errors
Problem: Network-level errors when communicating with gateway.Solutions:
- Check network connectivity
- Verify firewall settings allow connections to gateway port
- Ensure Terminal Gateway service is accessible
- Check terminal device IP address is reachable
Async/Await Compatibility
Async/Await Compatibility
Problem: Issues with async/await syntax or compatibility.Solutions:
- Ensure you’re using iOS 15+ or macOS 12+ for native async/await support
- Use callback-based methods if targeting older iOS versions
- Wrap async calls in Task blocks
Best Practices
Error Handling
Always implement comprehensive error handling:Device Management
Manage multiple terminal devices efficiently:Finding Terminal Information
- BRI Terminals
- NTT Terminals
- Cashup Terminals
- Atom Terminals
1
Find Terminal ID (TID)
Open the BRI FMS app on the terminal device and locate the Terminal ID in the device information section.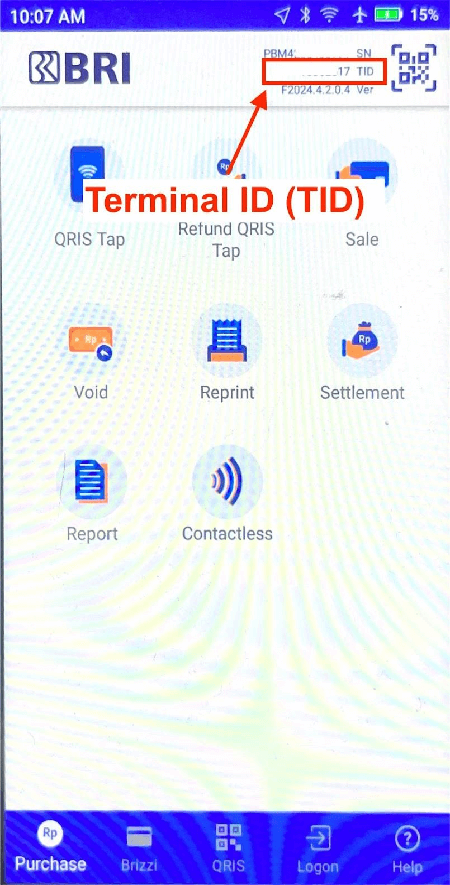
2
Find IP Address
Open the ECRLink app on the terminal and check the network settings for the IP address.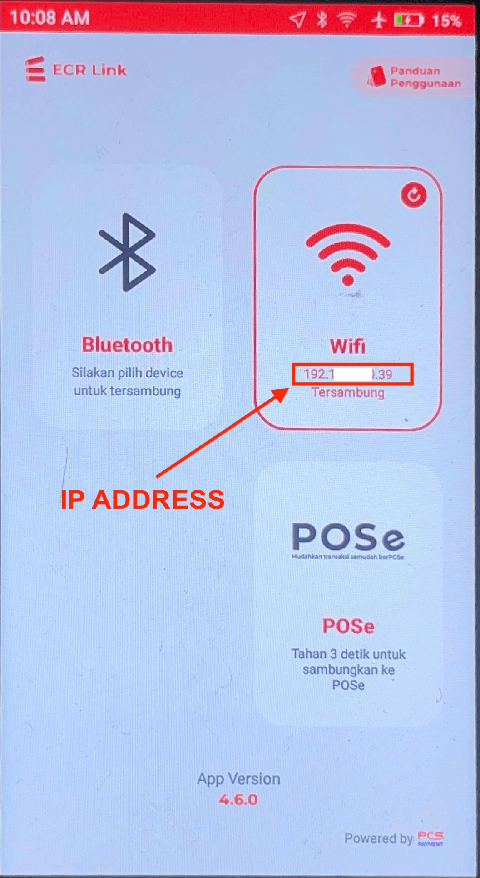
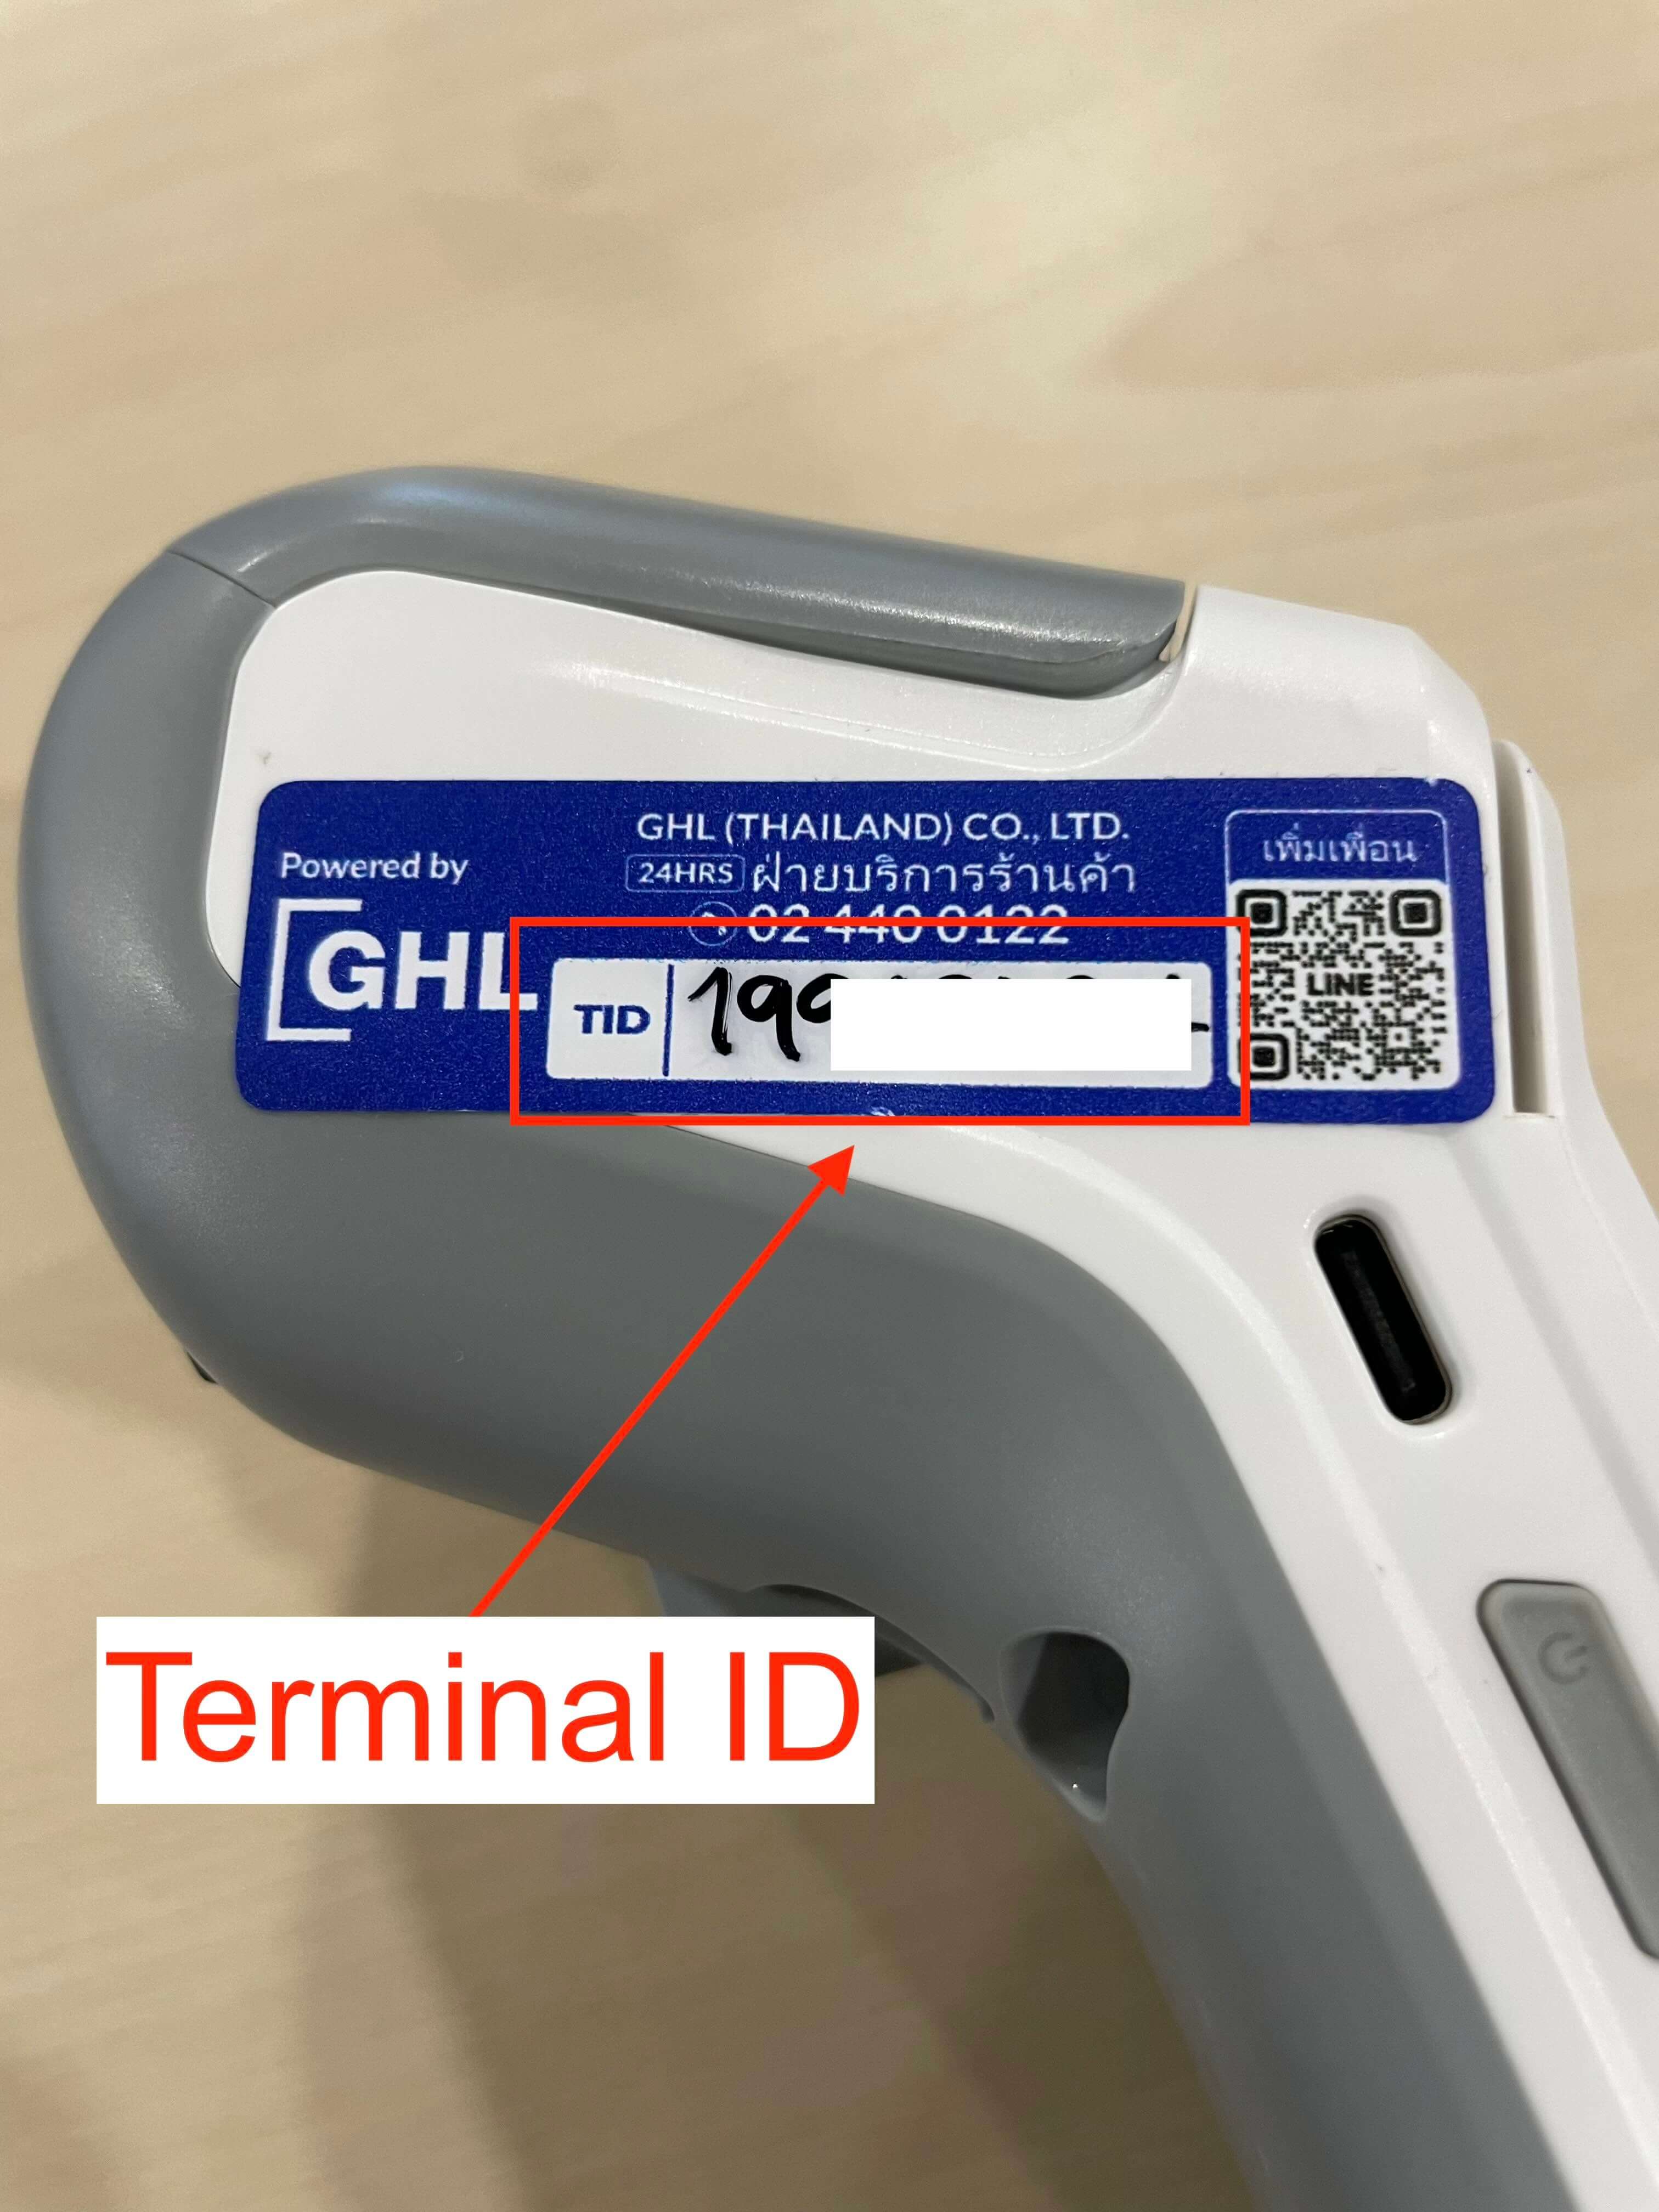
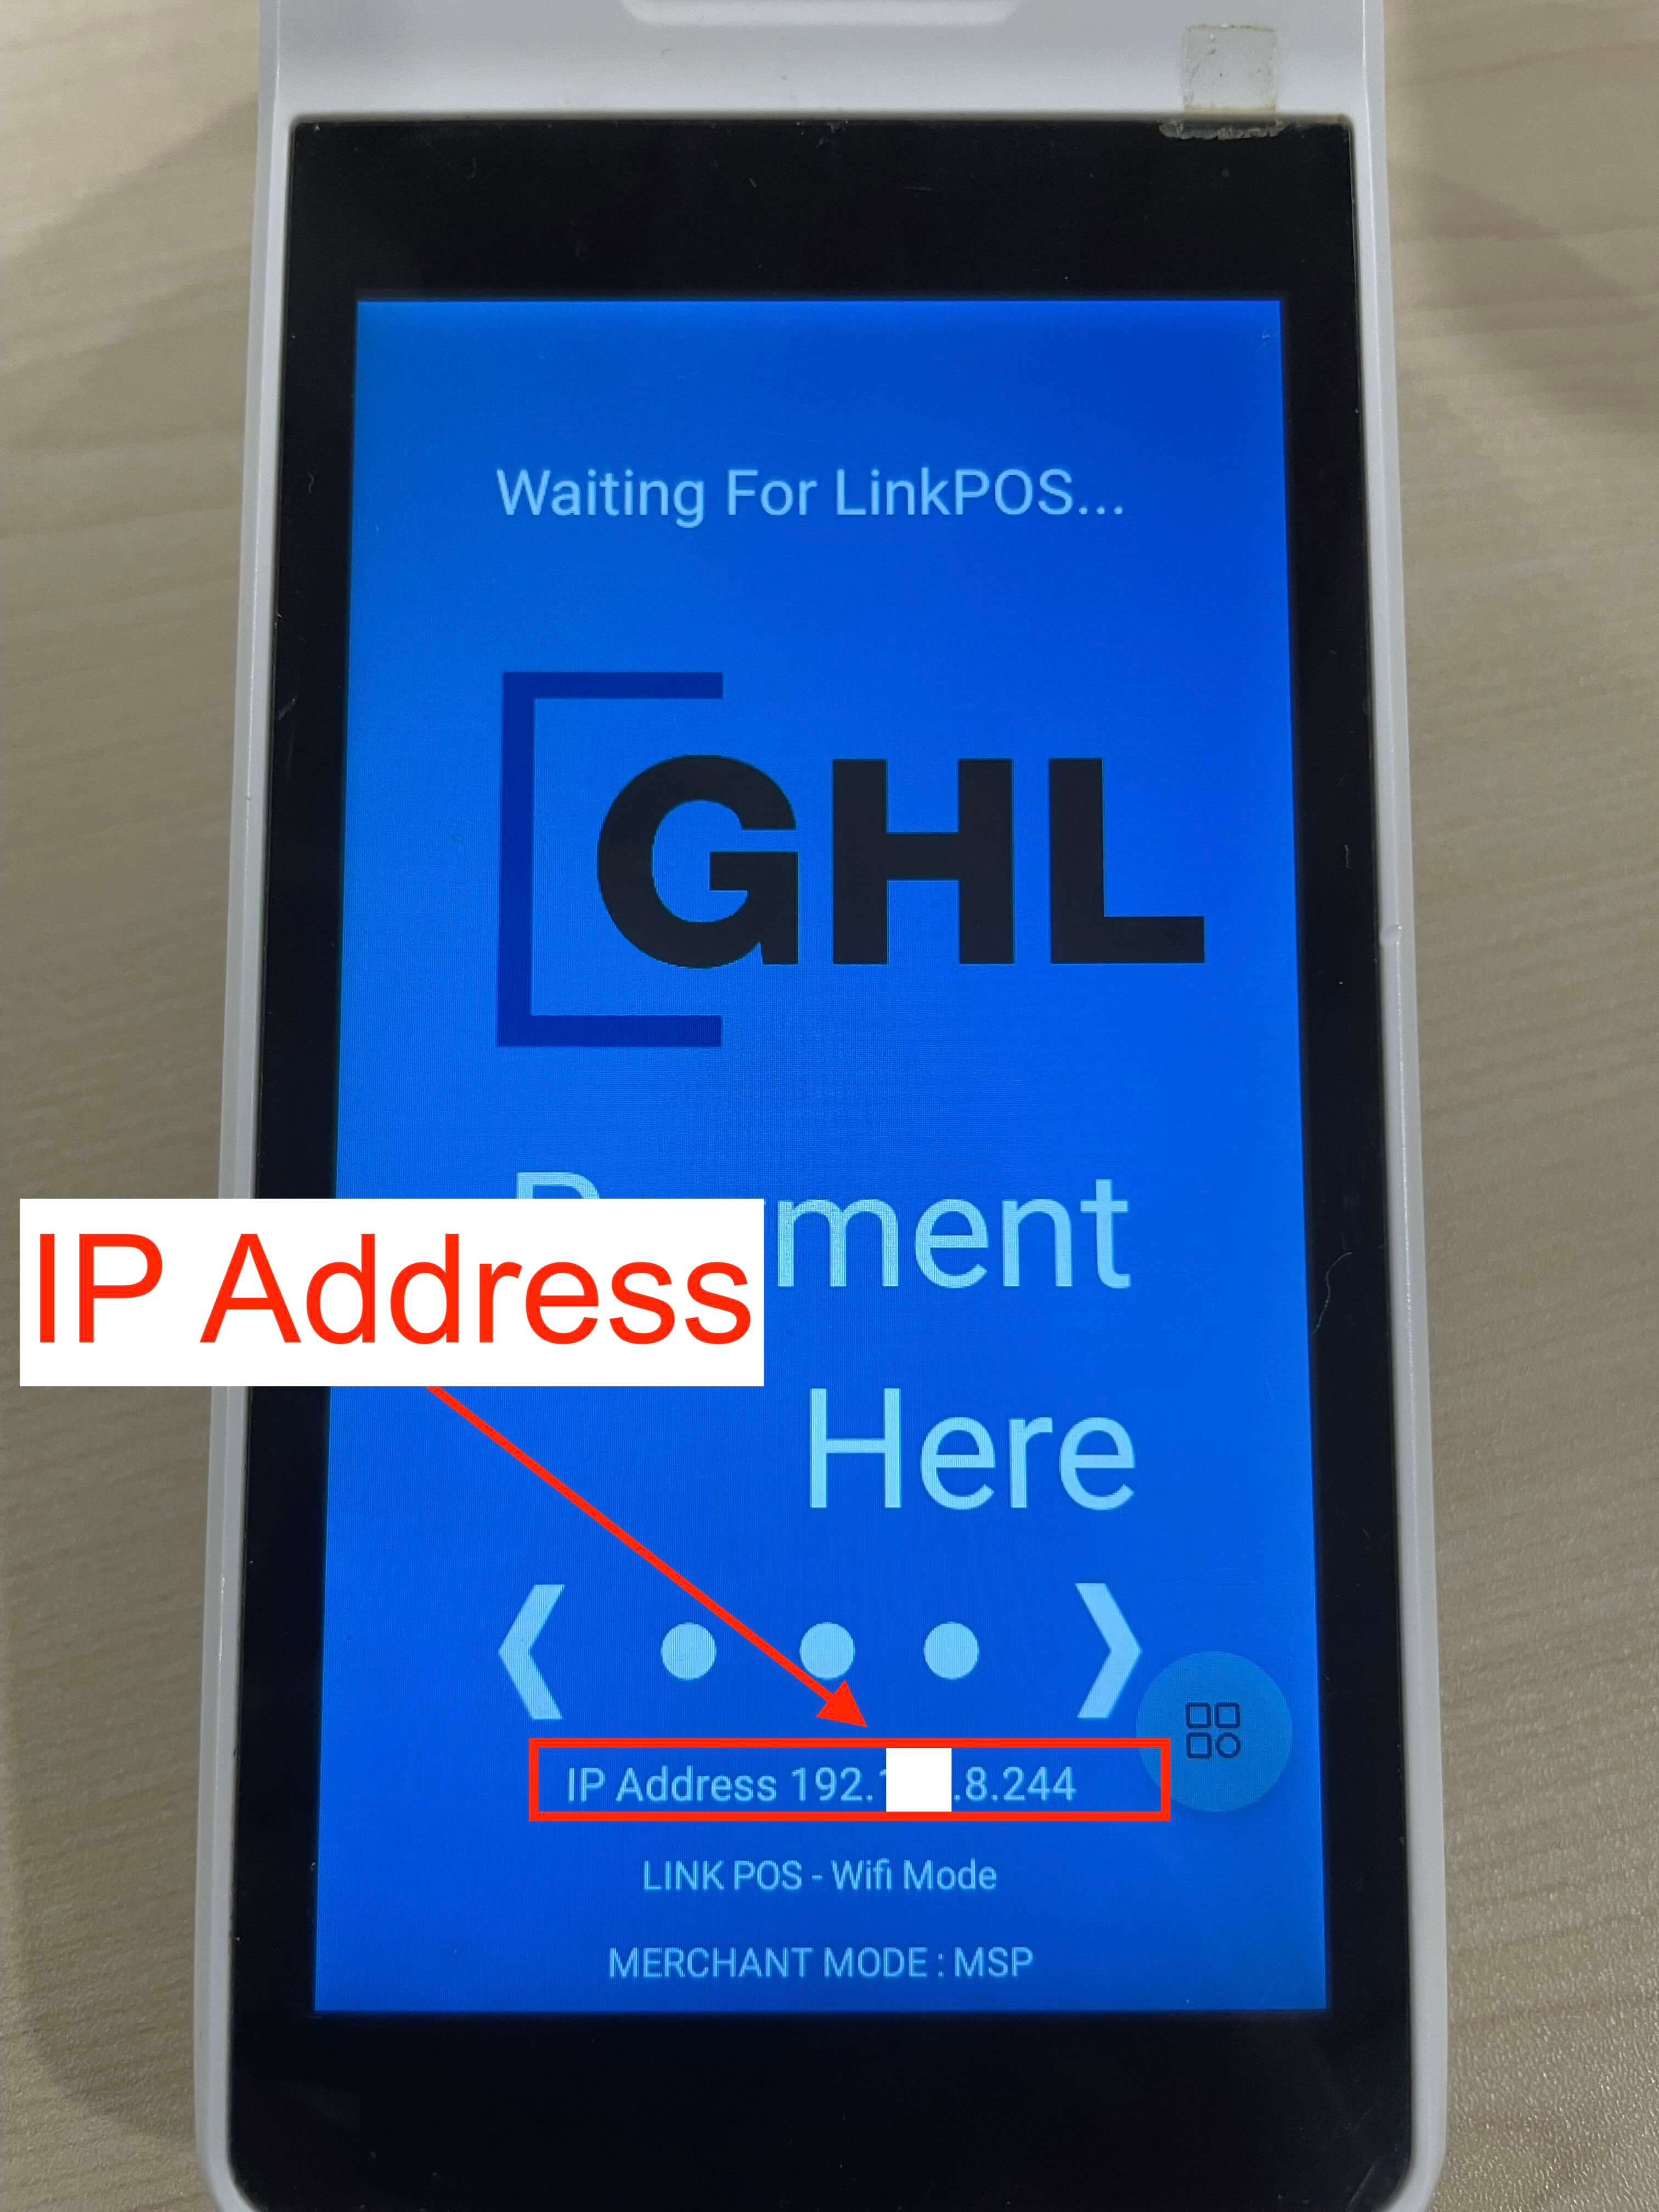
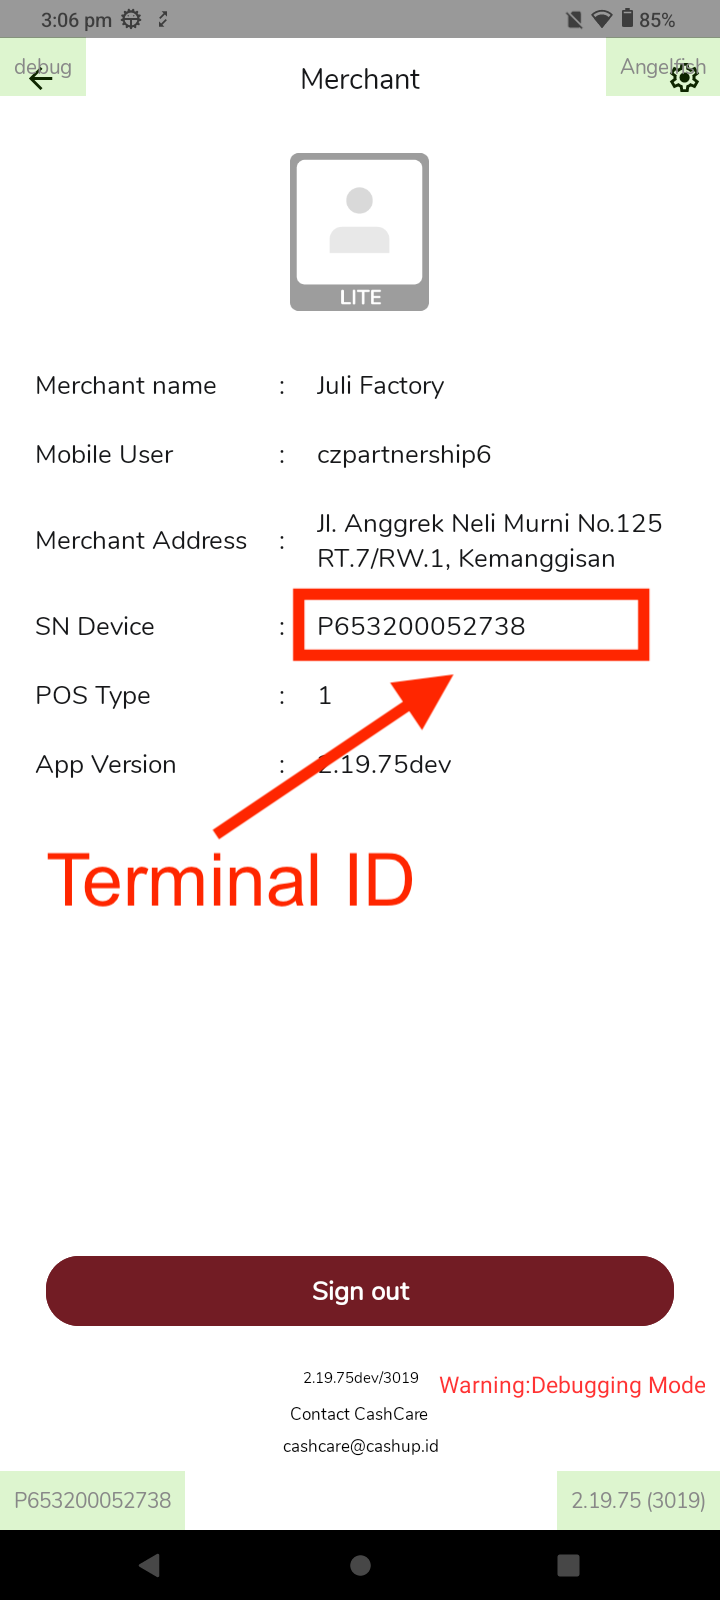
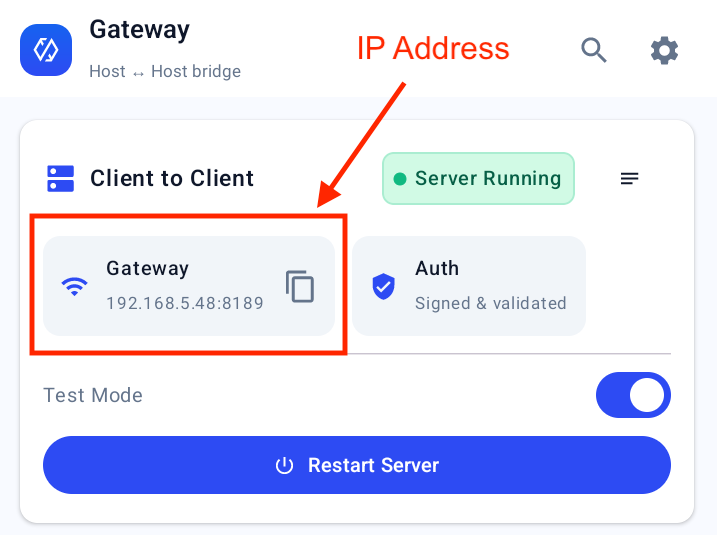
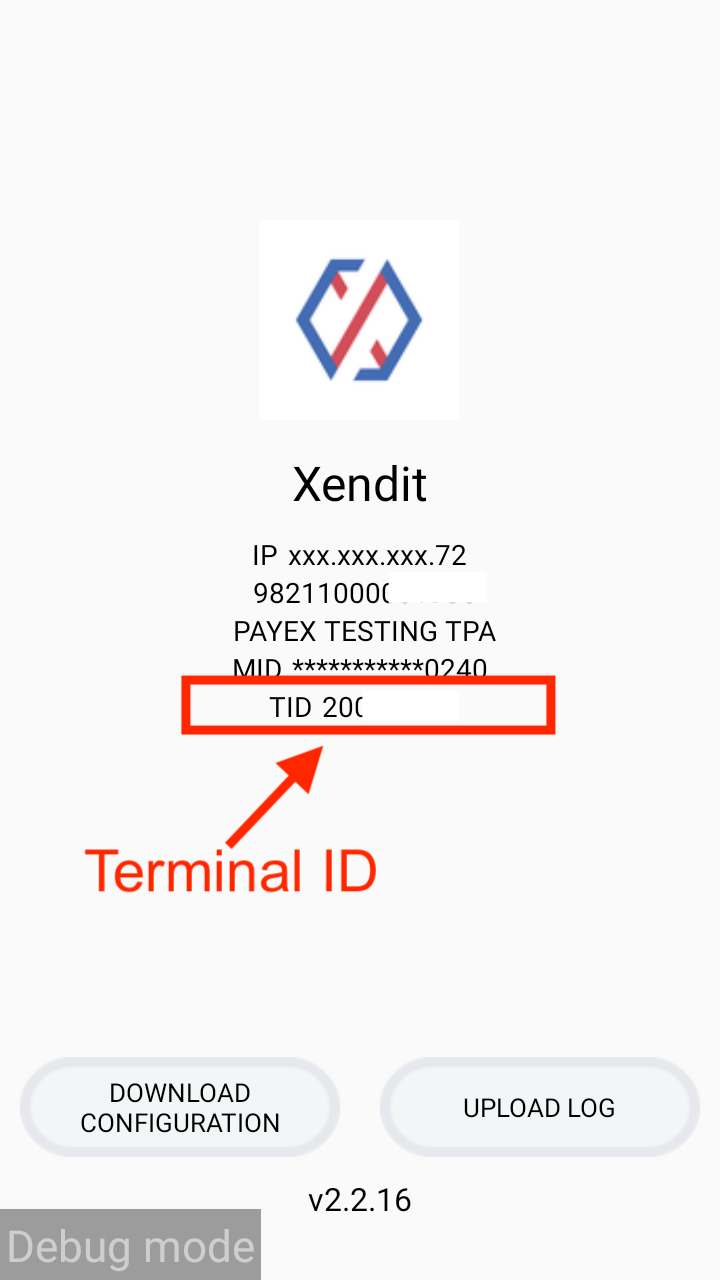
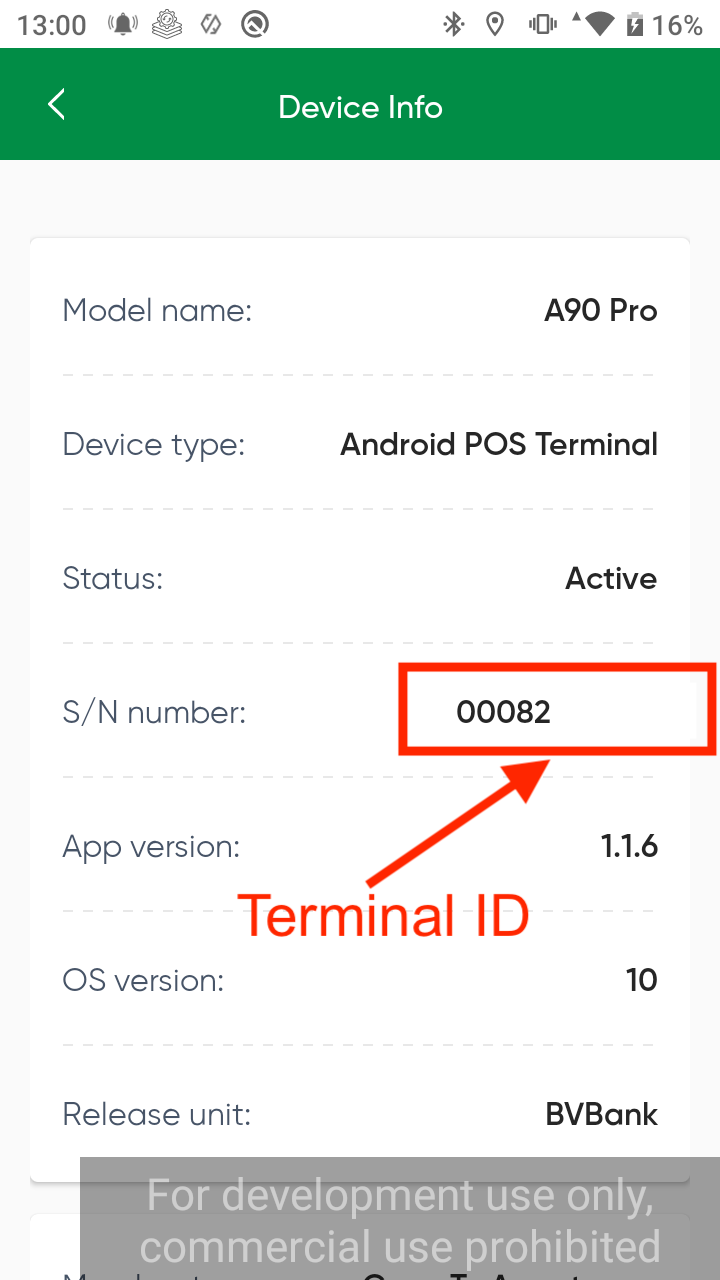
Screenshots and UI layouts may vary by firmware or app version. Refer to the latest vendor documentation if the interface differs from these instructions.