

Terminal H2H SDK for Android (Kotlin)
The Xendit’s Payment Terminal H2H Android SDK enables you to integrate secure payment processing into your Android applications. Connect to physical payment terminals and process transactions seamlessly using our Kotlin-based SDK.This SDK works alongside the Terminal API to provide complete in-person payment functionality. You’ll use the Terminal API to create payment sessions and this SDK to interact with physical payment devices.
Version information
v1.2.2 — 24-Aug-2026
v1.2.2 — 24-Aug-2026
What’s new:
- BRI payment method mapping: Fixed case sensitivity in BRI mapping logic. BRI payment methods (such as QRIS) now map correctly regardless of string casing.
v1.2.1 — 13-May-2026
v1.2.1 — 13-May-2026
What’s new:
- Activity Lifecycle Management: Introduced
TerminalActivityLifecycleObserverinterface for reusable activity lifecycle tracking, intent queuing, and dispatch logic - Enhanced Provider App Launching: Refactored Atom and SHC provider app launchers with improved background app launch handling
- Launch Failure Notifications: Added notification mechanism to prompt users when provider app launch fails while app is in background
- Callback Interface: New
TerminalAppLauncherCallbackinterface for custom handling of provider app launch failures - Improved Maintainability: Centralized lifecycle and launcher logic for better extensibility across different application contexts
v1.2.0 — 8-May-2026
v1.2.0 — 8-May-2026
What’s new:
- Core Stability: Fixed activity tracking bug in TerminalApplication where paused activities were not properly removed from internal tracking list
v1.1.3 — 26-Apr-2026
v1.1.3 — 26-Apr-2026
What’s new:
- Fixed casting issue on C2C request payload to improve compatibility and prevent runtime errors.
View all versions
View all versions
v1.1.1 — 23-Apr-2026
v1.1.1 — 23-Apr-2026
What’s new:
- Added Cashup provider support for Indonesian terminals
v1.0.0 — 19-Feb-2026
v1.0.0 — 19-Feb-2026
What’s new:
- Renamed class name
TerminalGatewaytoTerminalH2Hfor better consistency
v0.7.0 — 5-Dec-2025
v0.7.0 — 5-Dec-2025
What’s new:
- Fixed NTT payment method value maping to ensure correct provider selection
- Updated BRI payment flow to validate transaction data before executing terminal actions
- Added timeout configuration for card and QR transactions to auto-cancel and retry stalled requests
- Added support to handle retry requests via
/v1/terminal/sessions/{id}/retryendpoint
v0.6.0 — 20-Nov-2025
v0.6.0 — 20-Nov-2025
What’s new:
- Added support for multiple concurrent device connections, enabling simultaneous transactions across different terminals
- [BRI] Fixed status value handling in void and cancel API responses for improved transaction status accuracy
v0.5.0 — 30-Oct-2025
v0.5.0 — 30-Oct-2025
What’s new:
- Introduced command ID handling for settlement operations
- Enhanced retry logic with configurable attempt counts
- Improved error handling and logging throughout the gateway service
v0.4.1 — 7-Oct-2025
v0.4.1 — 7-Oct-2025
Bug fixes and improvements:
- Fix data mapping for terminal responses
- [BRI] Enhanced status verification after transaction timeout for improved reliability
v0.4.0 — 13-May-2025
v0.4.0 — 13-May-2025
XenTerminal is the companion SDK to In-Person Payment Sessions API. This version provides core functionality for connecting to payment terminals and processing transactions.
The SDK follows semantic versioning. Breaking changes will bump the major version number.
Installation
Follow these steps to add the Terminal H2H Android SDK to your project.1
Configure Gradle settings
Add
mavenCentral() to your Gradle configuration so Gradle can resolve the SDK artifacts.- Modern Approach (Recommended)
- Old Android Project
Add Maven Central to your Gradle settings file:
Verify
mavenCentral() is available in the repository list used by your app module.2
Add dependencies
Add the required dependencies to your
build.gradle.kts or build.gradle file:Provider-specific dependencies are optional and enable convenient helper methods for creating
TerminalDevice instances. Include only the dependencies for providers you plan to use.Sync your project to download the dependencies.
Getting Started
Before you begin, ensure you have the following:- Client key: Request an In-Person Payment
CLIENT_KEYfrom the Xendit team - Terminal device information: Obtain the Terminal ID and IP address for each device
- Android project: Set up with minimum SDK version 21 (Android 5.0)
Step 1: Initialize the SDK
Initialize the Terminal H2H SDK in your Application class:MyApp.kt
Use
TerminalMode.INTEGRATION for development and testing. Switch to TerminalMode.LIVE for production with a live client key.Step 2: Add Terminal Providers
Add the specific terminal providers you need for your integration:For Share Commerce (SHC), Cashup, and Atom terminals, you do not need to add a Terminal H2H provider. Those devices run terminal logic through the Gateway app installed on the hardware. If the app is missing, install it from the Gateway download page or contact inpersonpayments@xendit.co for assistance.
- BRI Provider (Indonesia)
- NTT Provider (Thailand)
- Cashup (Indonesia)
- Multiple Providers
BRI provider supports timeout configuration for card and QR transactions, and provides enhanced transaction retry capabilities.
After adding providers, they will be available for use when registering terminal devices in the next step.
Step 3: Register Terminal Devices
CreateTerminalDevice entries for each terminal and register them with the gateway:
Set
active = true for terminals that should be available immediately. You can keep an entry with active = false to stage devices without establishing a connection.After successful registration, your terminal devices will be available for payment processing.
Step 4: Calling Terminal API
With Terminal H2H SDK configured, you can now process payments using the Terminal API. The SDK handles communication with physical terminals through the local gateway service.For complete API documentation including request/response formats, error handling, and advanced features, see the Terminal API (H2H) documentation.
You’re now ready to process payments using the Terminal H2H SDK integrated with Terminal API.
Configuring App for Terminal Device
- Cashup Indonesia
- SHC Malaysia
When running your application on a Terminal device, additional configuration is required to enable the terminal to communicate with the Cashup payment system. Follow these steps:
1
Configure AndroidManifest.xml
Add the Cashup result activity to your
AndroidManifest.xml file:AndroidManifest.xml
2
Configure Application Class
Choose one of the following approaches to configure your Application class:
- Extend TerminalApplication
- Use TerminalAppLauncherCallback
Make your
Application class extend TerminalApplication and configure the Cashup provider launcher:Application.kt
Don’t forget to register your custom
Application class in the AndroidManifest.xml:AndroidManifest.xml
Your app is now configured to run on Cashup Terminal devices and can communicate with the Cashup payment system.
3
Configure Receipt Printing
Control whether the terminal prints a receipt after a transaction:
This setting allows you to control the default receipt printing behavior for Cashup terminals.
Configuration and Management
Set Operation Timeout
Configure the timeout for terminal operations:The default timeout is 5 minutes. Use the type-specific methods to override card vs QR timeouts when needed.
Restart Terminal Connection
Manage and restart terminal service connections:- Restart All Connections
- Restart Single Connection
Call the method without parameters to restart all connections and tasks:
Monitor Connection State
Observe terminal connection states in real-time:- Using Coroutine Scope
- Using Flow
Use the
observeConnection method with a coroutine scope:Connection States
Monitor Error States
Observe and handle errors across all terminal devices:Error Handling
Error Data Structure
All errors returned by the Terminal H2H SDK follow this structure:Error Codes Reference
Error Handling Best Practices
Implement comprehensive error handling for robust payment processing:Troubleshooting
Common Issues and Solutions
Unresponsive EDC Machine
Unresponsive EDC Machine
Problem: The EDC (Electronic Data Capture) machine becomes unresponsive or stops processing transactions.Solution:
- Restart the EDC machine by holding the power button and selecting “Restart”
- Wait for the device to fully boot up and reconnect
- Verify the terminal is back online using the connection monitoring features
Kiosk Mode Configuration
Kiosk Mode Configuration
Problem: Unexpected behaviors or unauthorized access to terminal functions.Solution:
- Ensure all transactions are initiated only through the SDK
- Contact the Xendit EDC team to enable POS-only mode for your Terminal IDs
- Configure terminal settings to disable manual transaction entry
No Response After Payment Completion
No Response After Payment Completion
Problem: EDC fails to send transaction results to the SDK after payment completion.Solution:
- Query the Payment Session using the Terminal API to retrieve the latest status
- Check network connectivity between the EDC and your application
- Verify the callback URL configuration in your payment session
- Implement retry logic for failed status updates
Transaction Stuck or Missing Callback After Receipt Printed
Transaction Stuck or Missing Callback After Receipt Printed
Problem: Transaction appears stuck or you don’t receive a callback after the terminal prints a receipt, indicating the transaction may be incomplete.Solution:
Call the Terminal API retry endpoint to request the app check the transaction status and redo the transaction if it’s incomplete:
This troubleshooting section applies only to BRI terminals.
The retry endpoint
/v1/terminal/sessions/{id}/retry instructs the app to verify the current transaction status with the terminal and automatically redo the transaction if it’s found to be incomplete.Connection Issues
Connection Issues
Problem: Unable to establish or maintain connection with terminal devices.Solutions:
- Check network connectivity: Ensure both devices are on the same network
- Verify IP addresses: Confirm terminal IP addresses are correct and accessible
- Firewall settings: Check if firewall is blocking the connection ports
- Terminal status: Ensure the terminal is powered on and in ready state
- SDK initialization: Verify client key and terminal configuration
Use the connection monitoring features to diagnose specific connection issues.
Finding Terminal Information
- BRI Terminals
- NTT Terminals
- Cashup Terminals
- Atom Terminals
1
Find Terminal ID (TID)
Open the BRI FMS app on the terminal device and locate the Terminal ID in the device information section.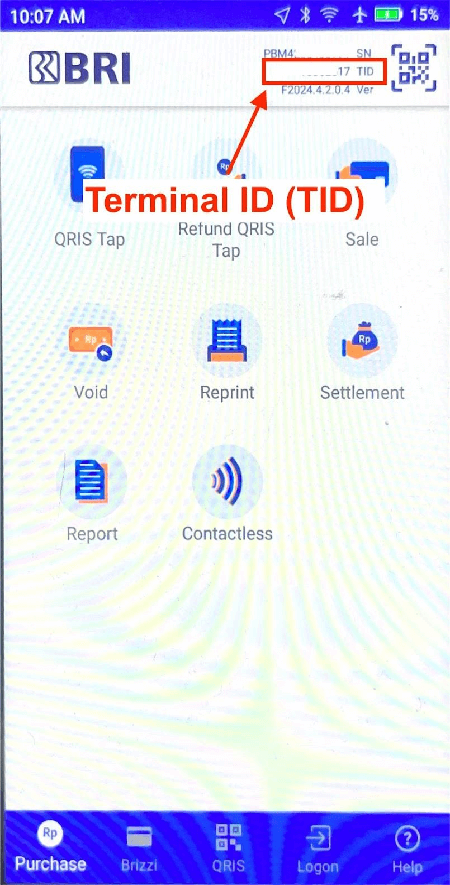
2
Find IP Address
Open the ECRLink app on the terminal and check the network settings for the IP address.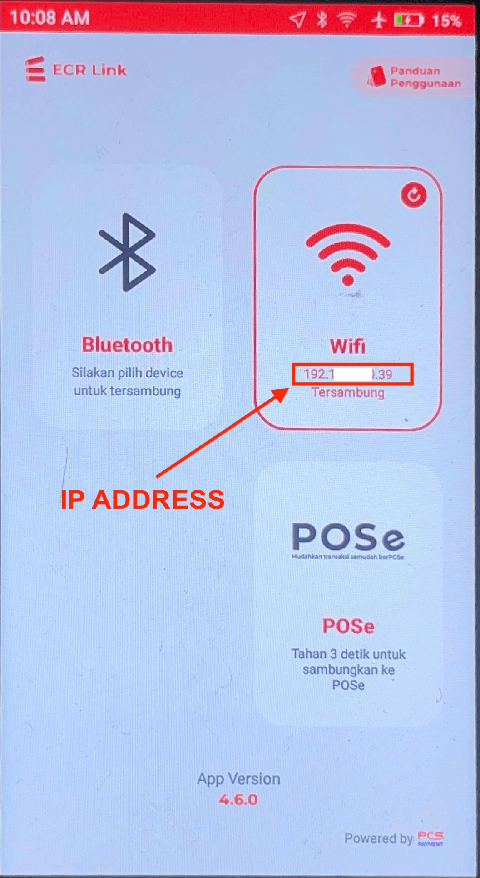
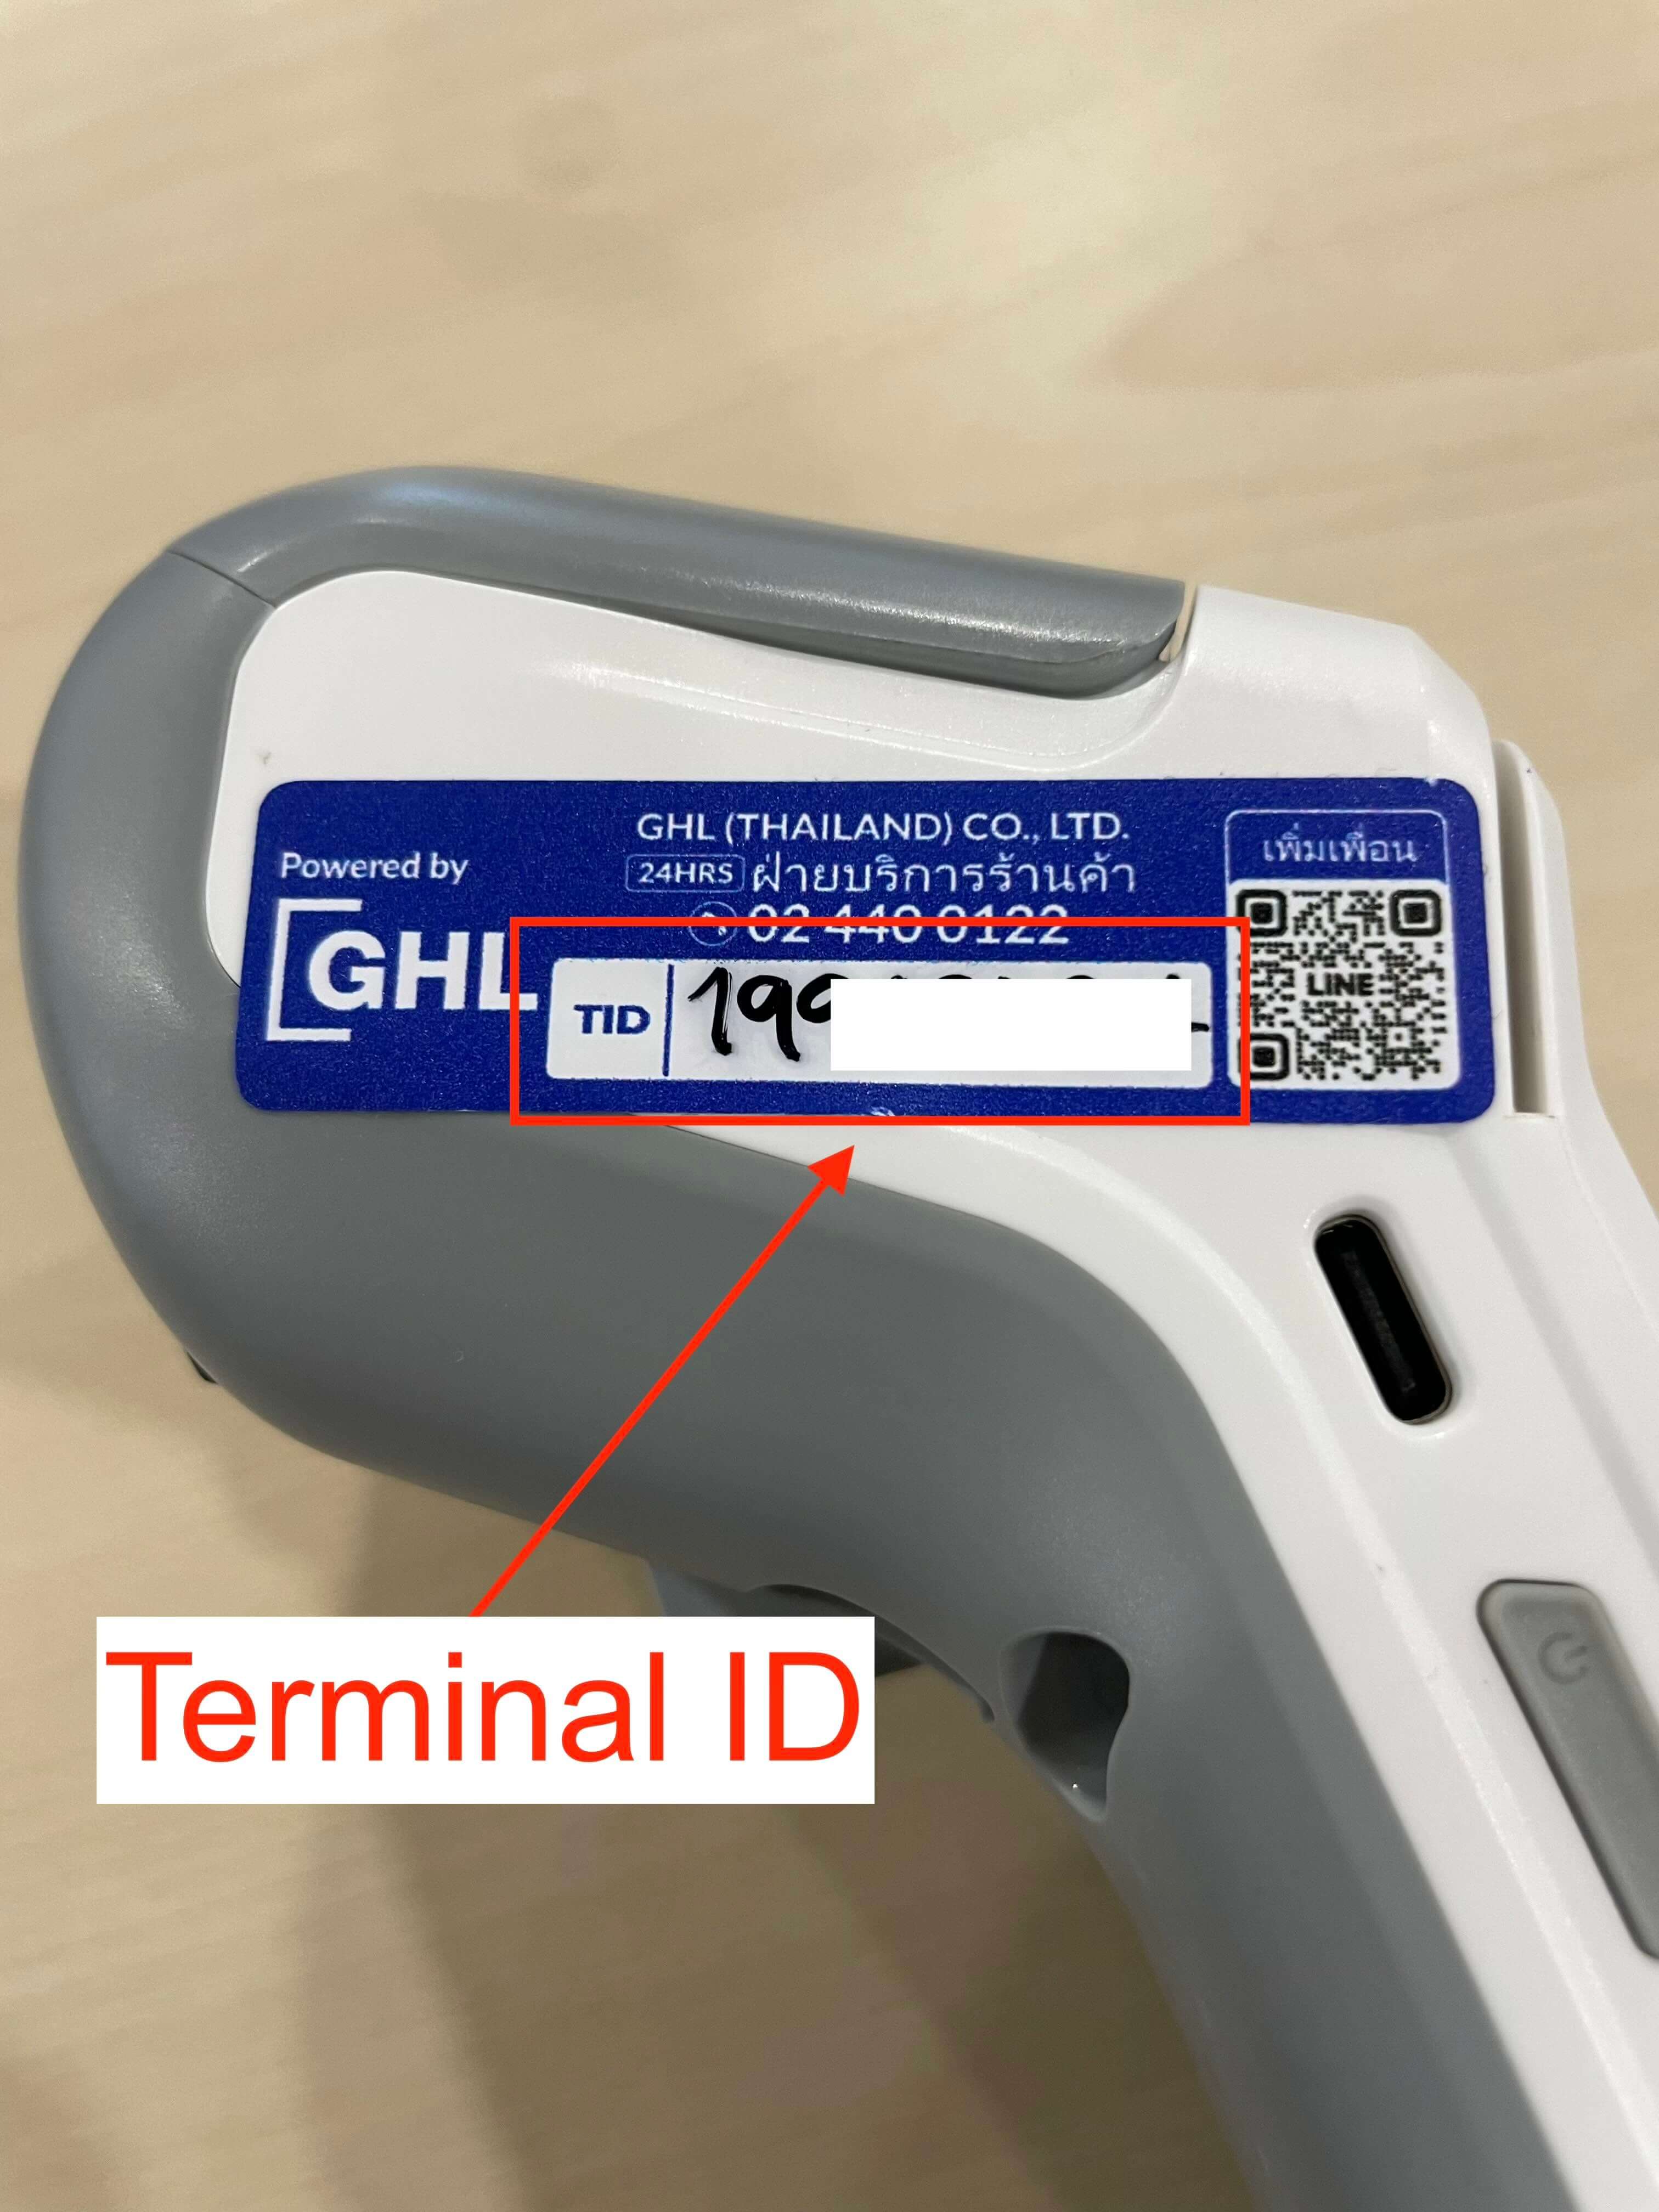
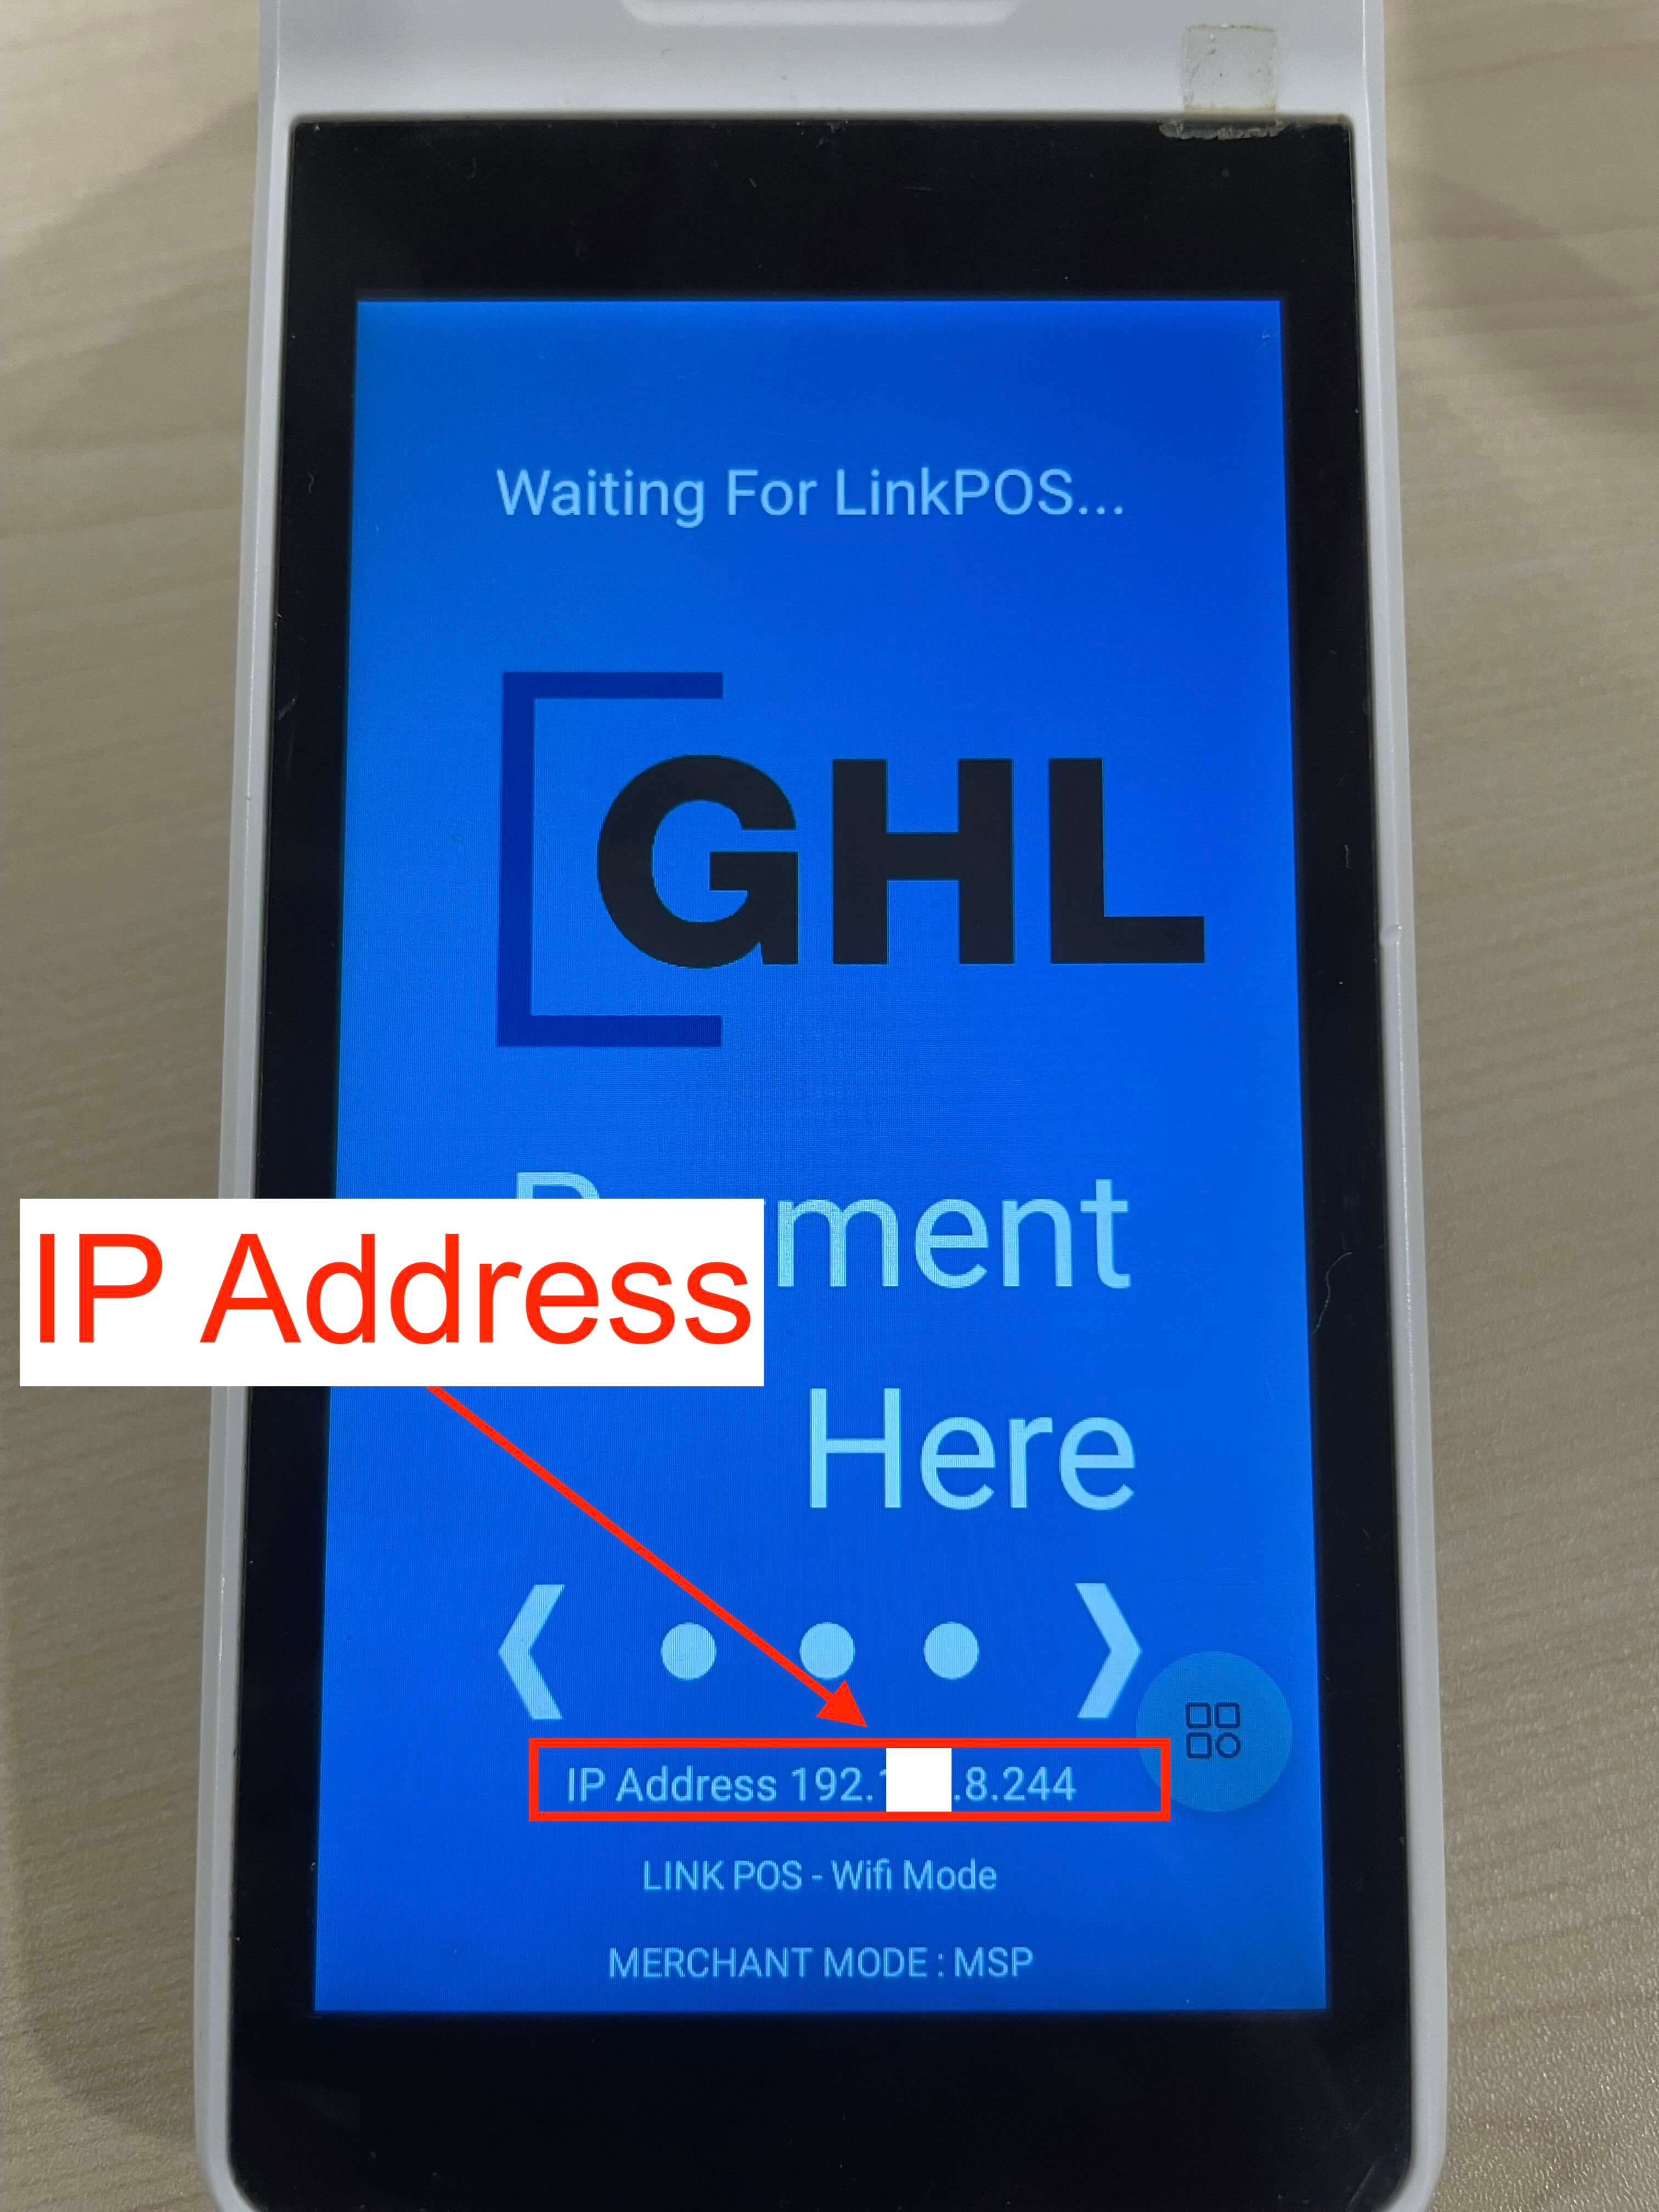
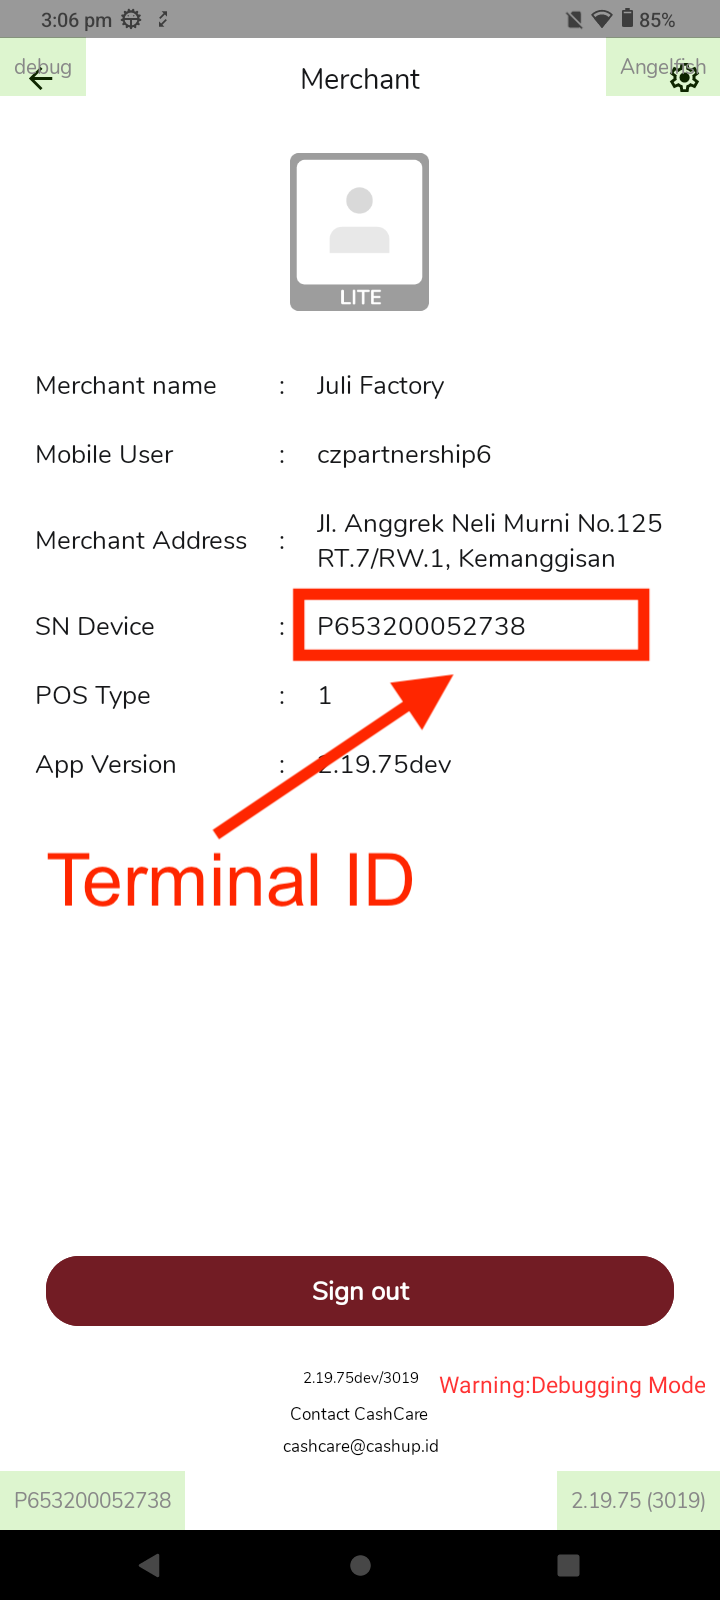
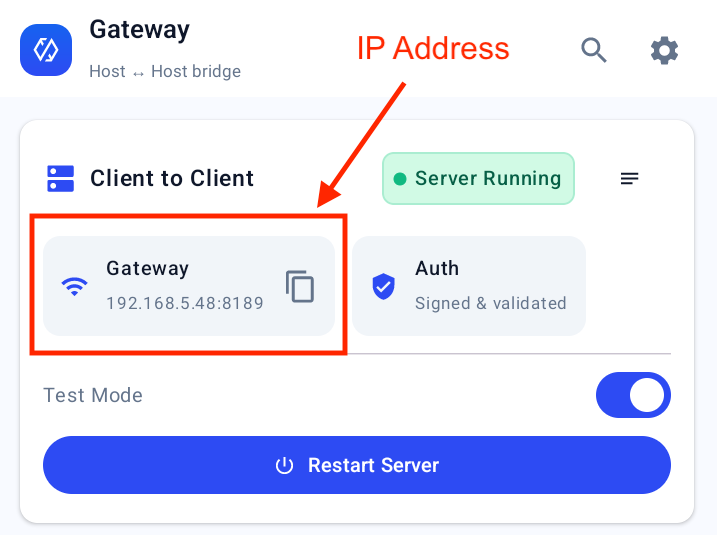
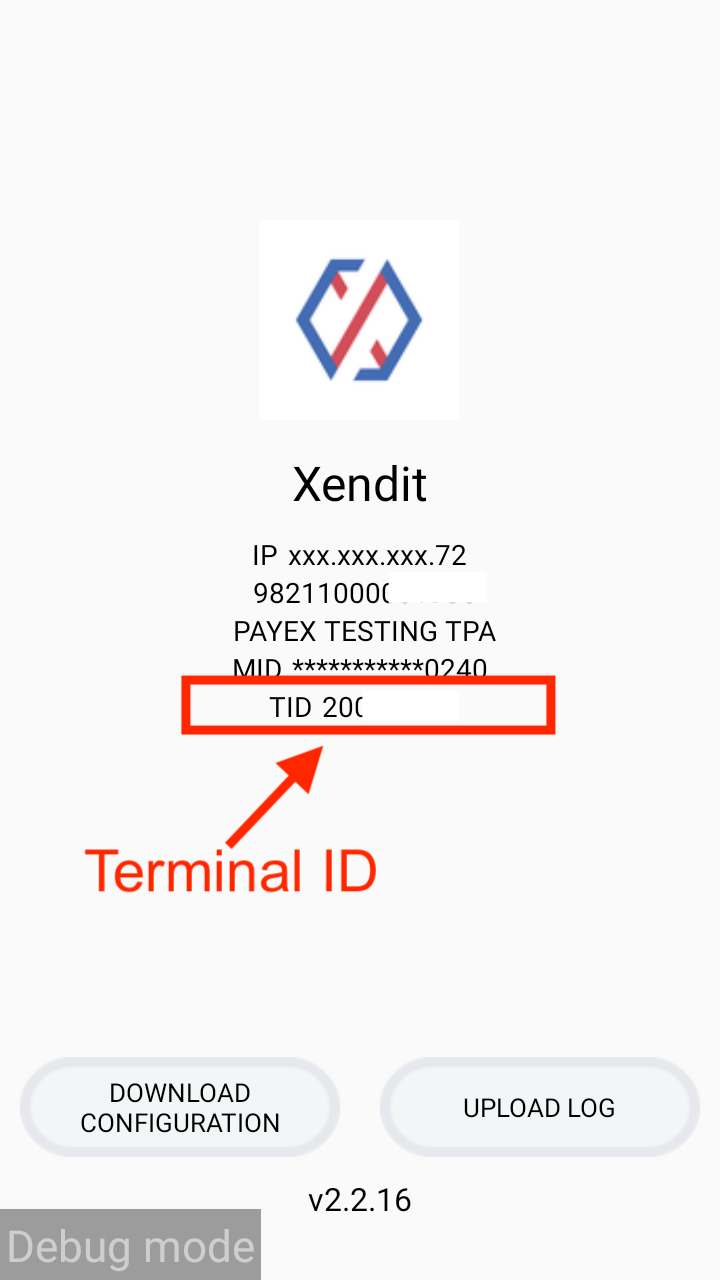
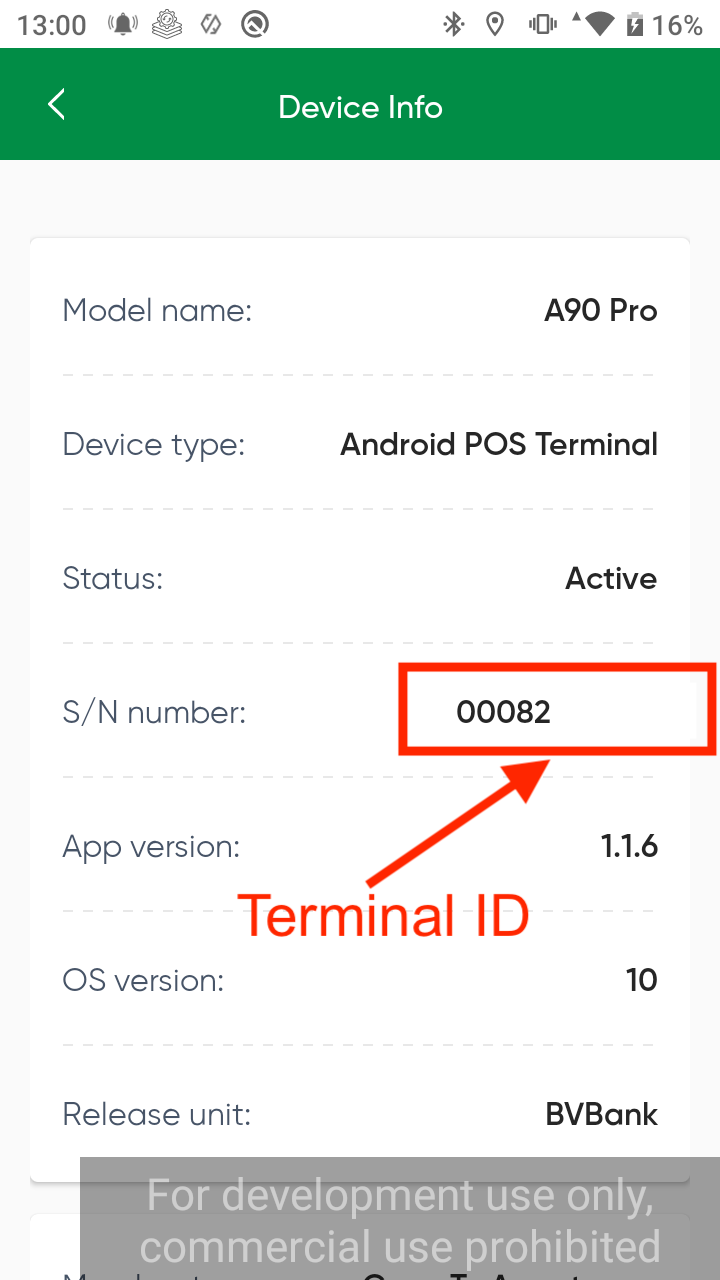
Screenshots and UI layouts may vary by firmware or app version. Refer to the latest vendor documentation if the interface differs from these instructions.